This page contains a tutorial to get you set up with a personal website using our AstroSites template page. At the end of this tutorial you will:
- Know the basics of HTML, CSS, and JavaScript.
- Know how to edit an HTML5 template site to make it your own.
- Have a personal website published using GitHub Pages.
First, you will want to familiarize yourself with HTML, CSS, and JavaScript by reading our tutorial on website building blocks. Once you are familiar with those concepts, please procede with the following tutorial.
HTML5 Up Templates
We will be editing a template taken from HTML5 template, a website that provides you with free website templates that you can edit and publish as your own. We have chosen to use an altered version of the Dimension theme for this workshop. We have chosen this template for its simplicity, aesthetic look, and functionality. However, if this template does not work for you, there are several more options available to you, and you should be able to transfer what you learn from editing our template using this tutorial to editing other template sites.
Hosting on GitHub
For this tutorial, we will be using GitHub as a hosting platform through their service GitHub Pages. GitHub pages makes it easy for you to easily and freely share a static webpage with the world. Static webpages are exactly what they sound like: their content is mostly static as a user interacts with it. In practice, this just means that your webpage does not talk to any servers as a user browses the page. While this does limit the functionality of your site (you won’t be making a YouTube or Twitter clone on GitHub), hosting a static site means your site will always be secure, quick to load, and responsive. This is in direct contrast to dynamic sites developed with, e.g. Wordpress, which are plagued by security issues and can get very slugish as your webpage gets larger and the number of users accesssing your site increases. Static webpages are simple, easy, and free, so they are one of the preferred ways to make a site in 2019.
To follow this tutorial, you will need a GitHub account, which you can get here: https://github.com/join.
Grabbing the Template
Before we start making our personal website, we first need to grab the template from the AstroSites public repository on GitHub.
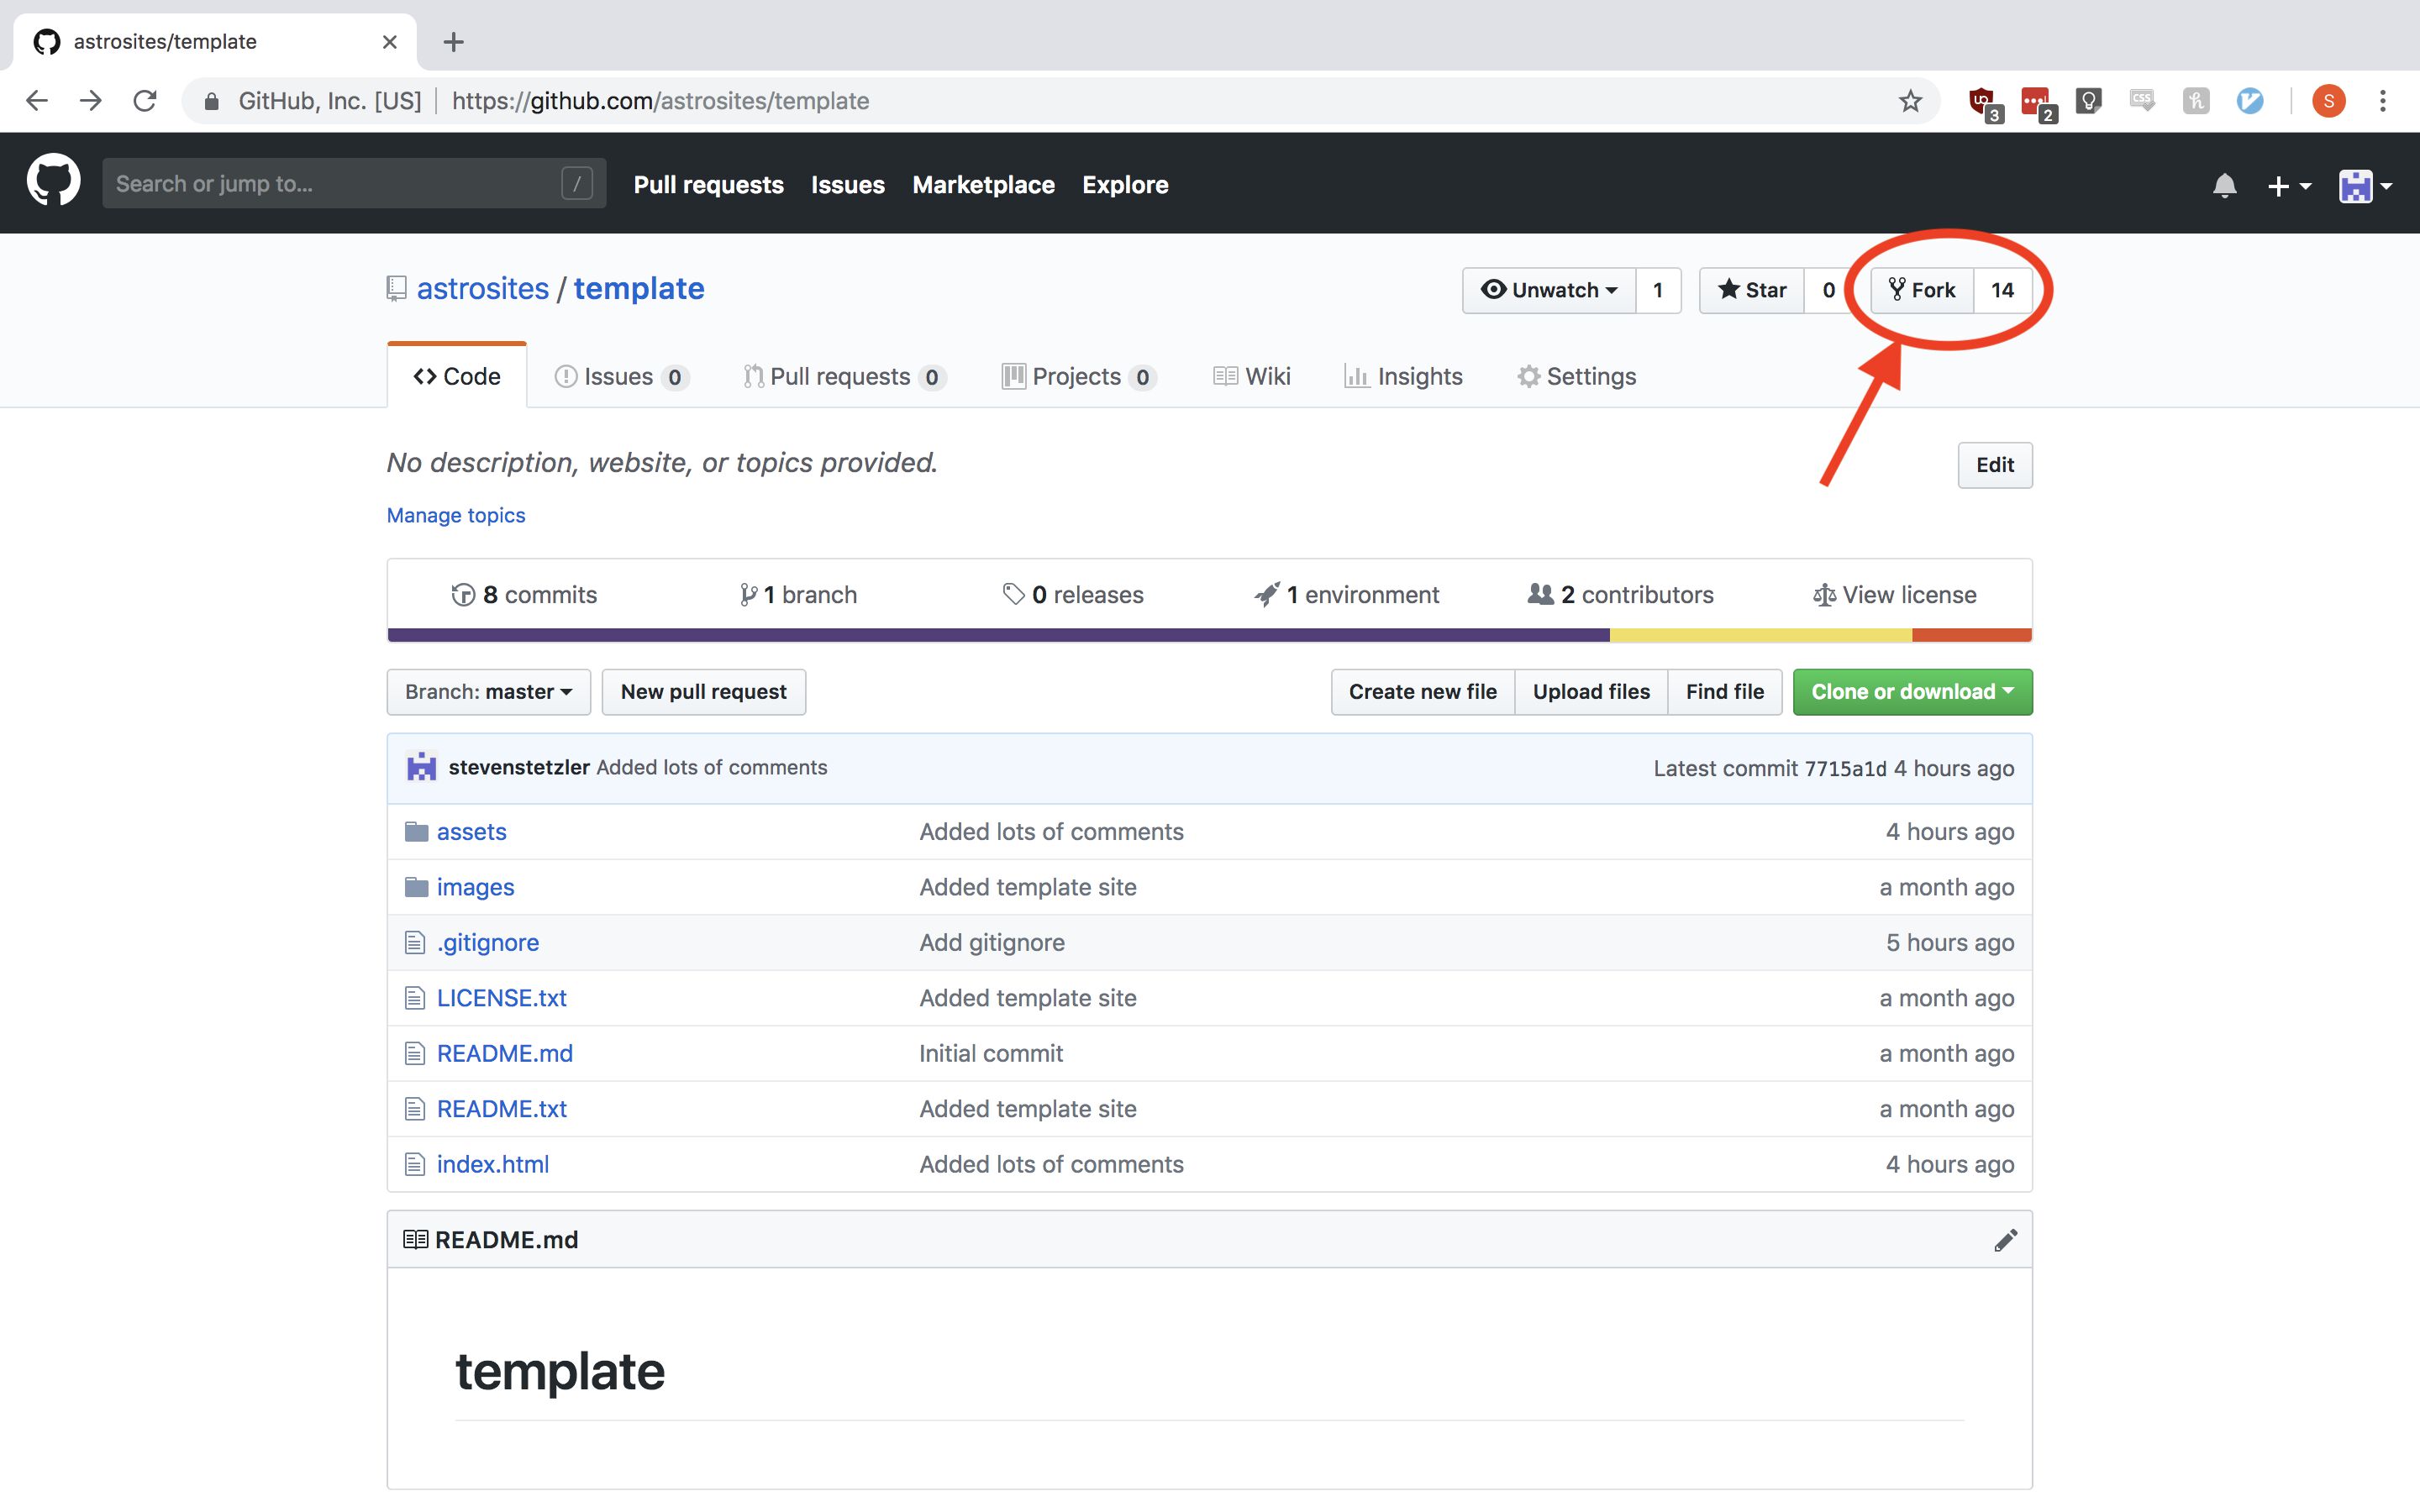
- Navigate to https://github.com/astrosites/template.
- Fork the repository, following the image below. This will create a copy of our repository that you can edit freely.
-
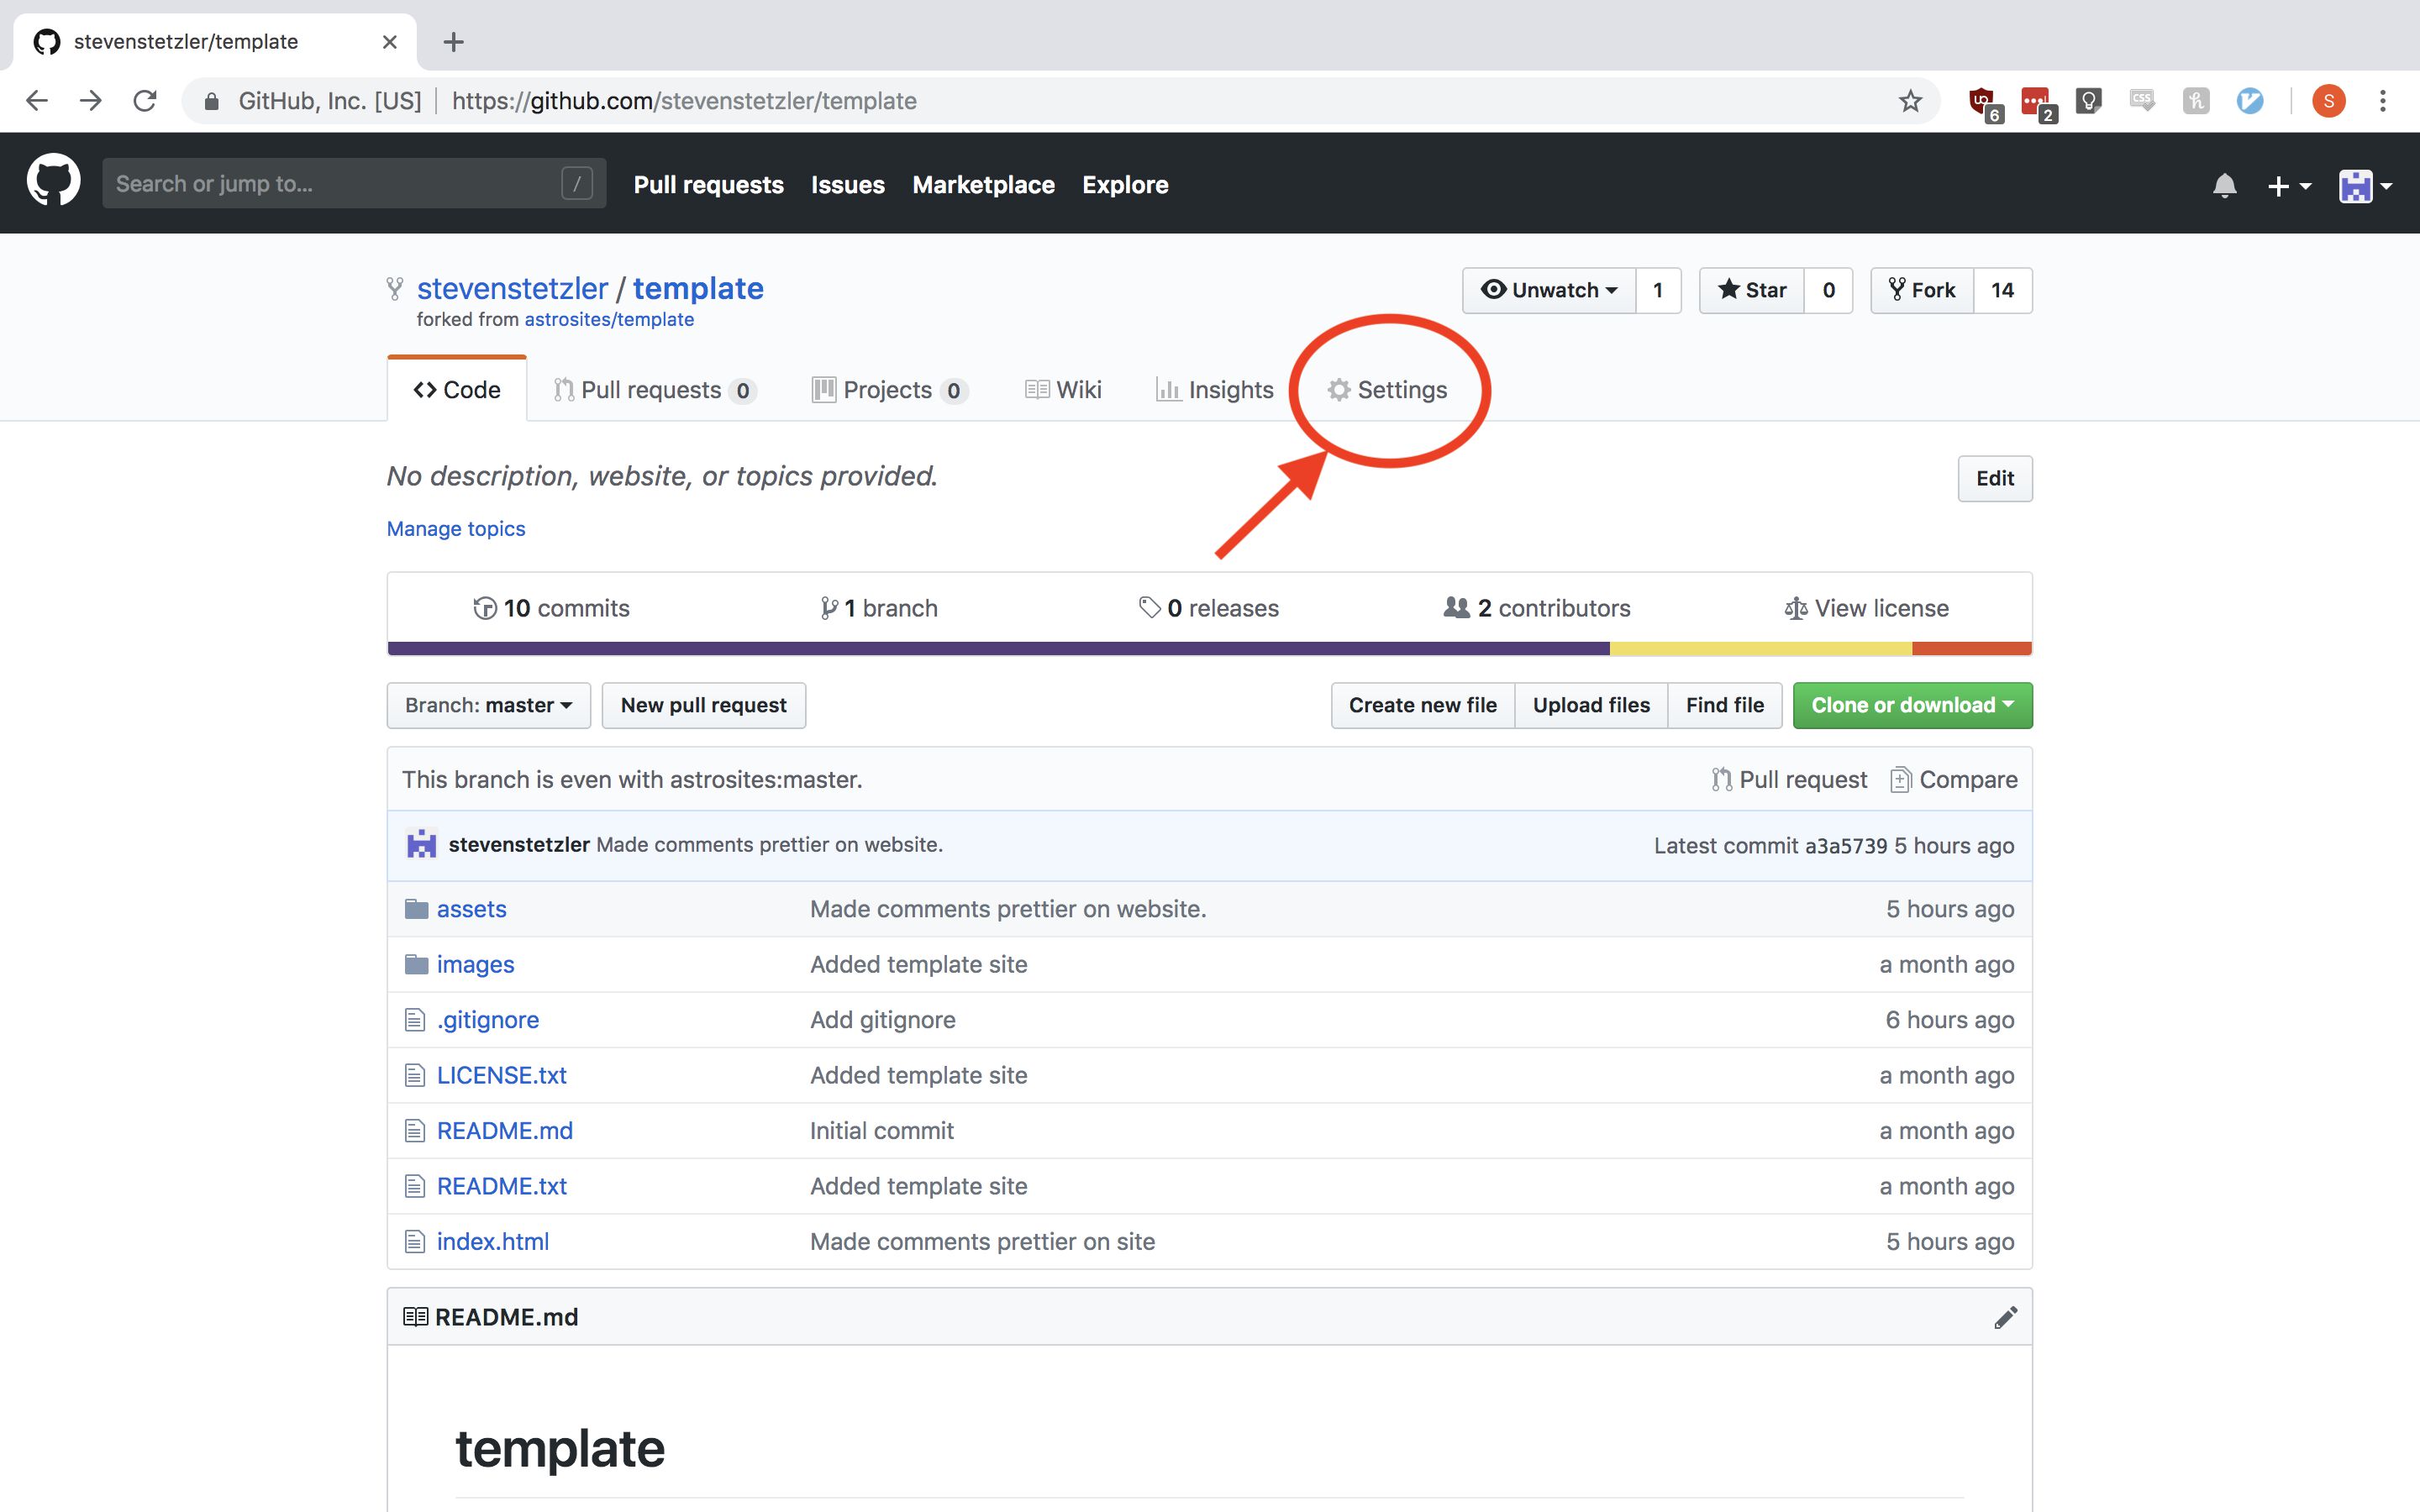
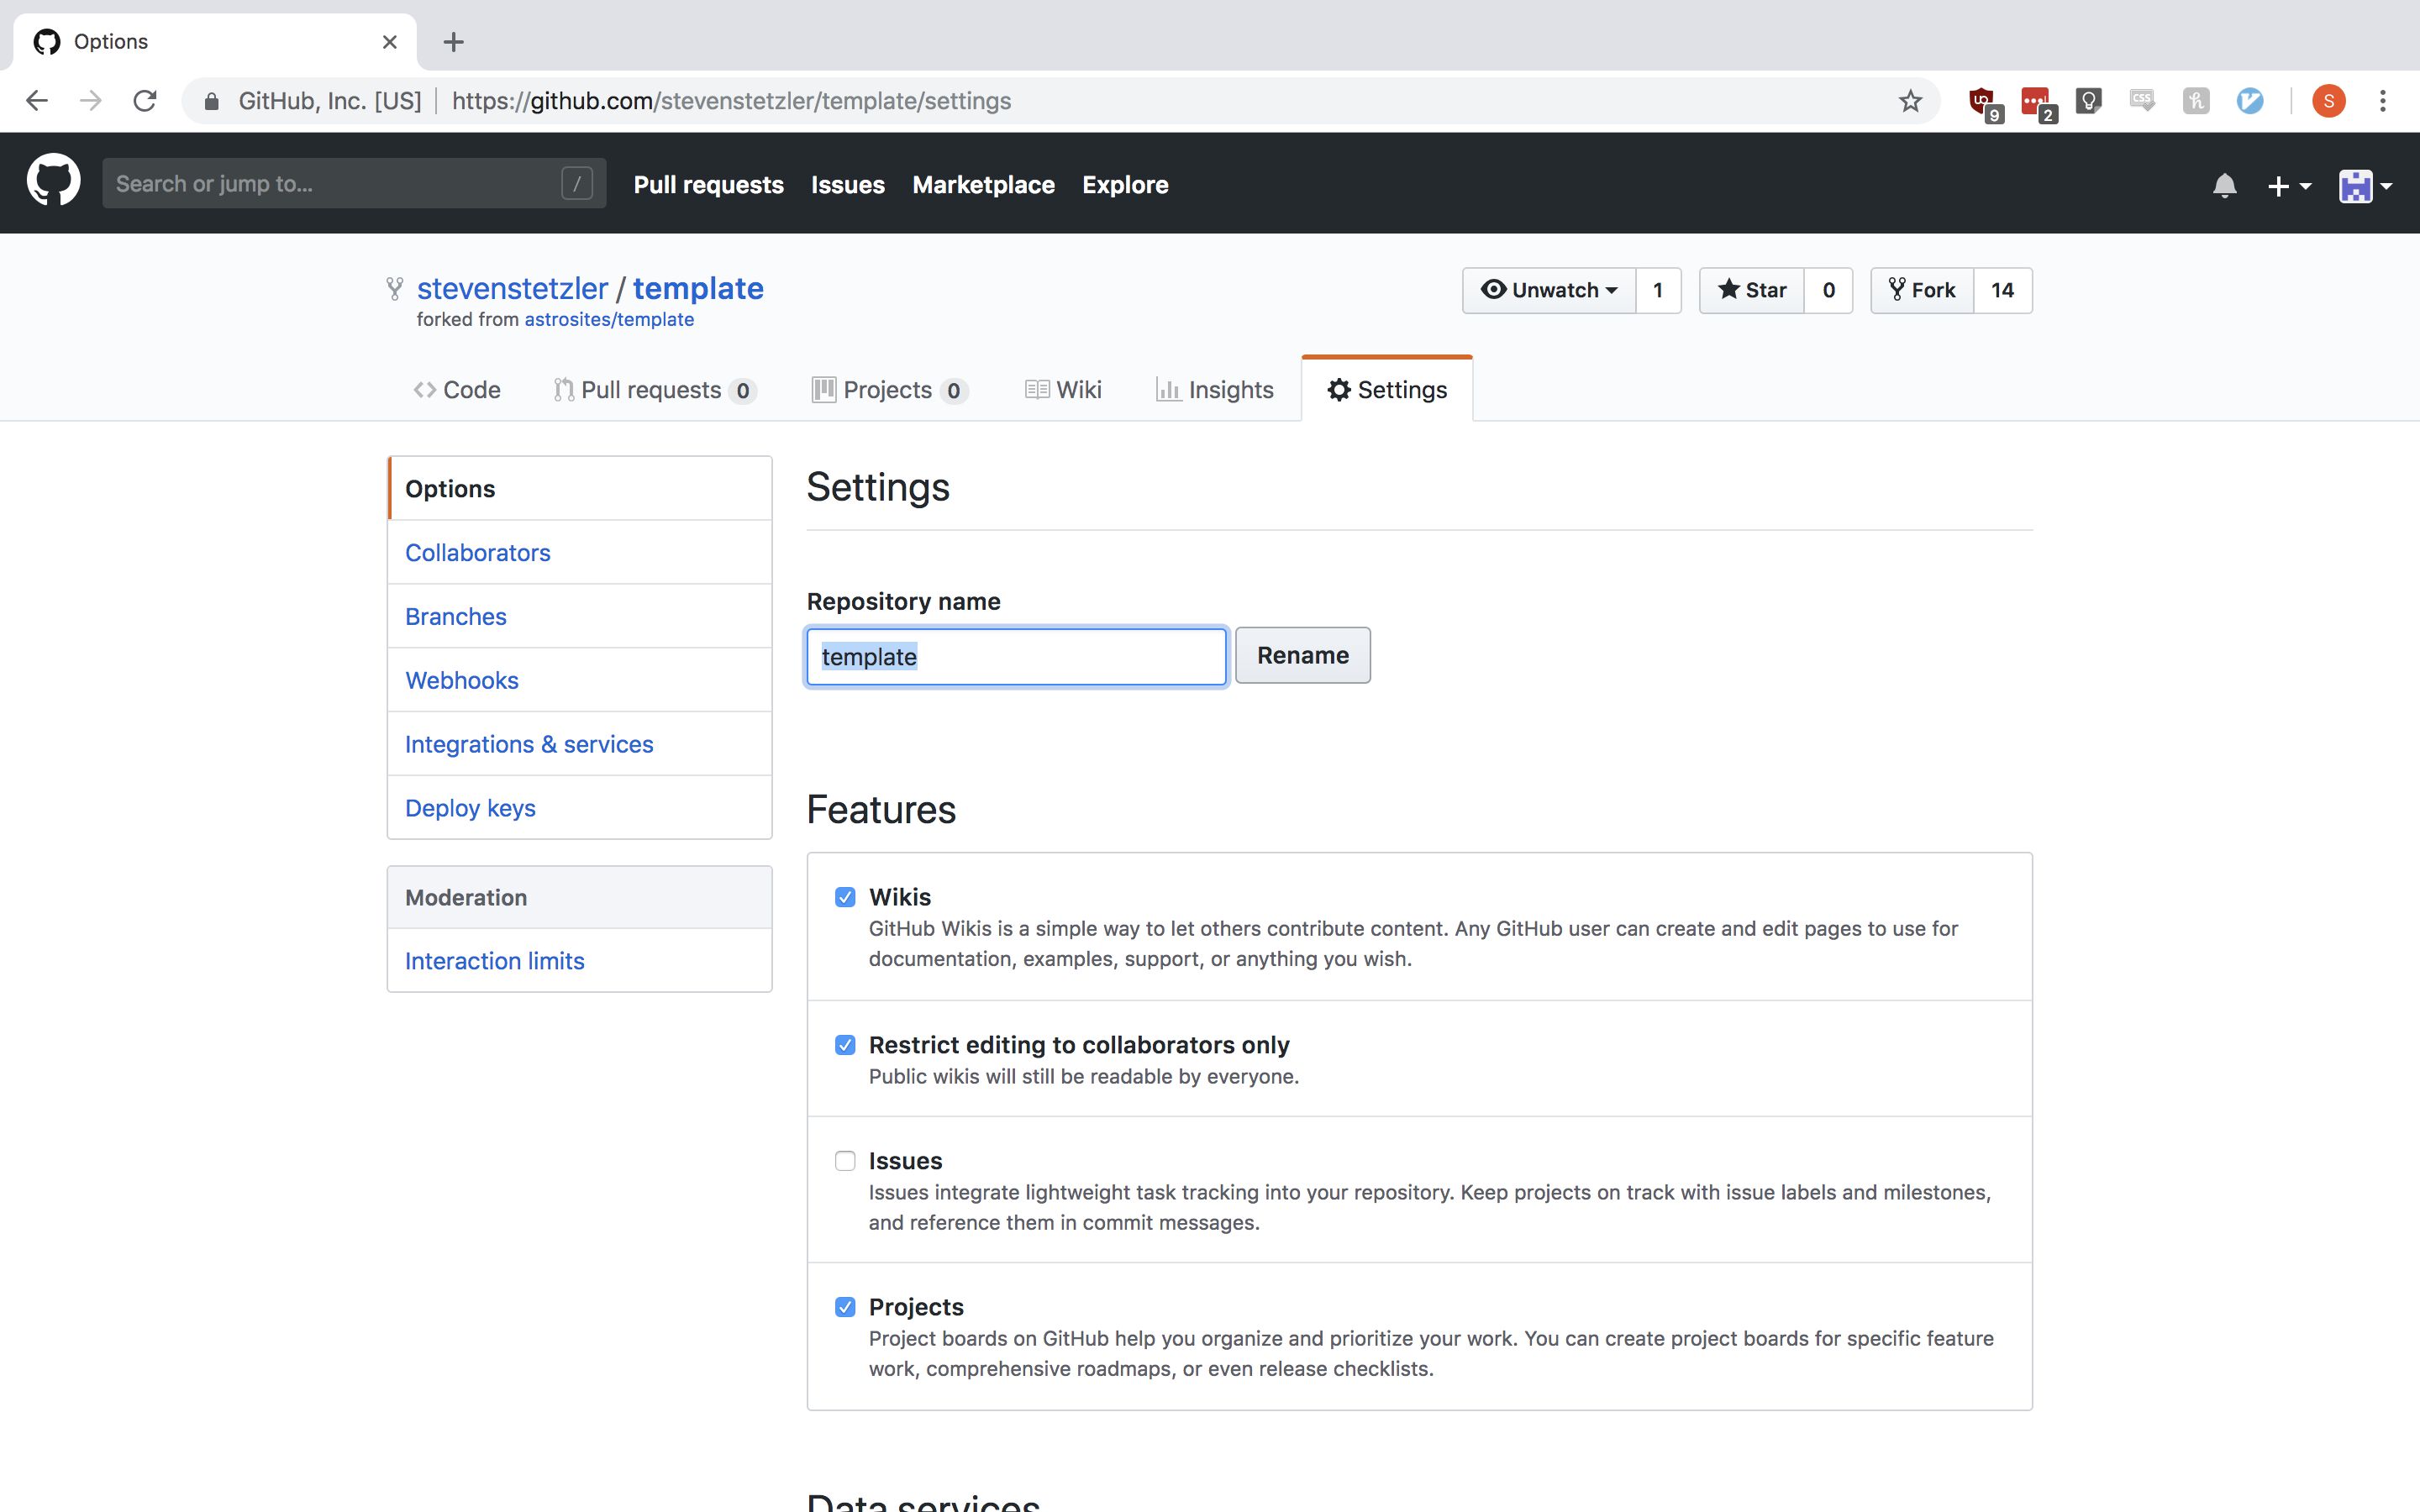
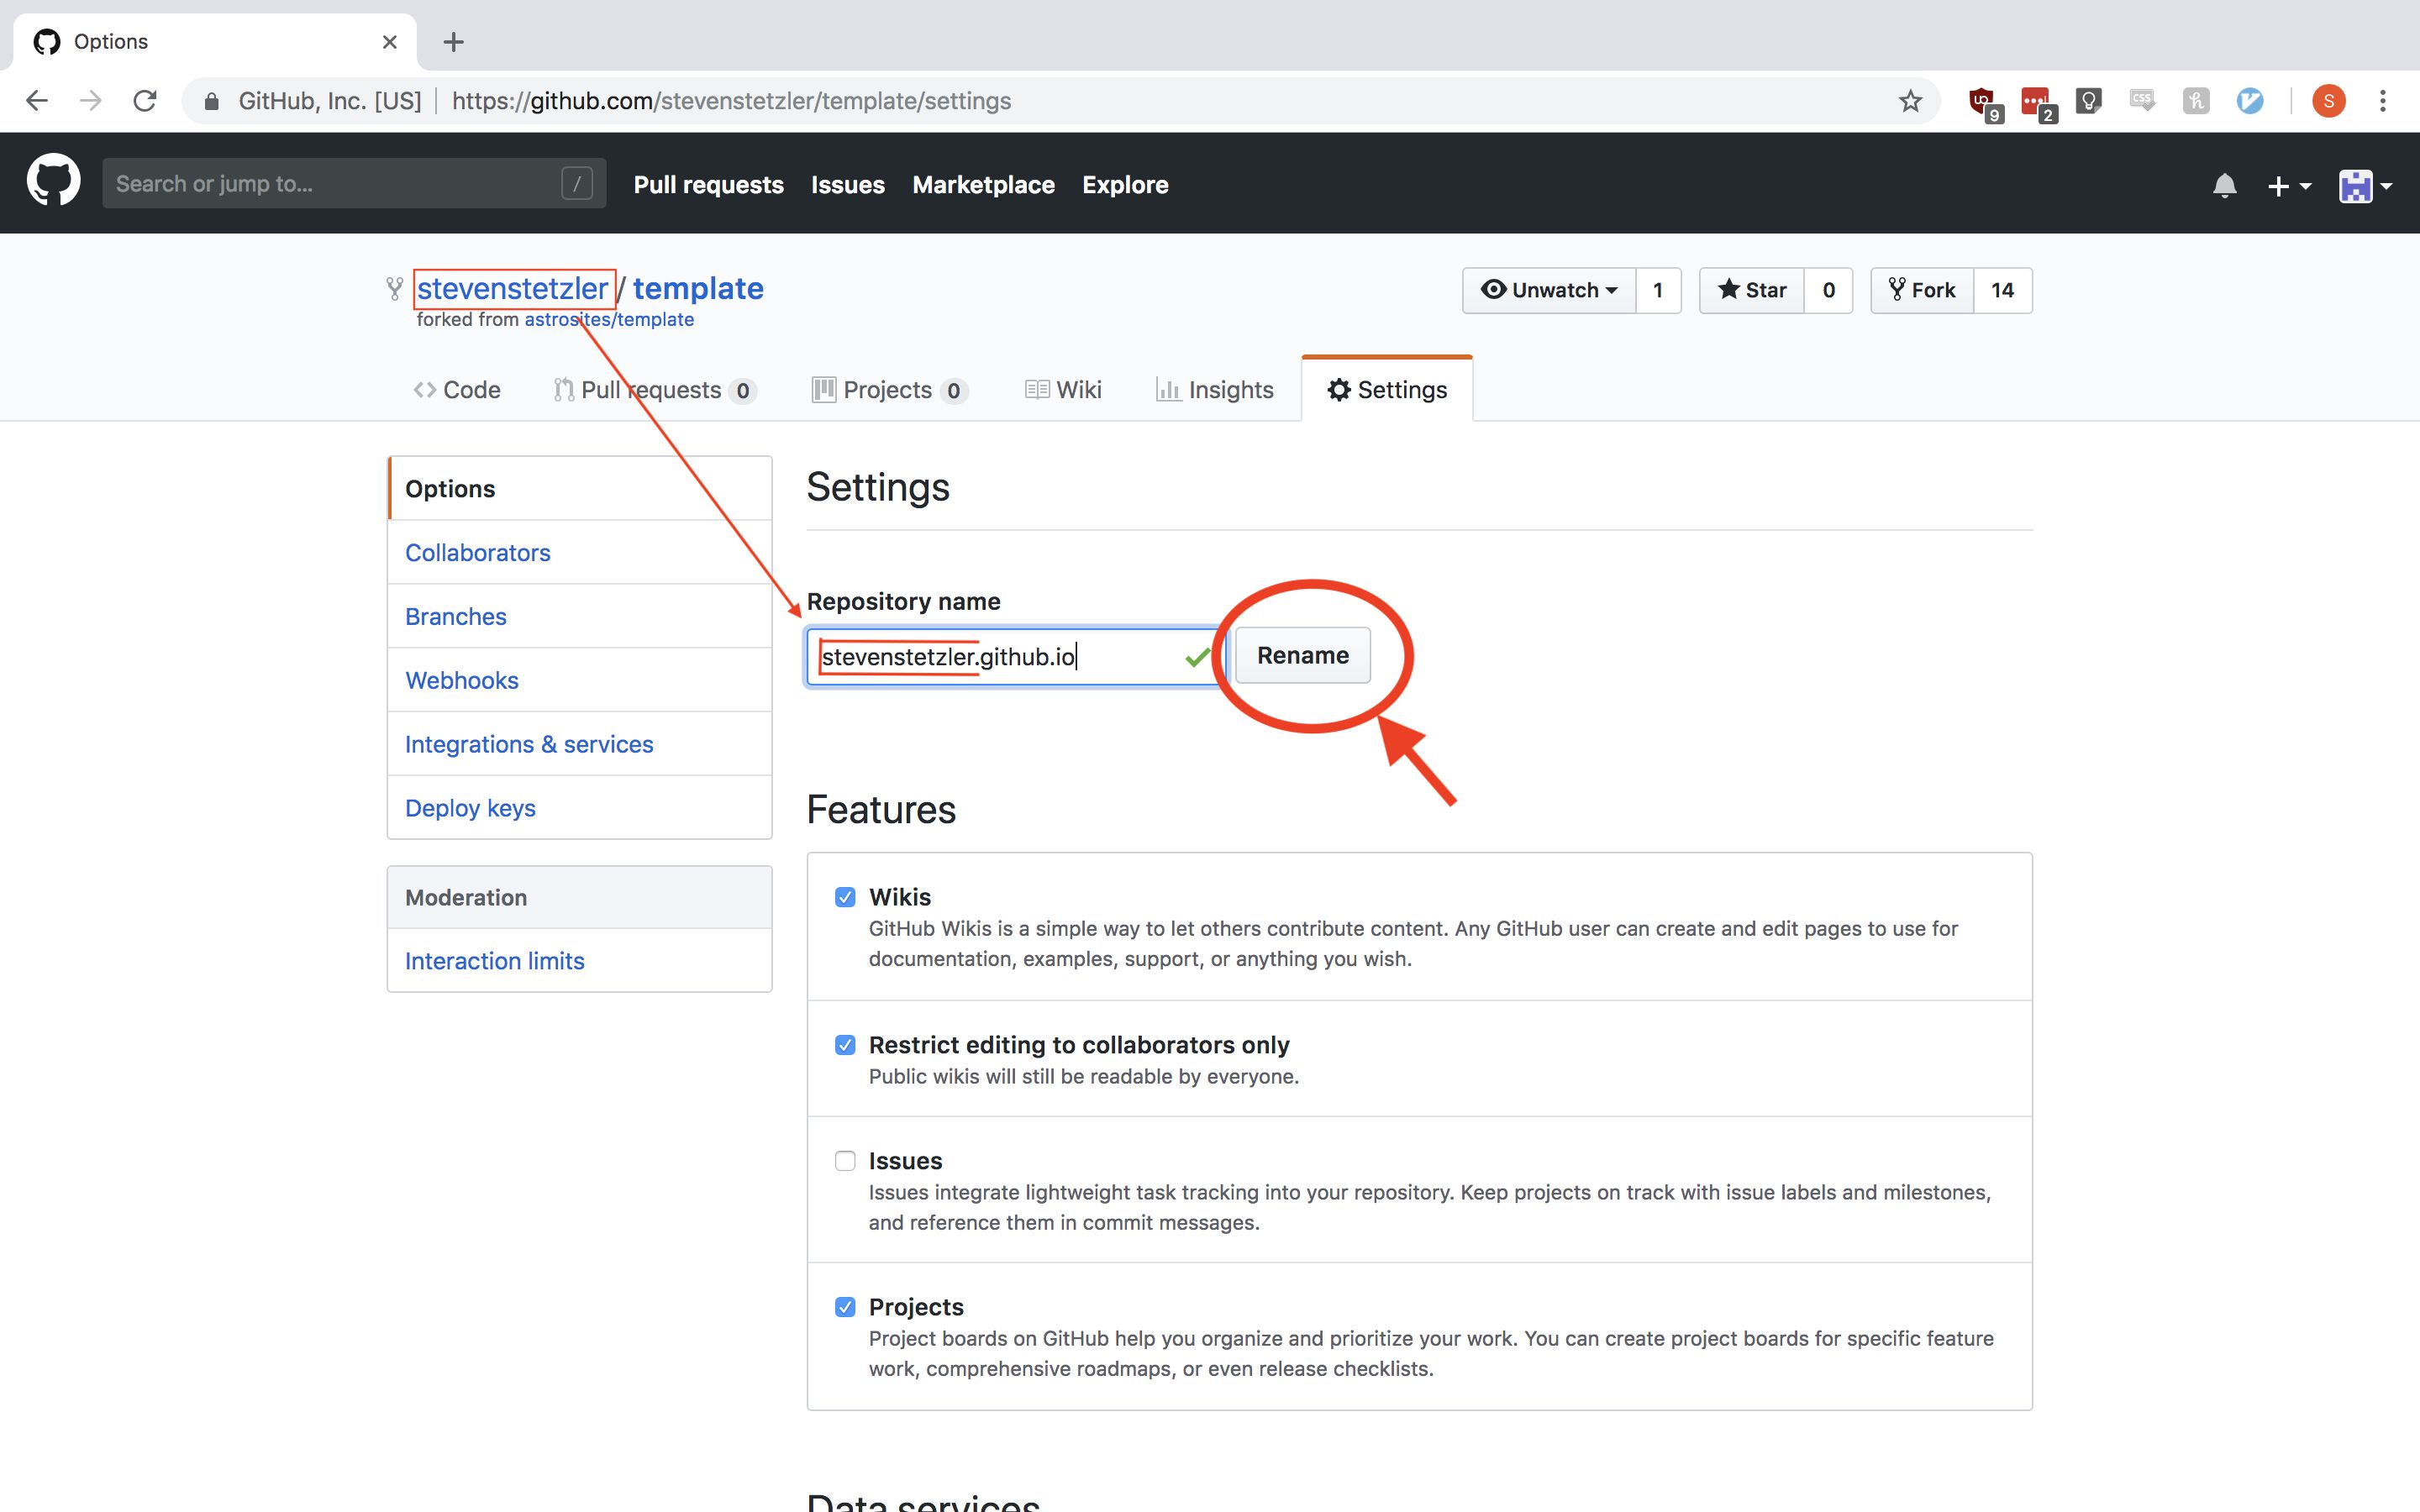
Rename the repository. Click “Settings”, replace “template” with “your-github-name.github.io” in the “Repository name” form, and click “Rename”:
-
Once renamed, navigate back to “Setting” and scroll down in the settings to the “GitHub Pages” section. Ensure that your repository has GitHub Pages enabled and that the master branch is chosen under “Source”.
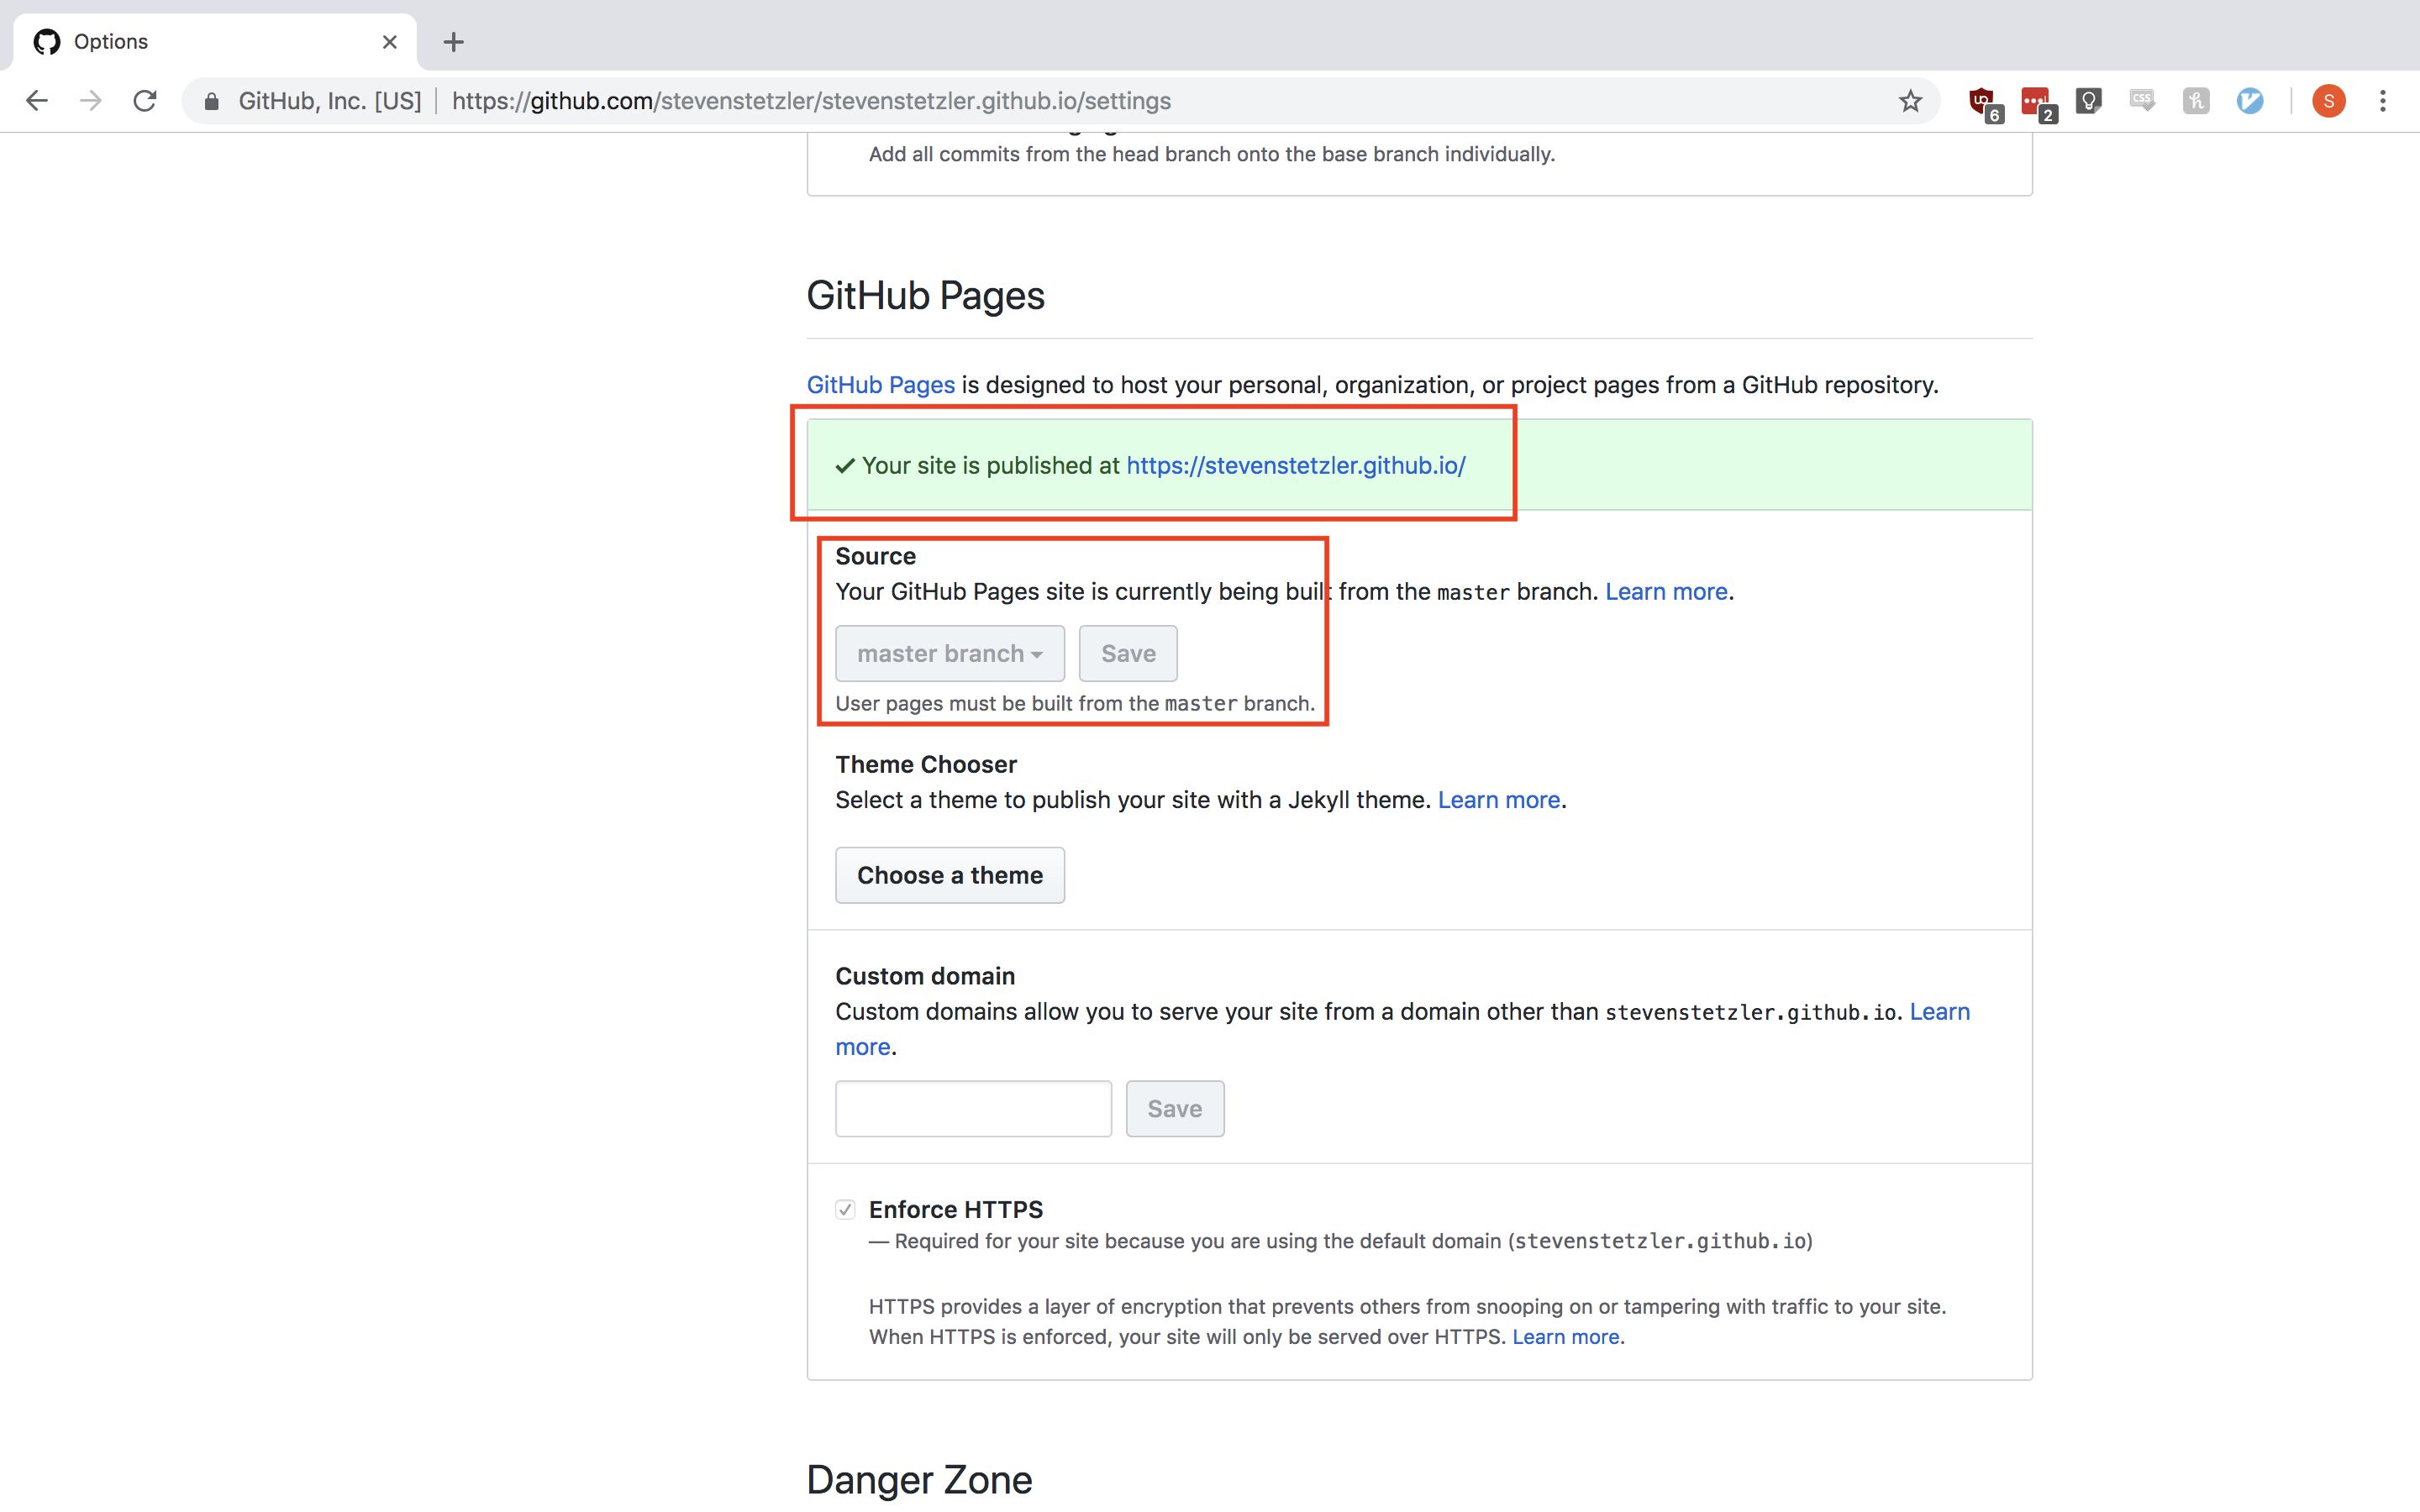
If it says “Your site is ready to be published…”, wait a minute or two and then refresh the page. It should publish automatically. If it’s still not ready, you can move on with the tutorial and wait for the publishing to happen in the background.
- You are done! Your new site is now published at https://your-github-name.github.io!
Now we can start editing the template to personalize it!
Repository Structure
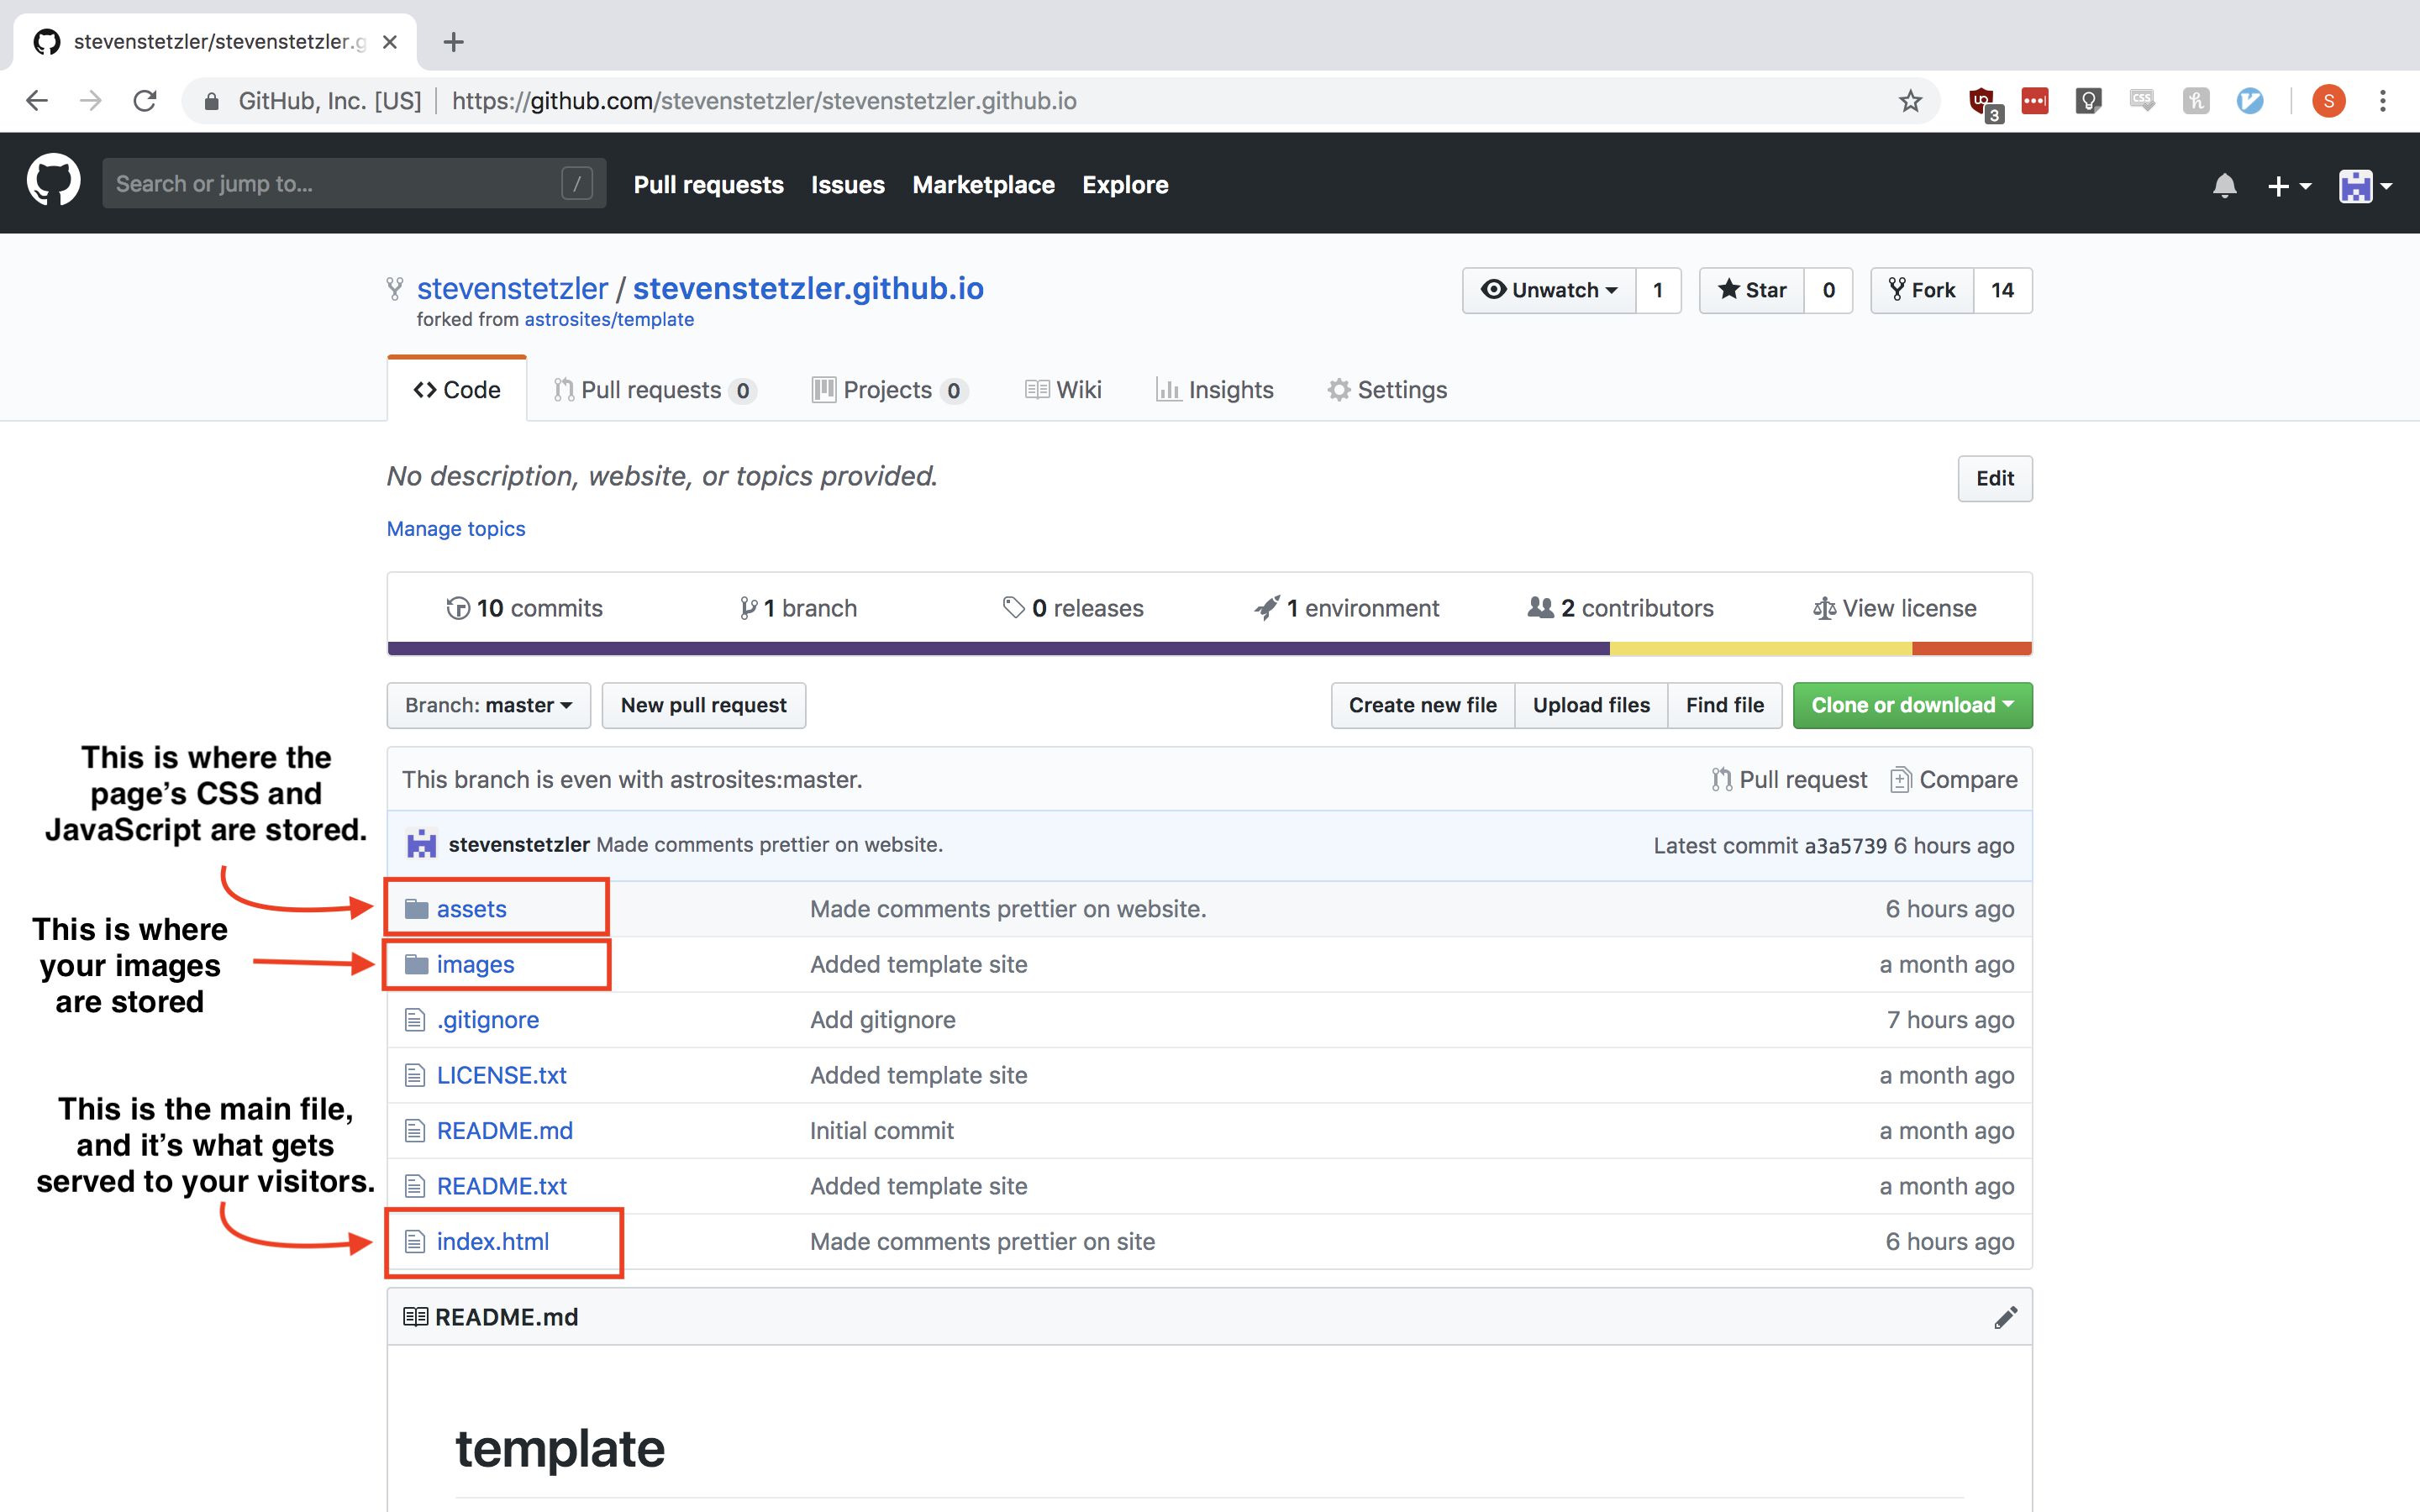
When people access the URL https://your-github-name.github.io, they will be served up the file index.html which is in the root folder of your repository. The CSS and JavaScript that the page uses is stored in the assets folder, and images the site uses are stored in the images folder:
Editing the Template
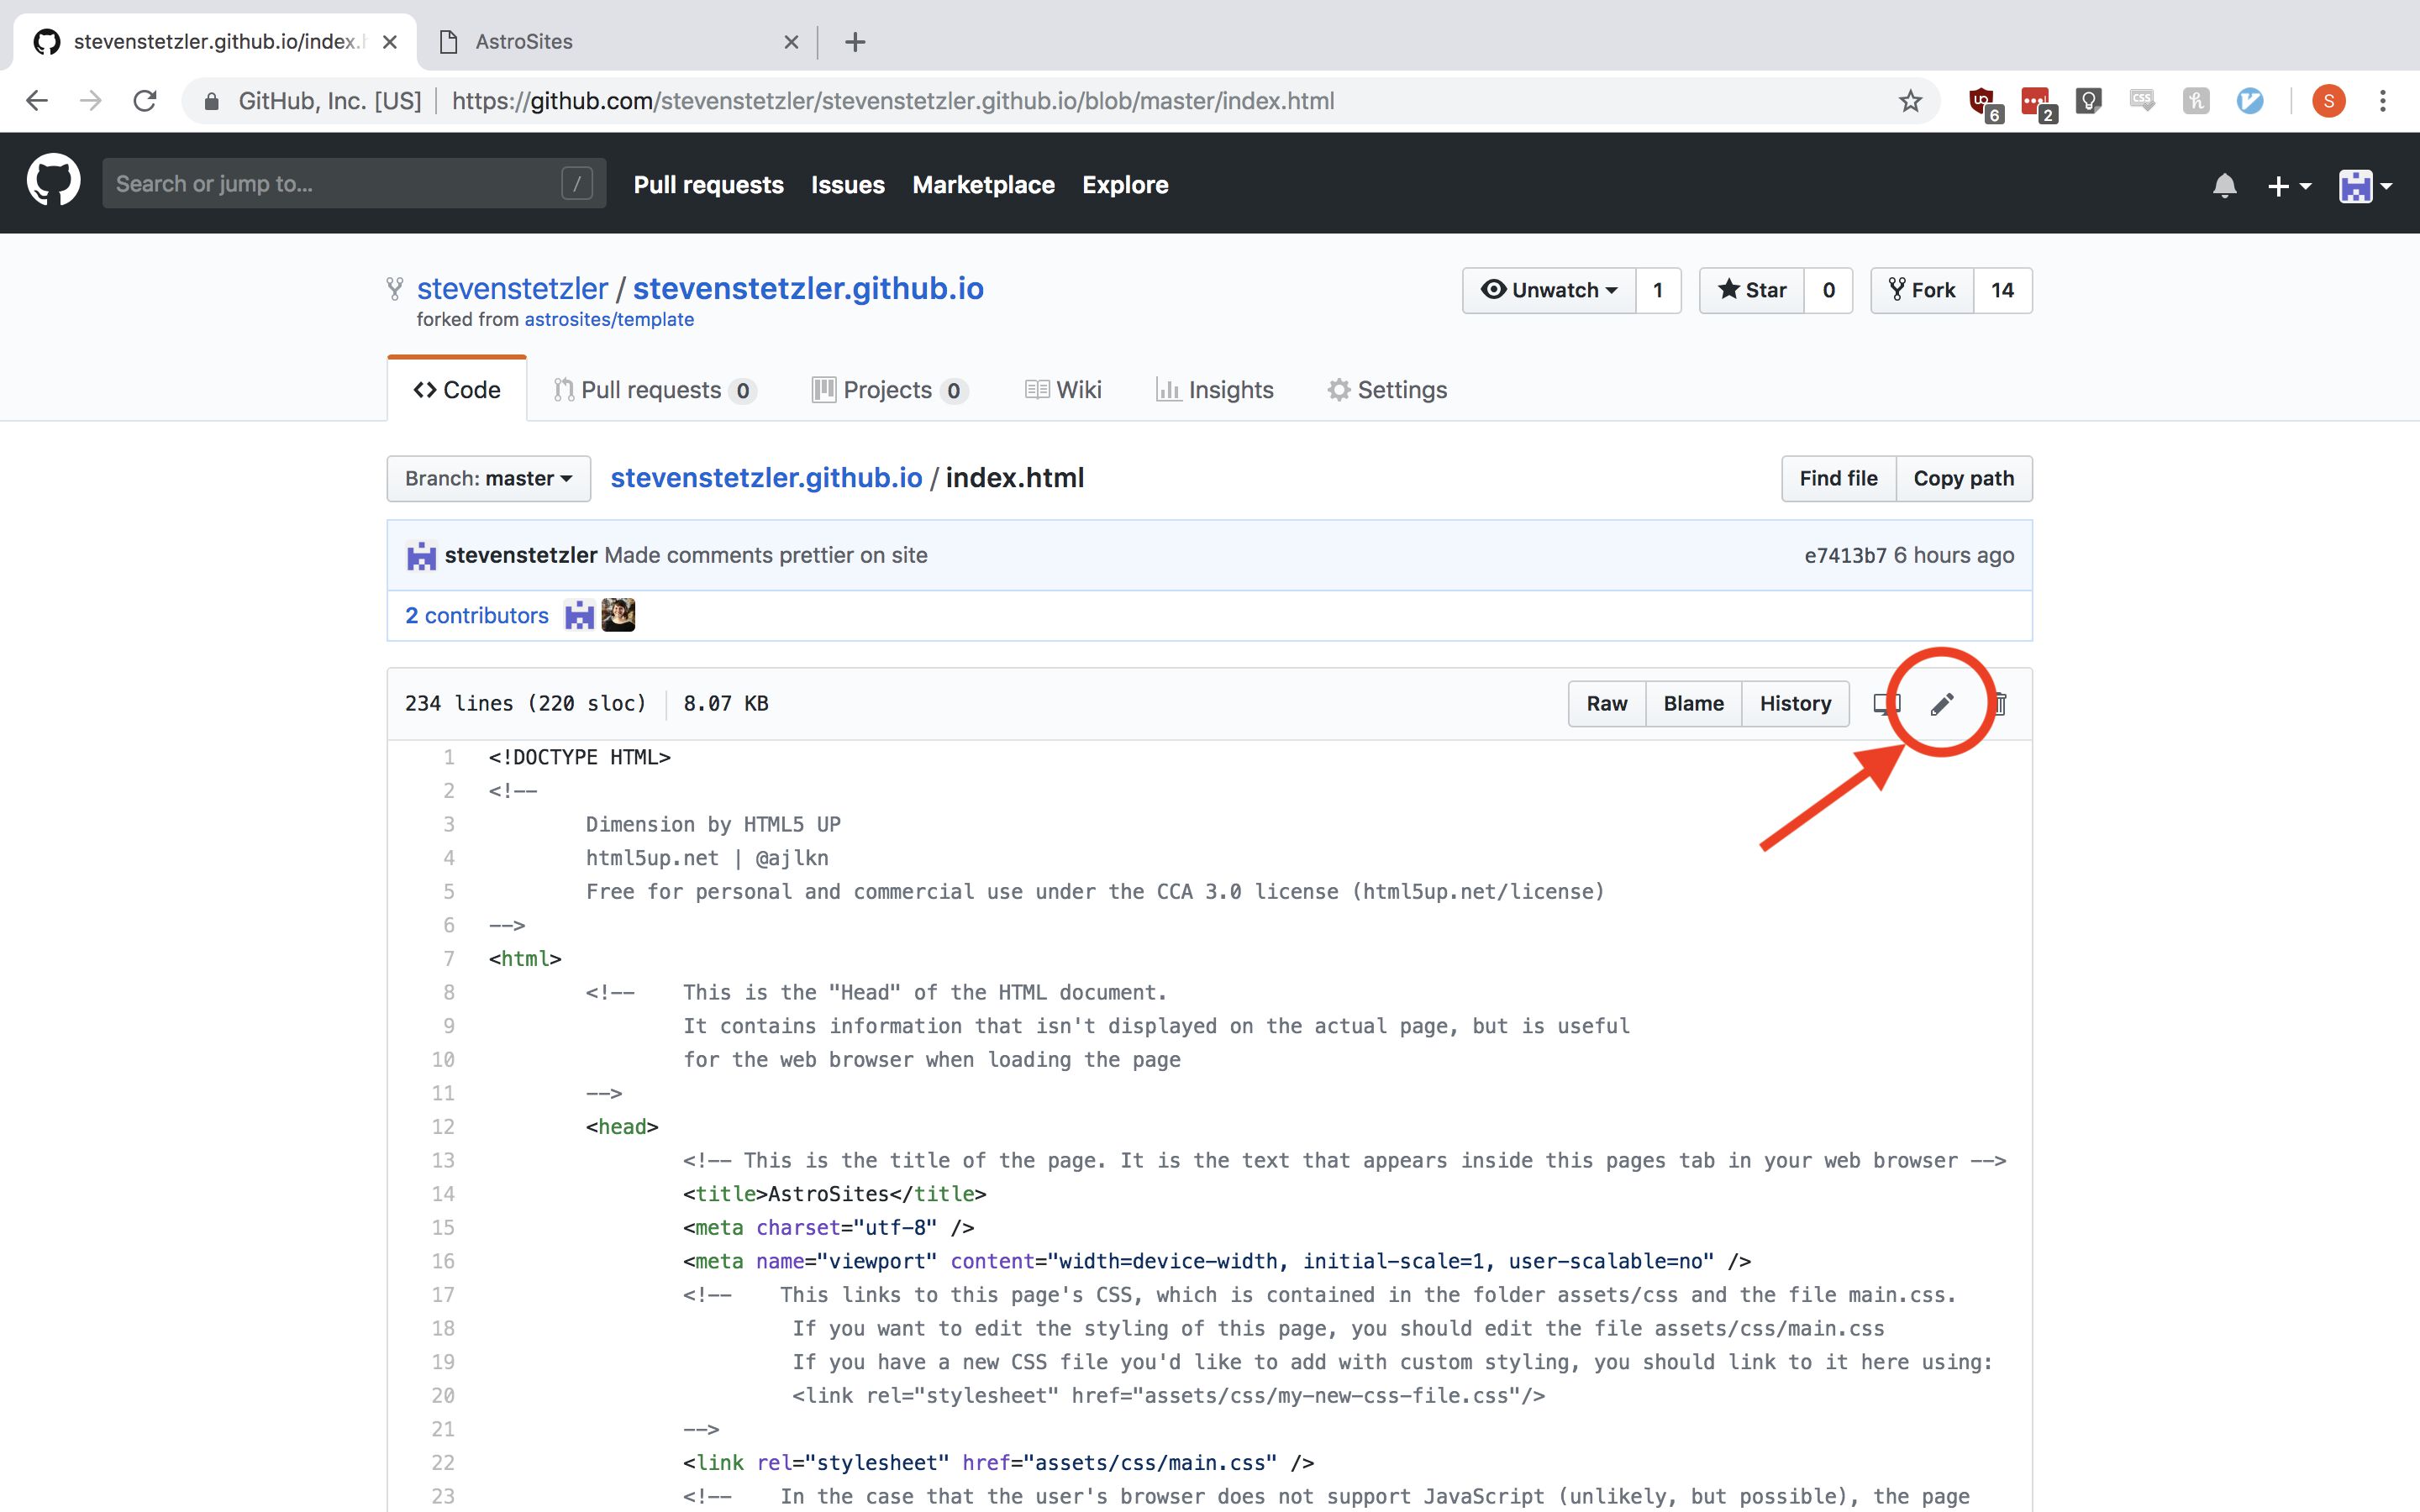
Most of the edits we will perform will be on index.html. Click on that file in your repository to open it up. Once the file is loaded, click on the pencil icon to start making edits.
In a second tab or window, pull up your site by navigating to https://your-github-name.github.io. This will allow you to see your edits happen as you make them in the HTML file.

Template Site Structure
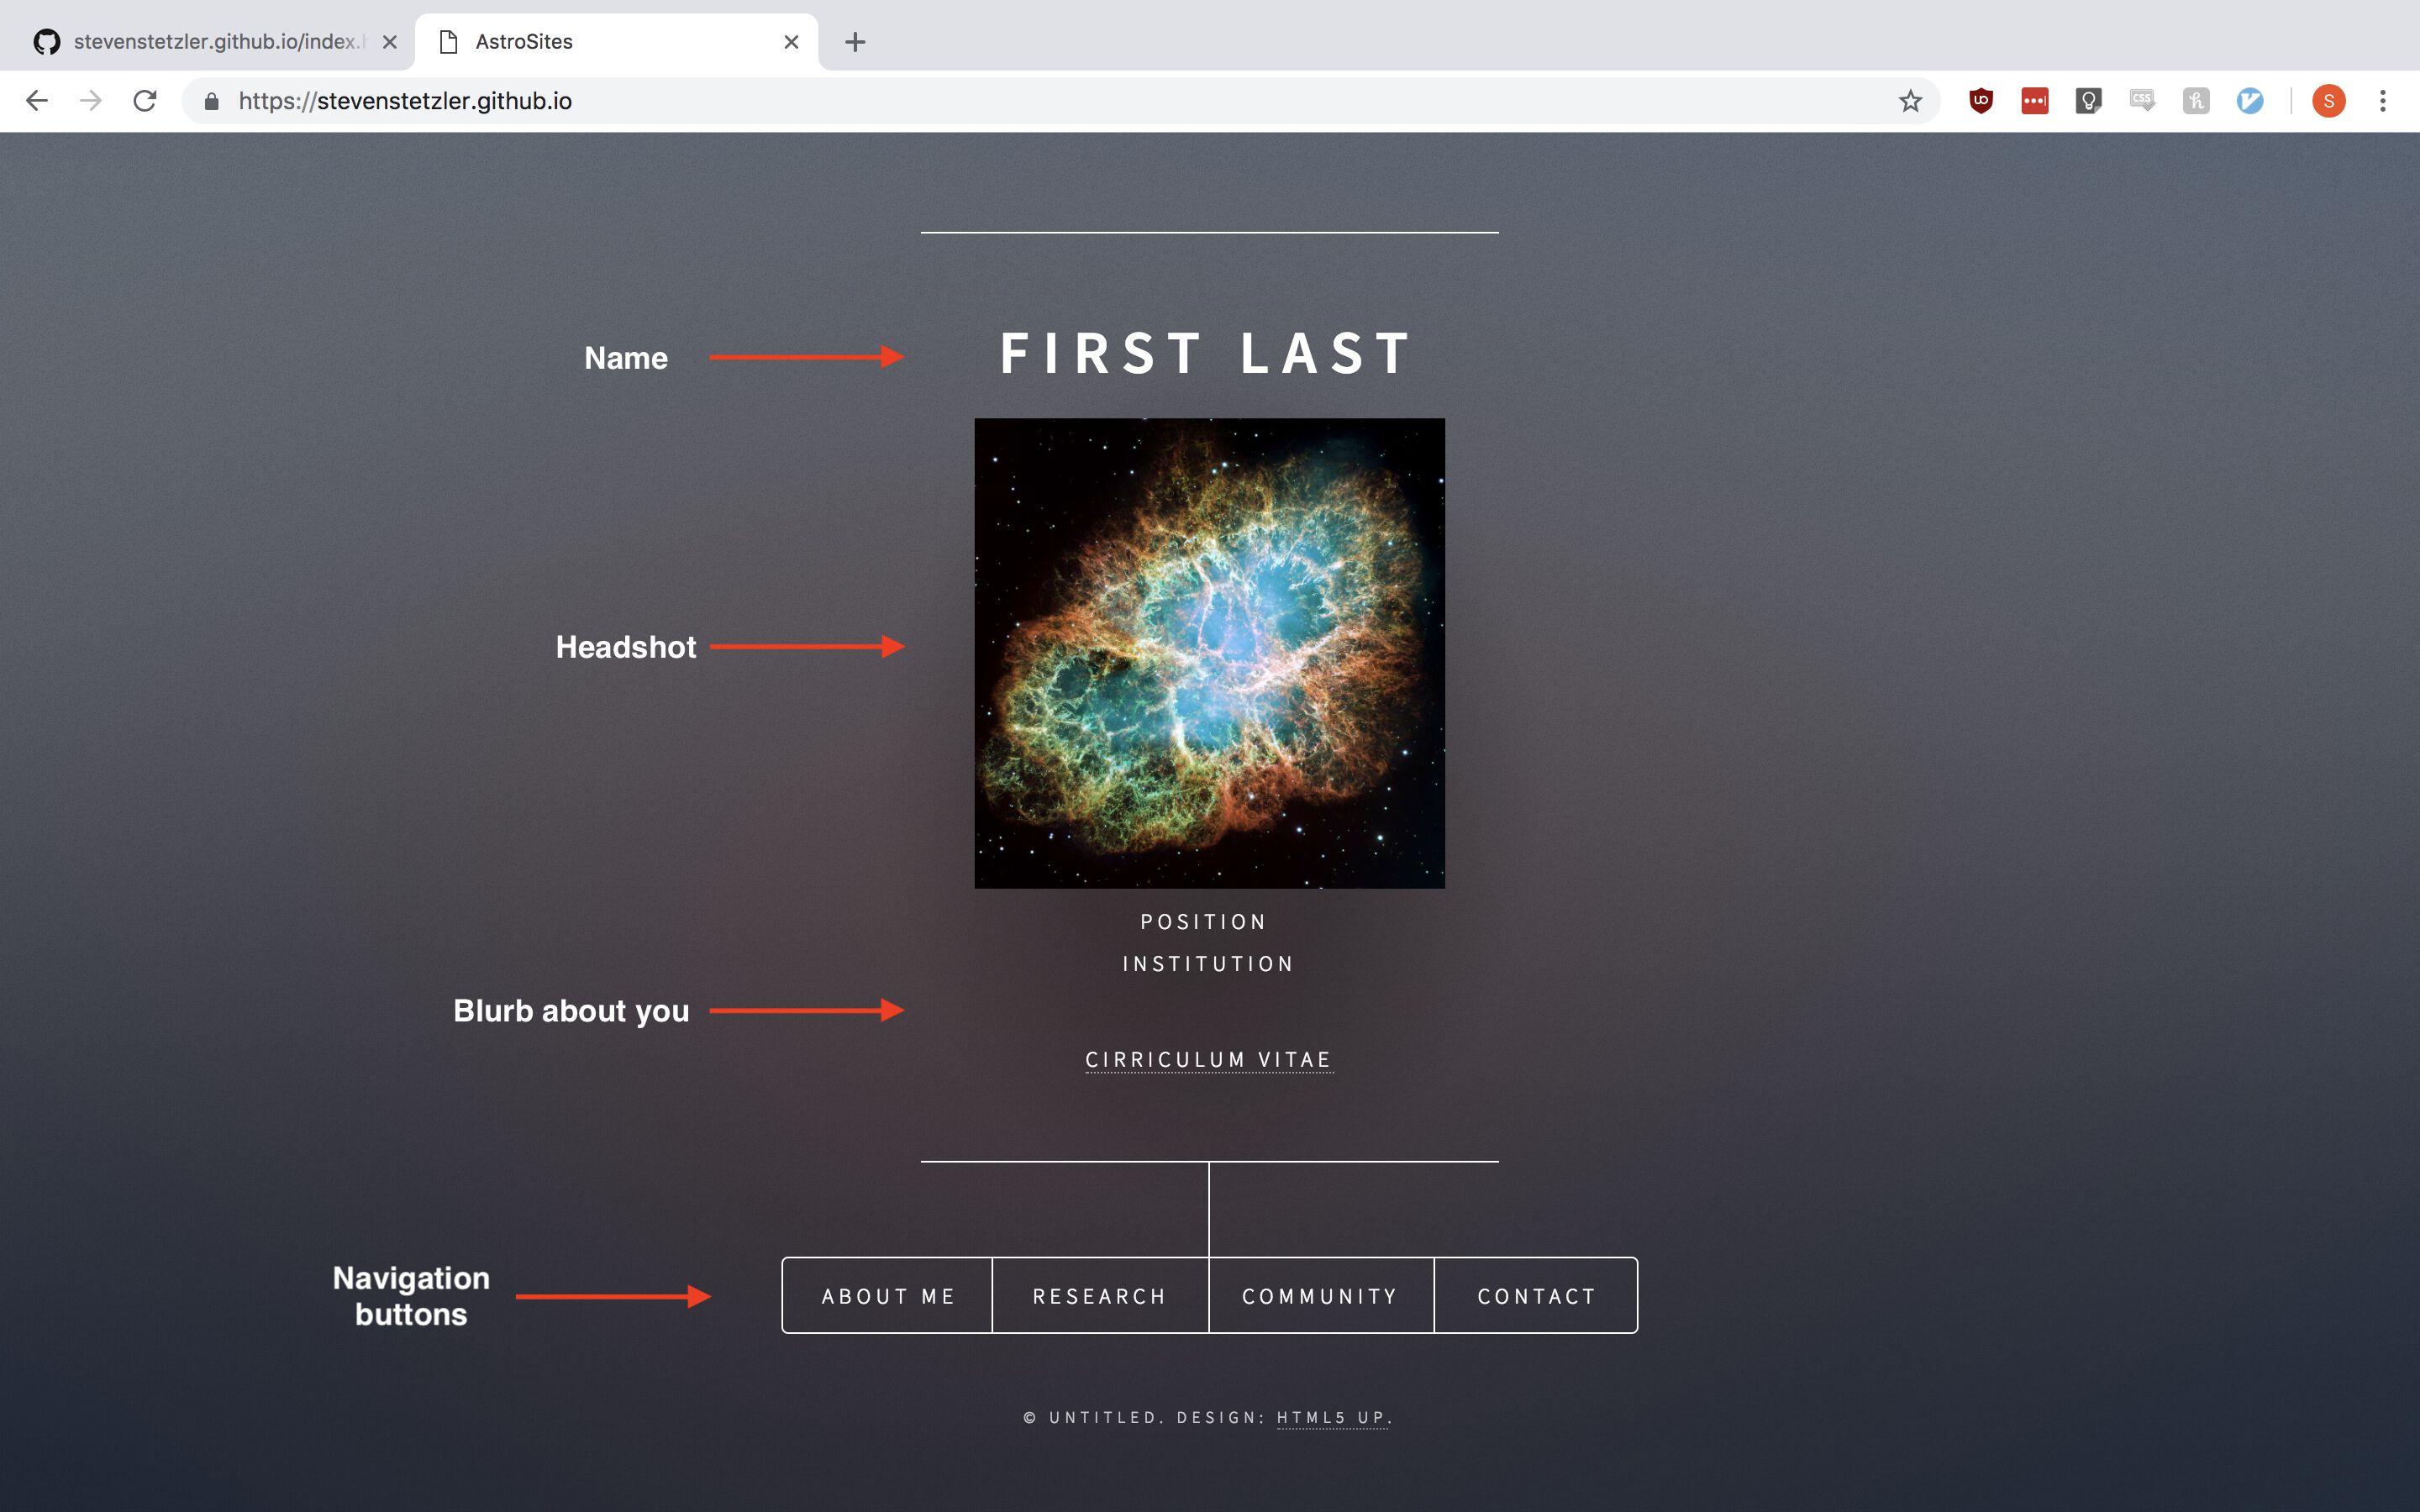
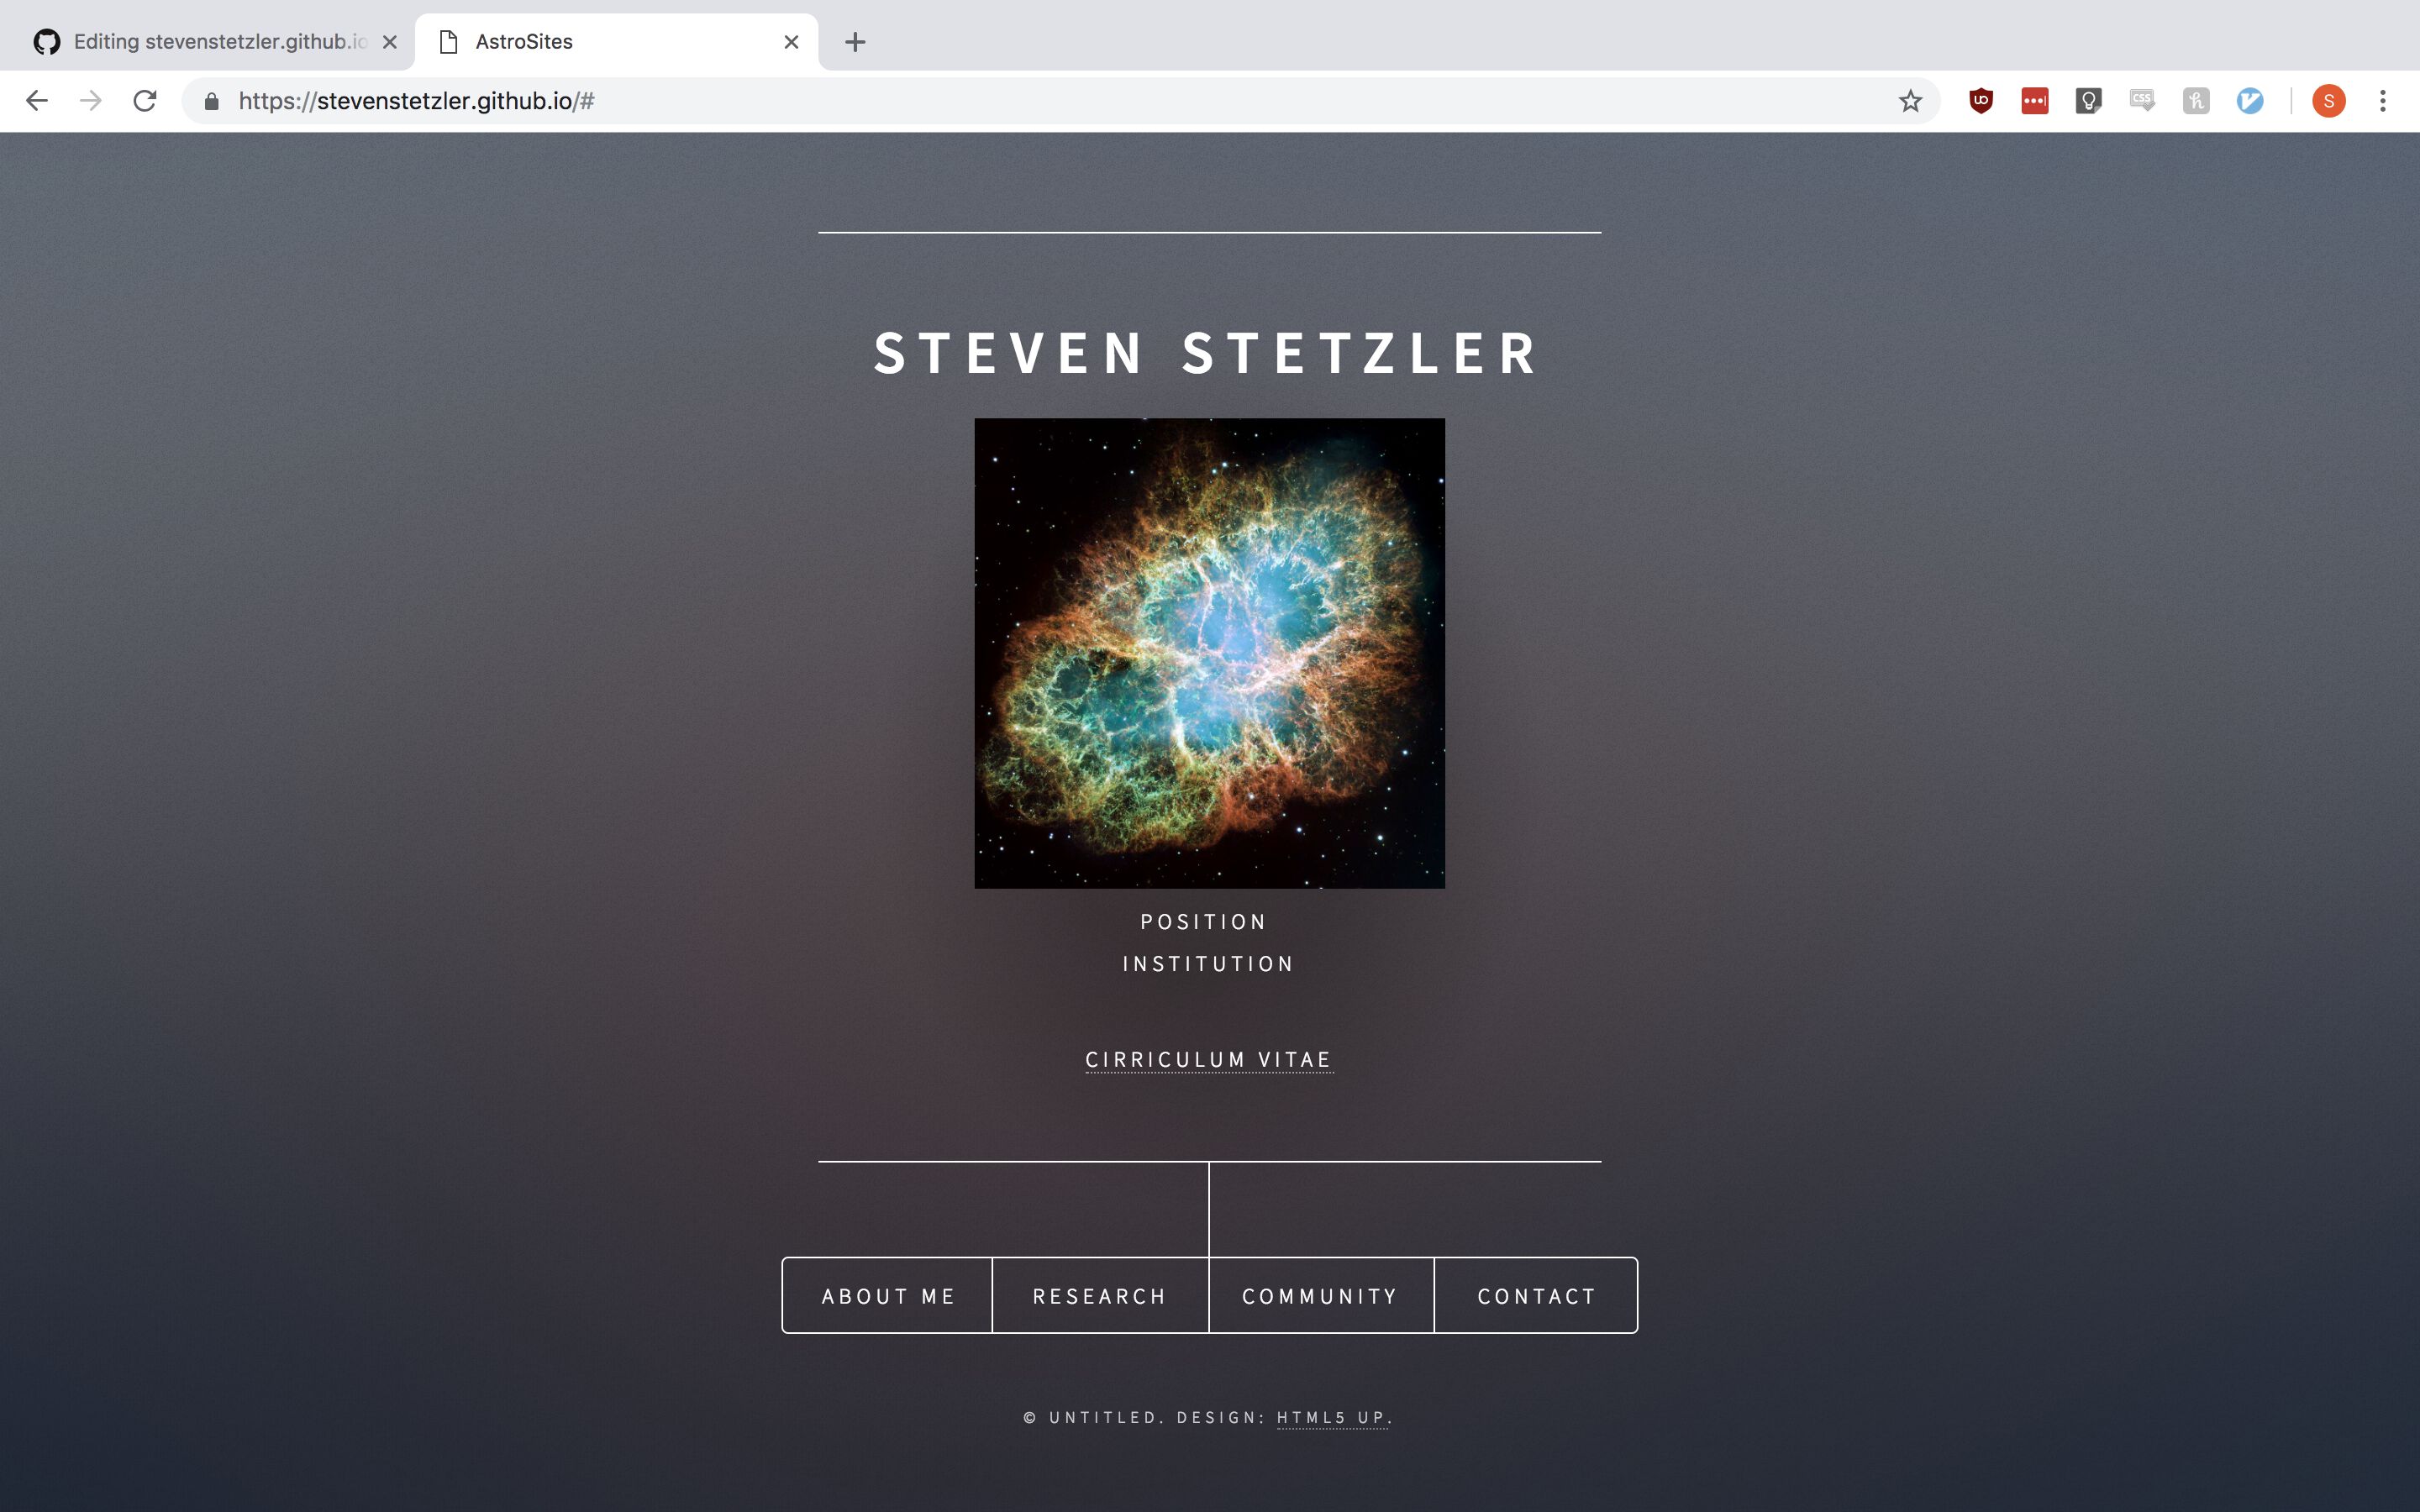
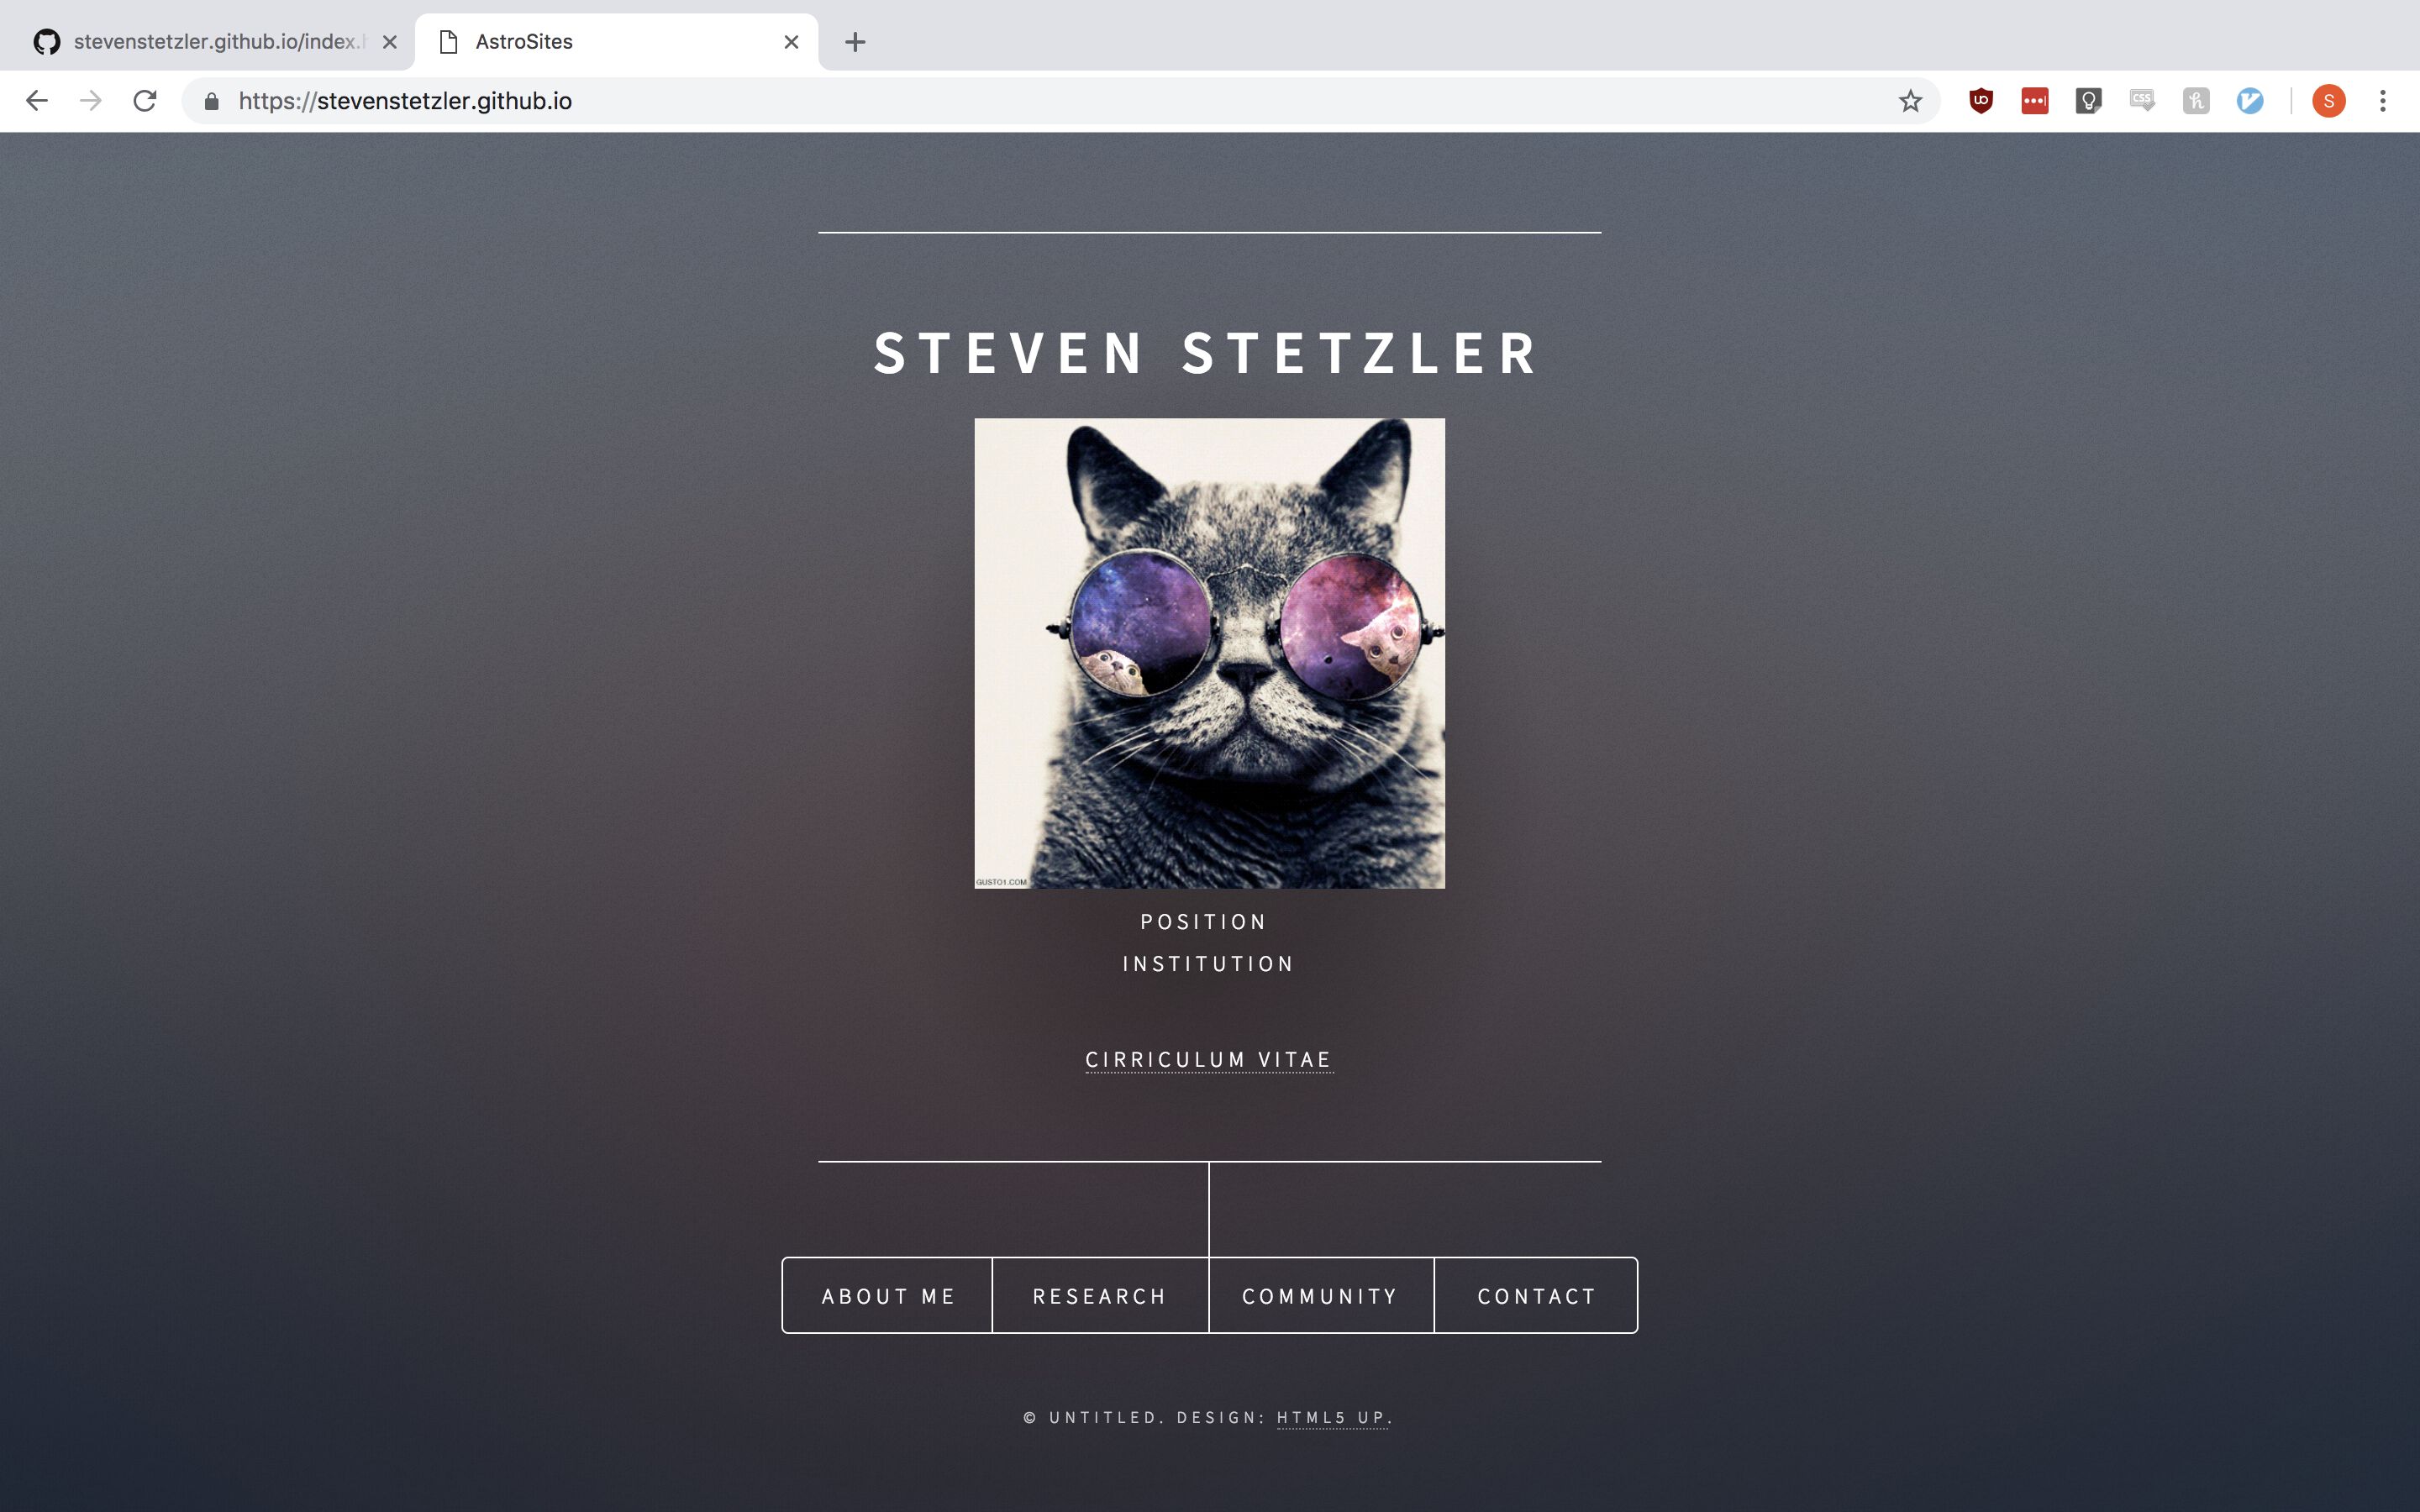
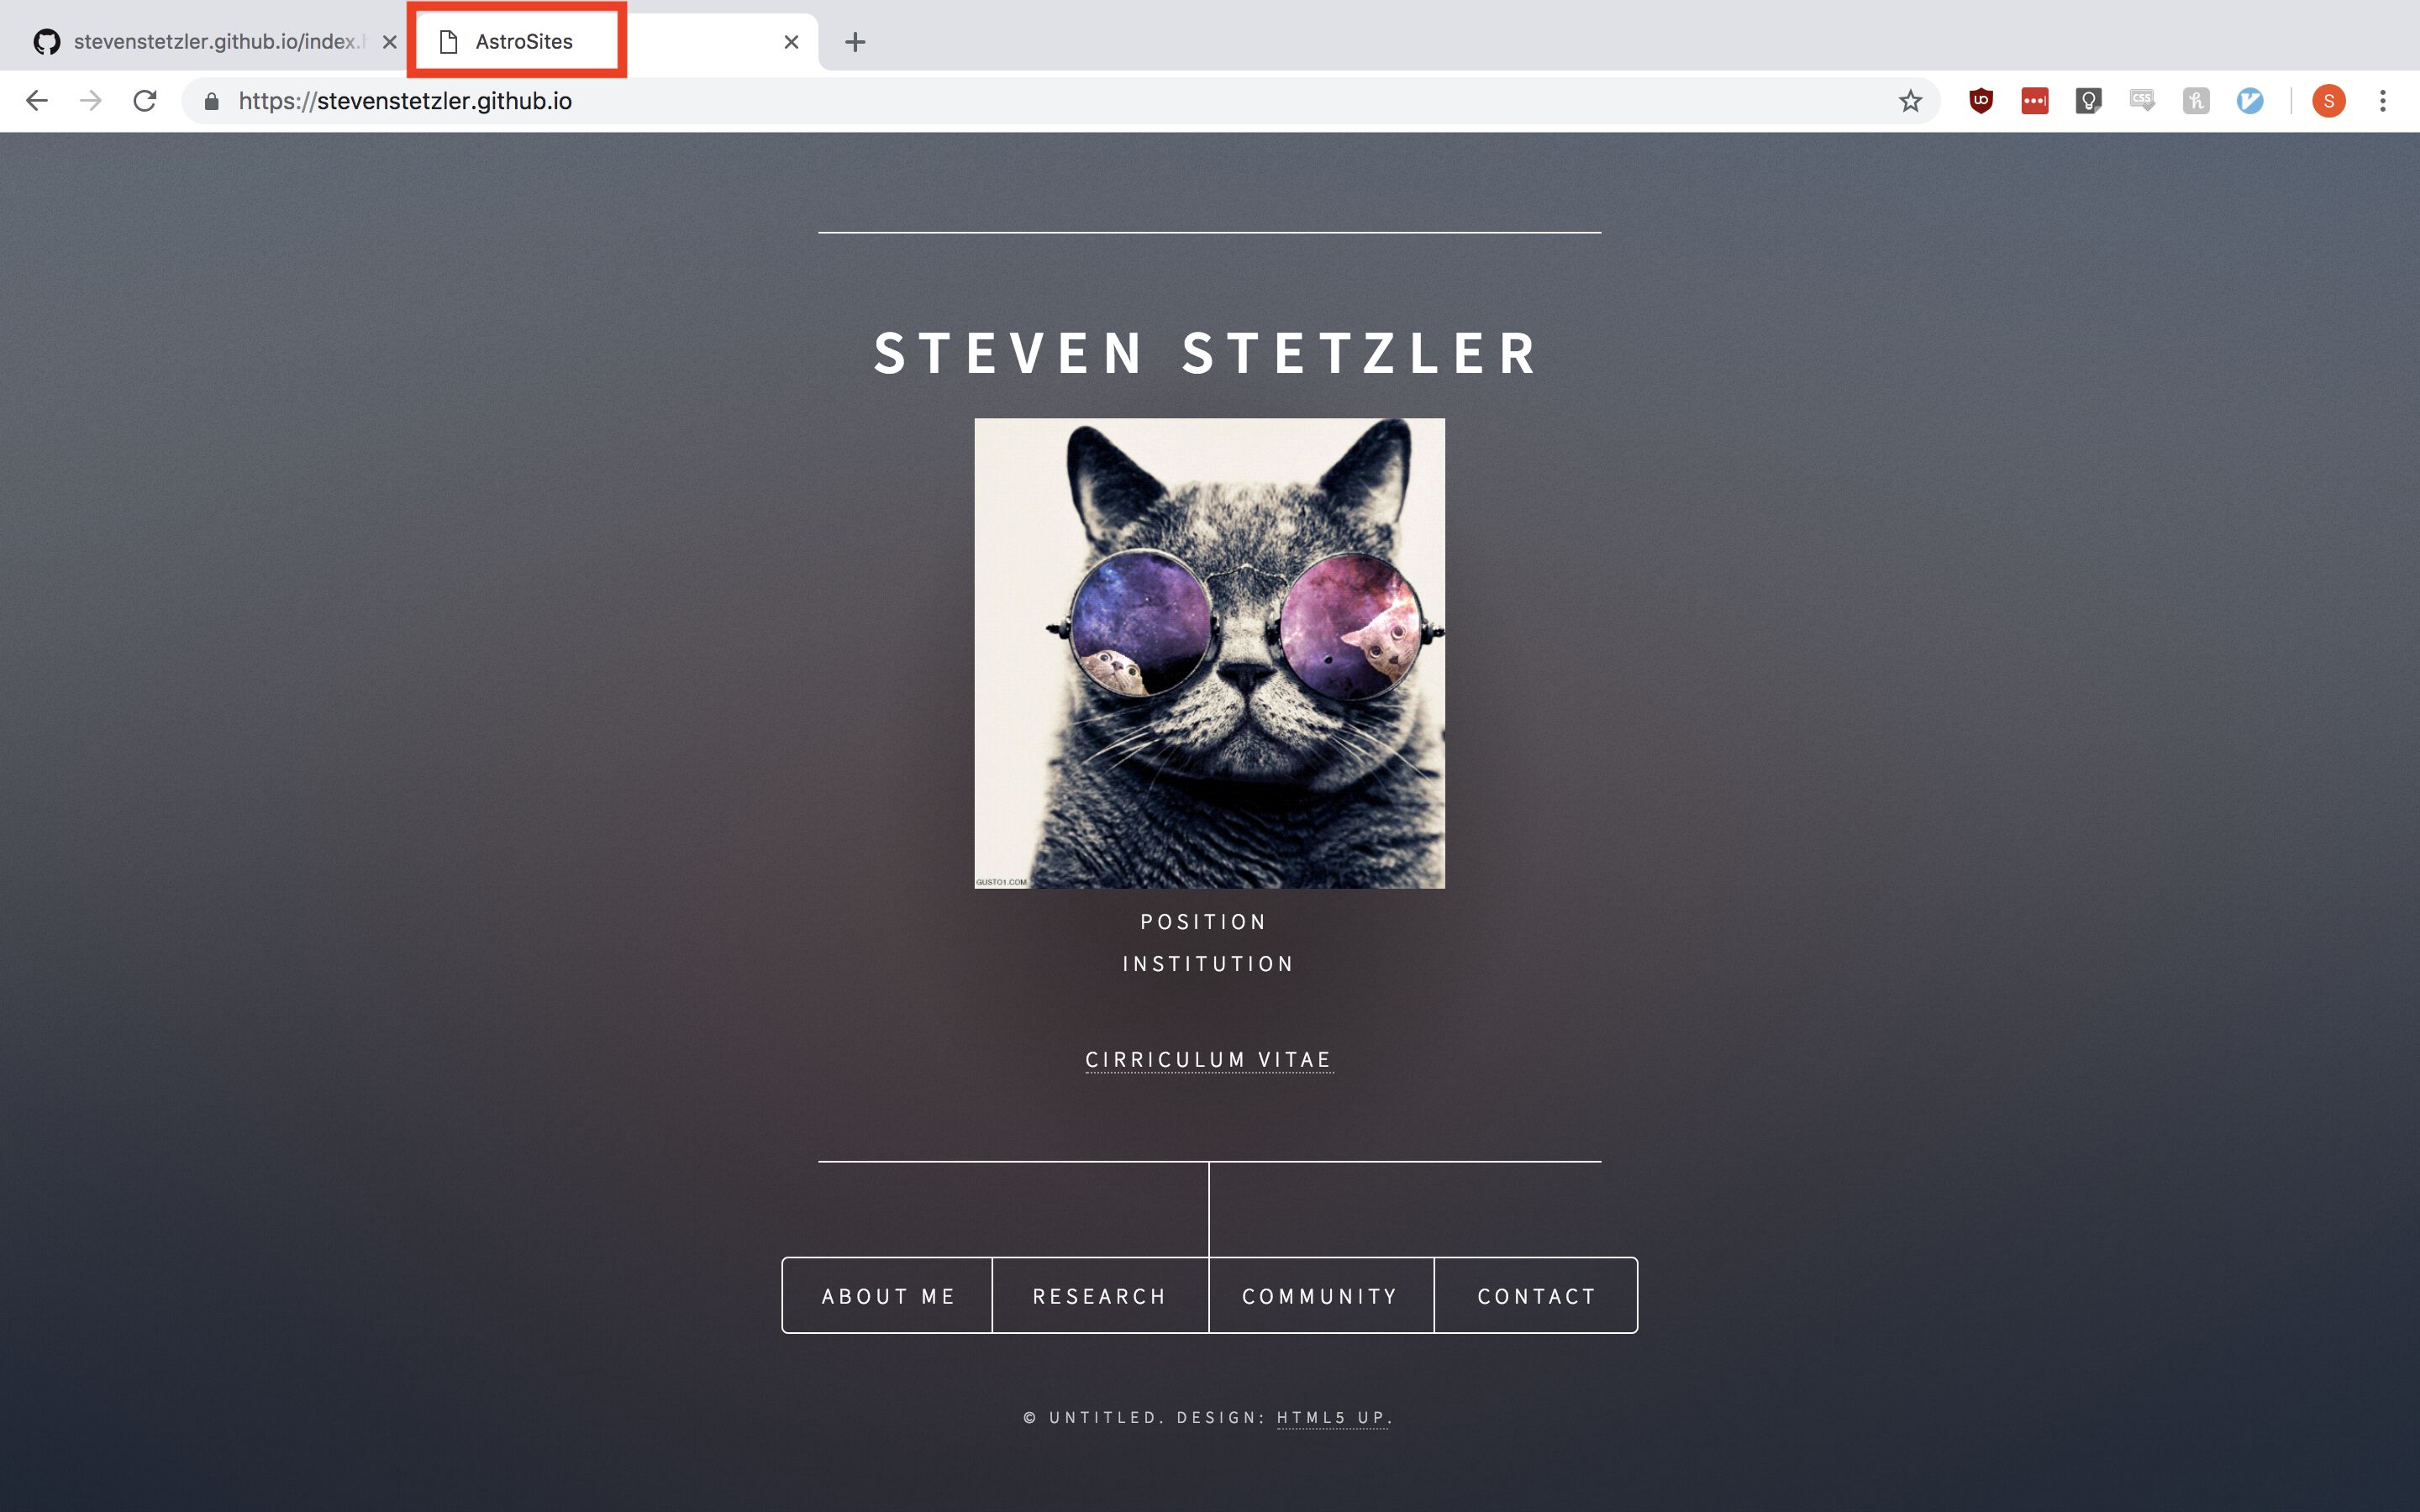
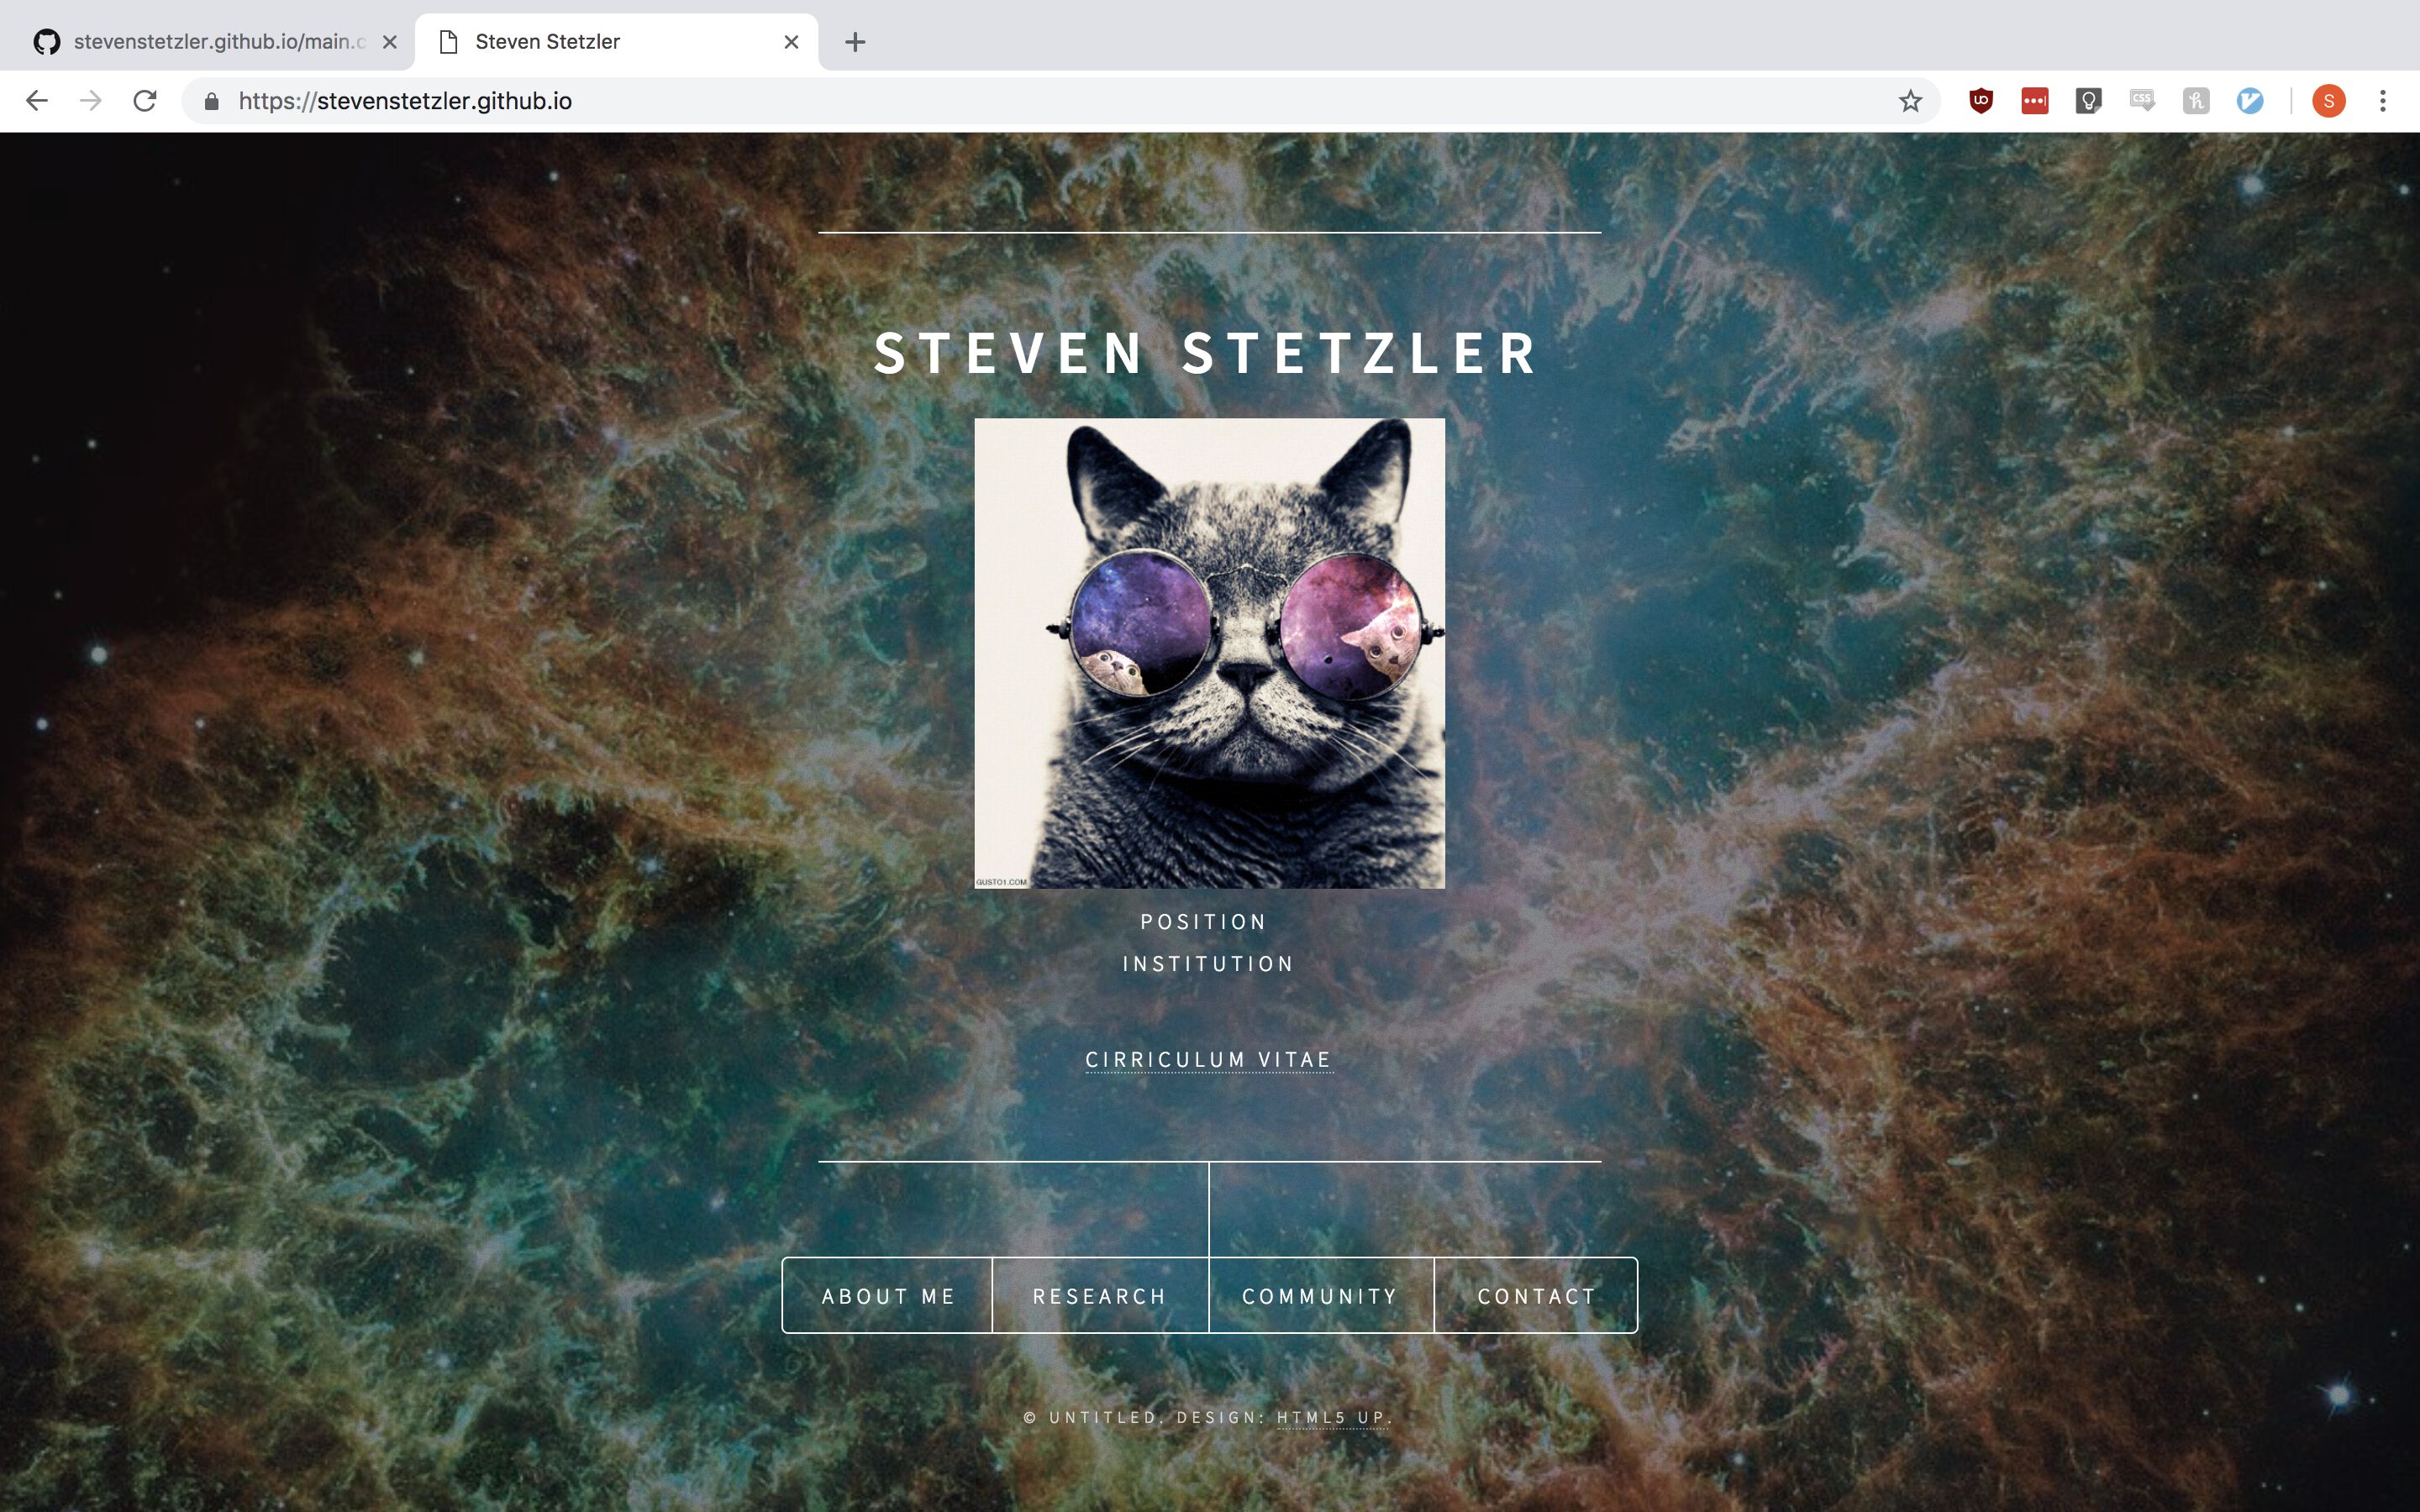
This template consists of two main portions. First, the home page, which is what you see in the previous image. The home page consists of a heading that displays your name, an image where you can put a headshot of yourself, space for you to put your position and institution or a short blurb about yourself, along with a navigation bar filled with buttons that navigate the user to different sections of the site.
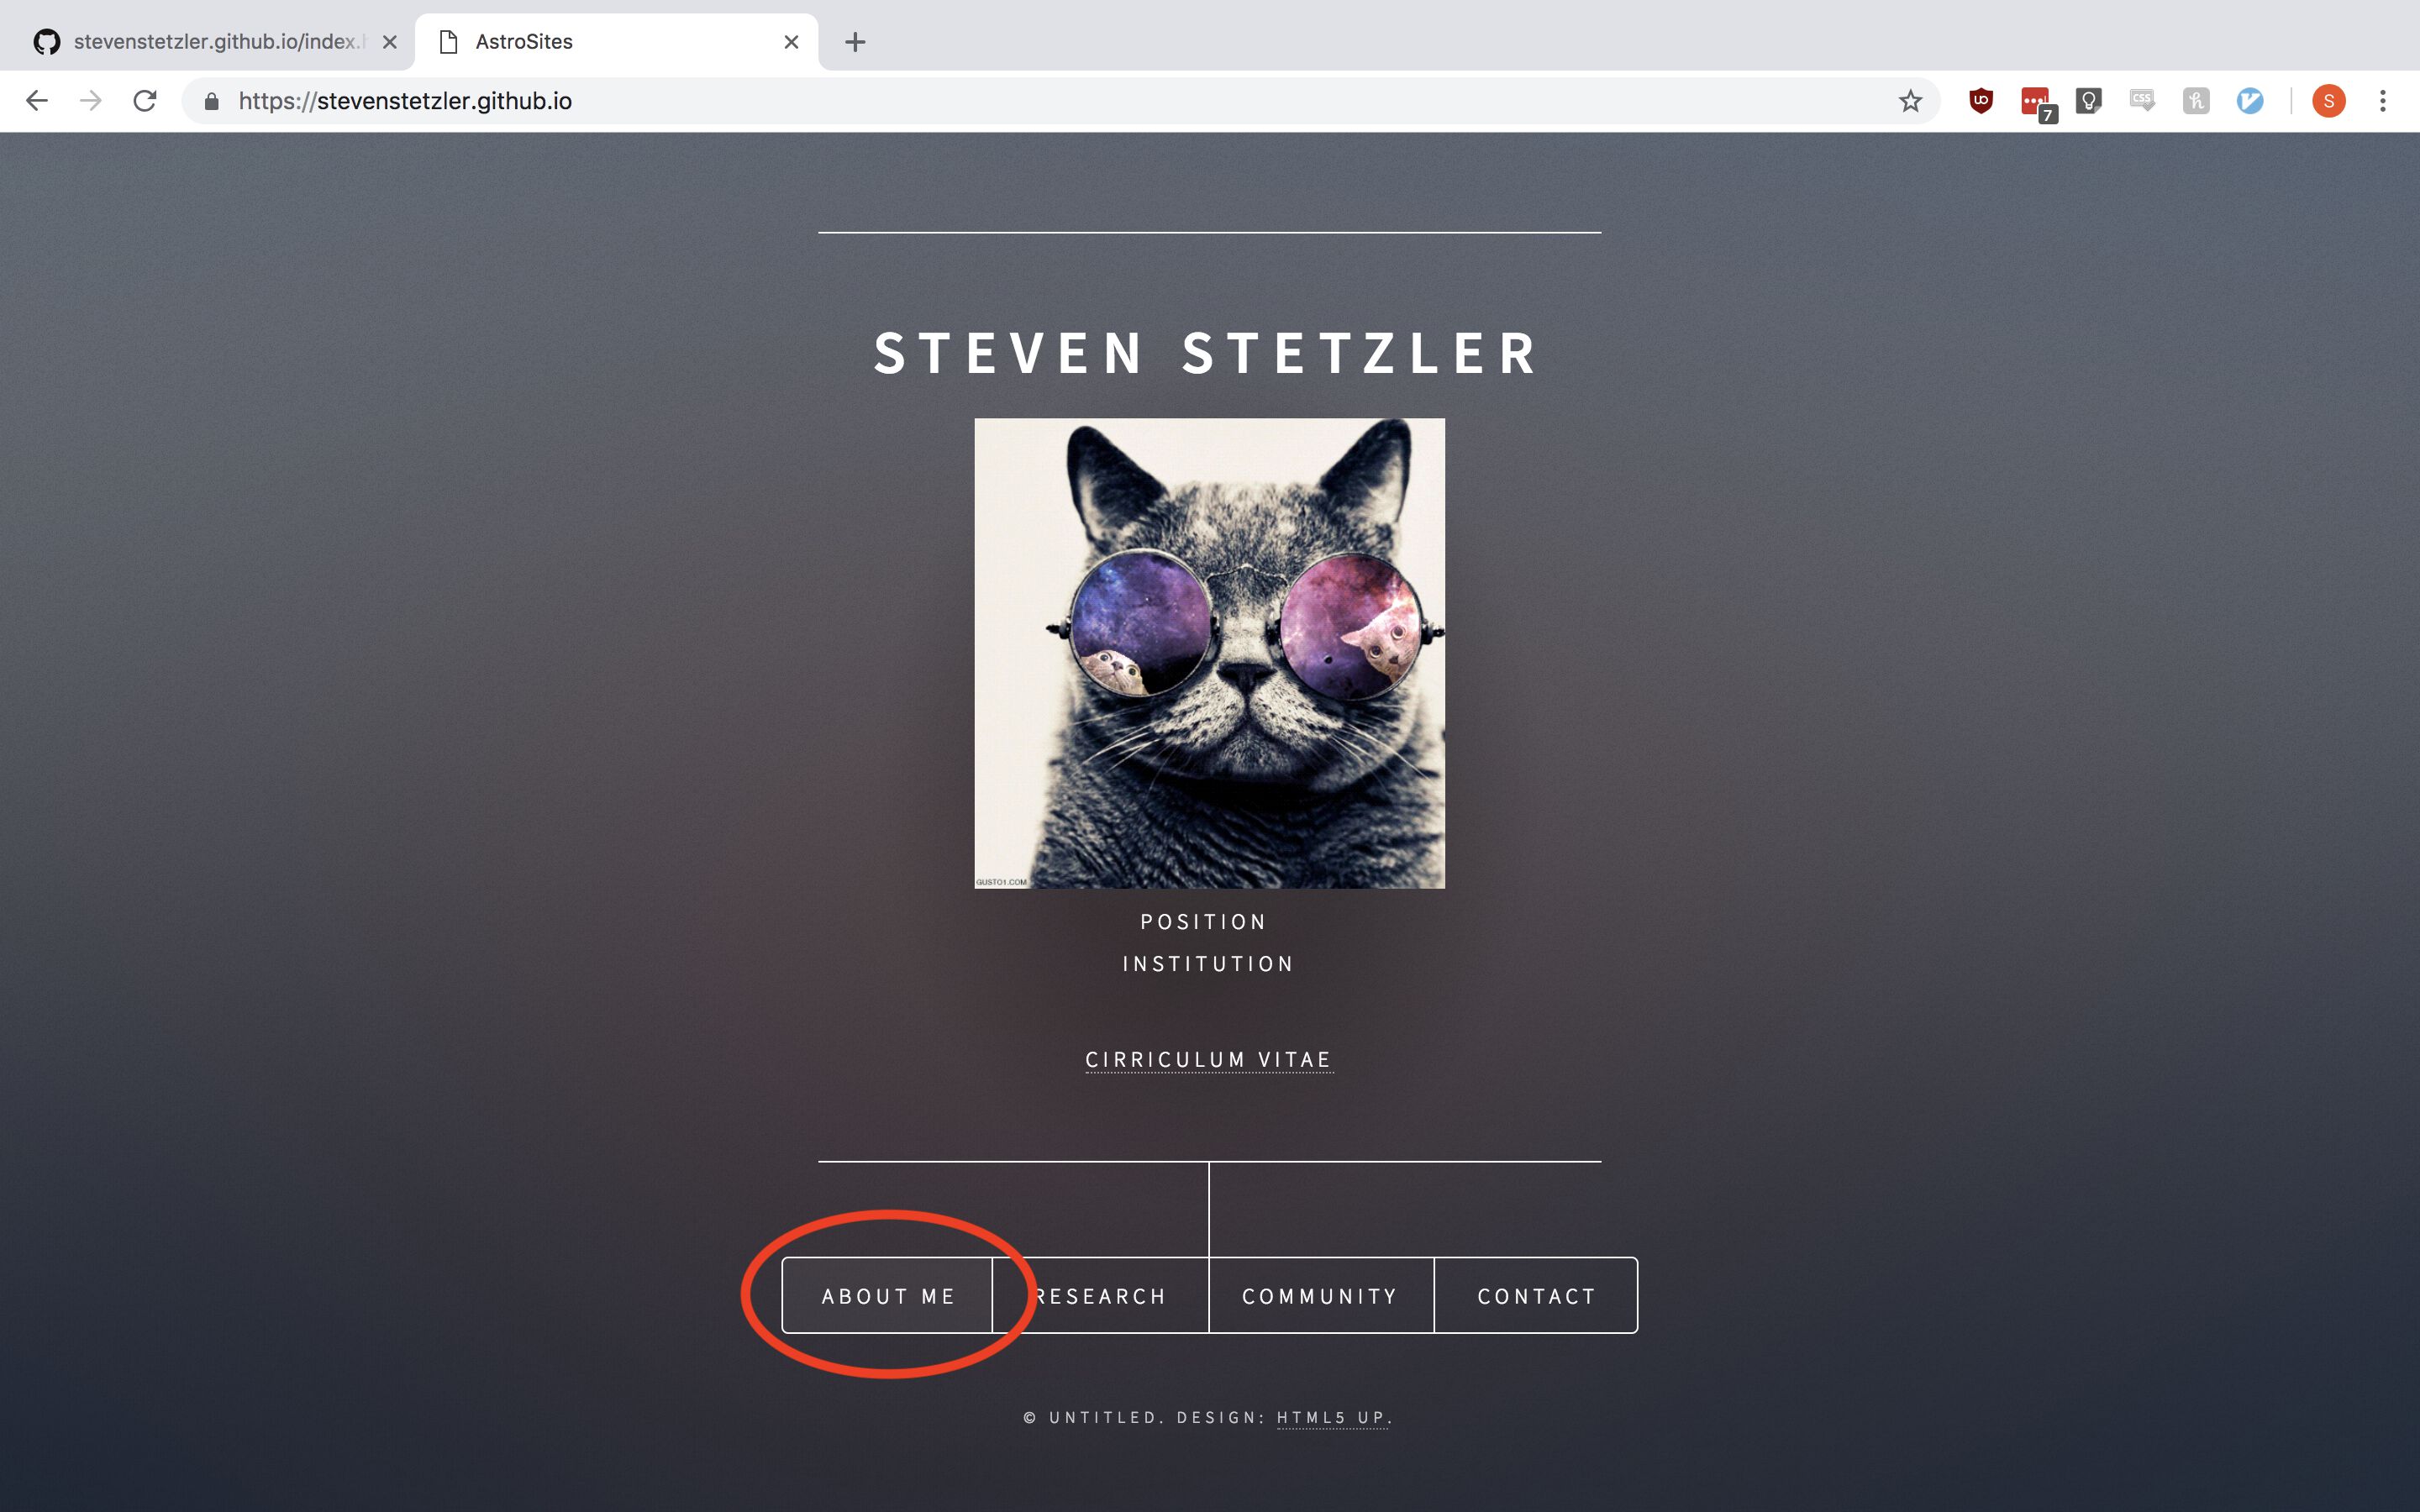
Each of the navigation buttons opens up a “card” within the window which provides the user with more information about you, your research, or anything else. Seen below is the website after clicking the “About Me” button:
Changing Names
The first thing we want to do is add our name to the site. To do this, we will use the Inspector tool in our web browser to identify which elements in the HTML control what we see displayed as “First Last”. Hover your mouse cursor over “First Last”, right-click, and select “Inspect”. Note that your inspection panel will look different depending on which browser you are using. However, all browsers should have this same functionality available. (For Safari, you must enable this feature by opening Preferences, navigating to the Advanced tab, and enabling “Show Develop menu in menu bar”. For more info see here.)
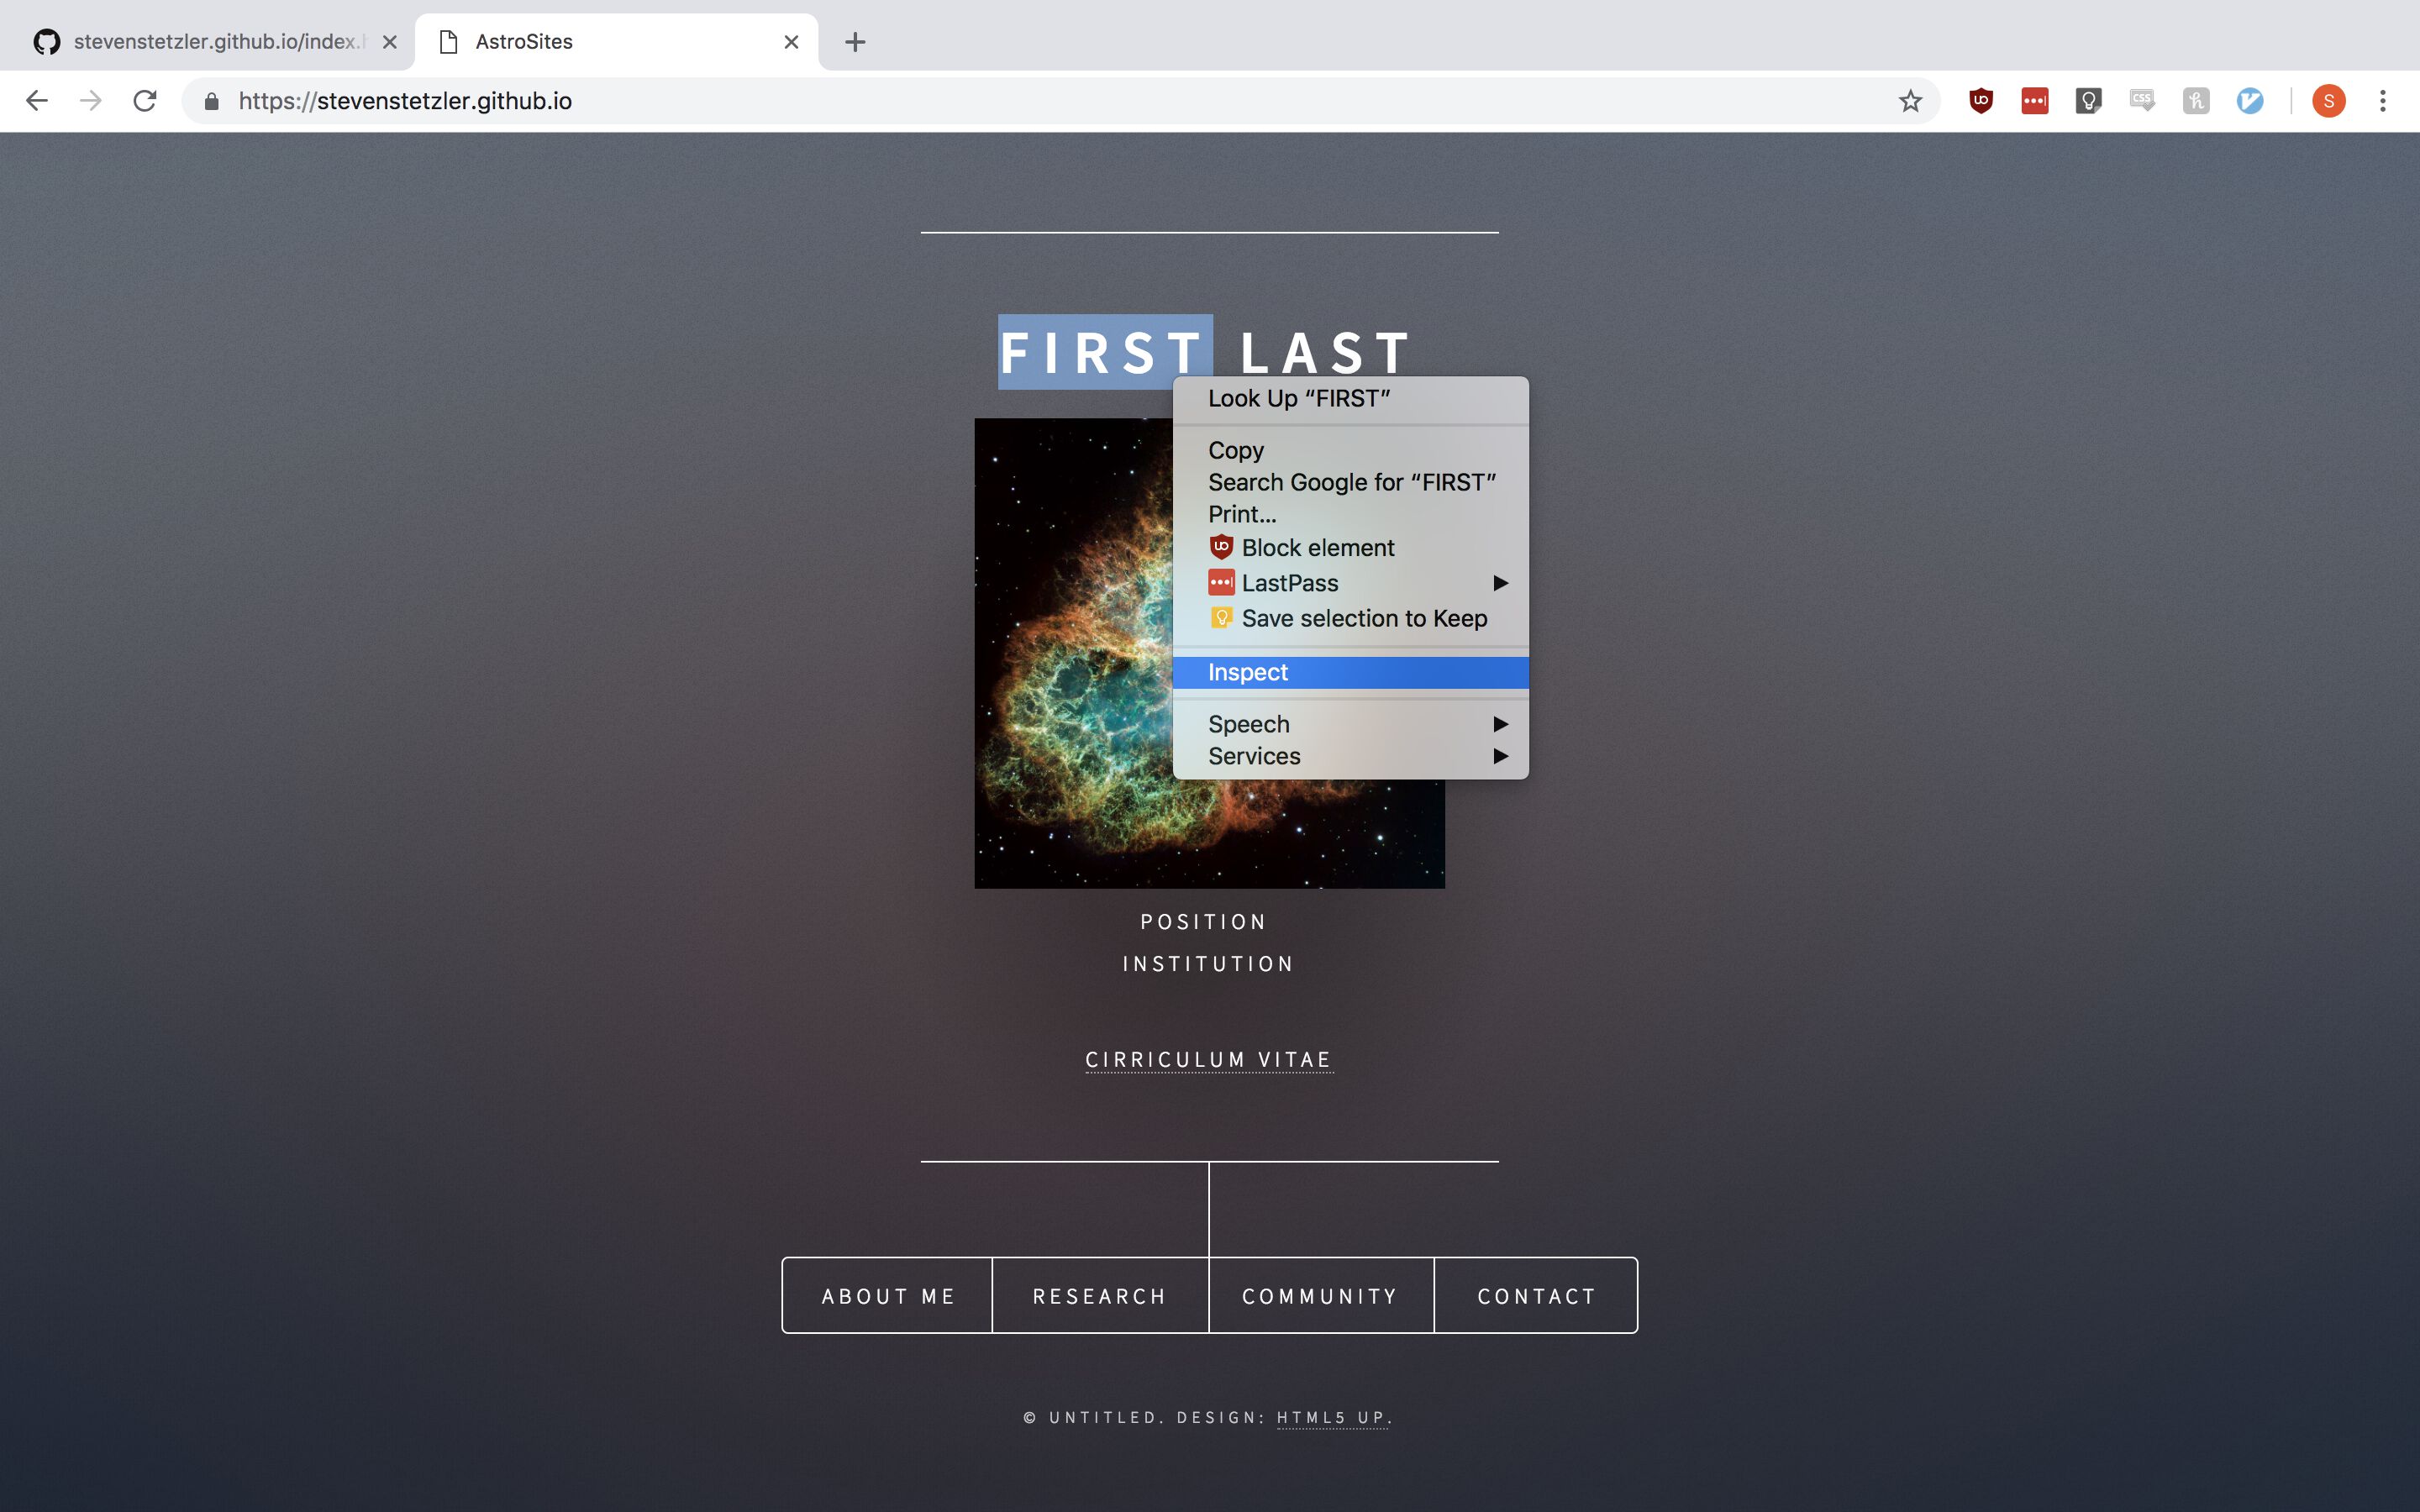
By observing what we see in the inspector, we can find the information in index.html that we should change to make our desired edits. We see that the “First Last” text is contained in <h1> tags which are children elements of <div class="inner"> and is followed by an <img> tag which contains the image we see displayed on the front page.

Use your mouse cursor (or arrow keys) to click on the different elements inside the inspector (for example the parent <div class="inner"> element and the <img> following it>) surrounding the “First Last” heading to see how selecting elements in the inspector on the right will show you visually where those elements appear on the page on the left.

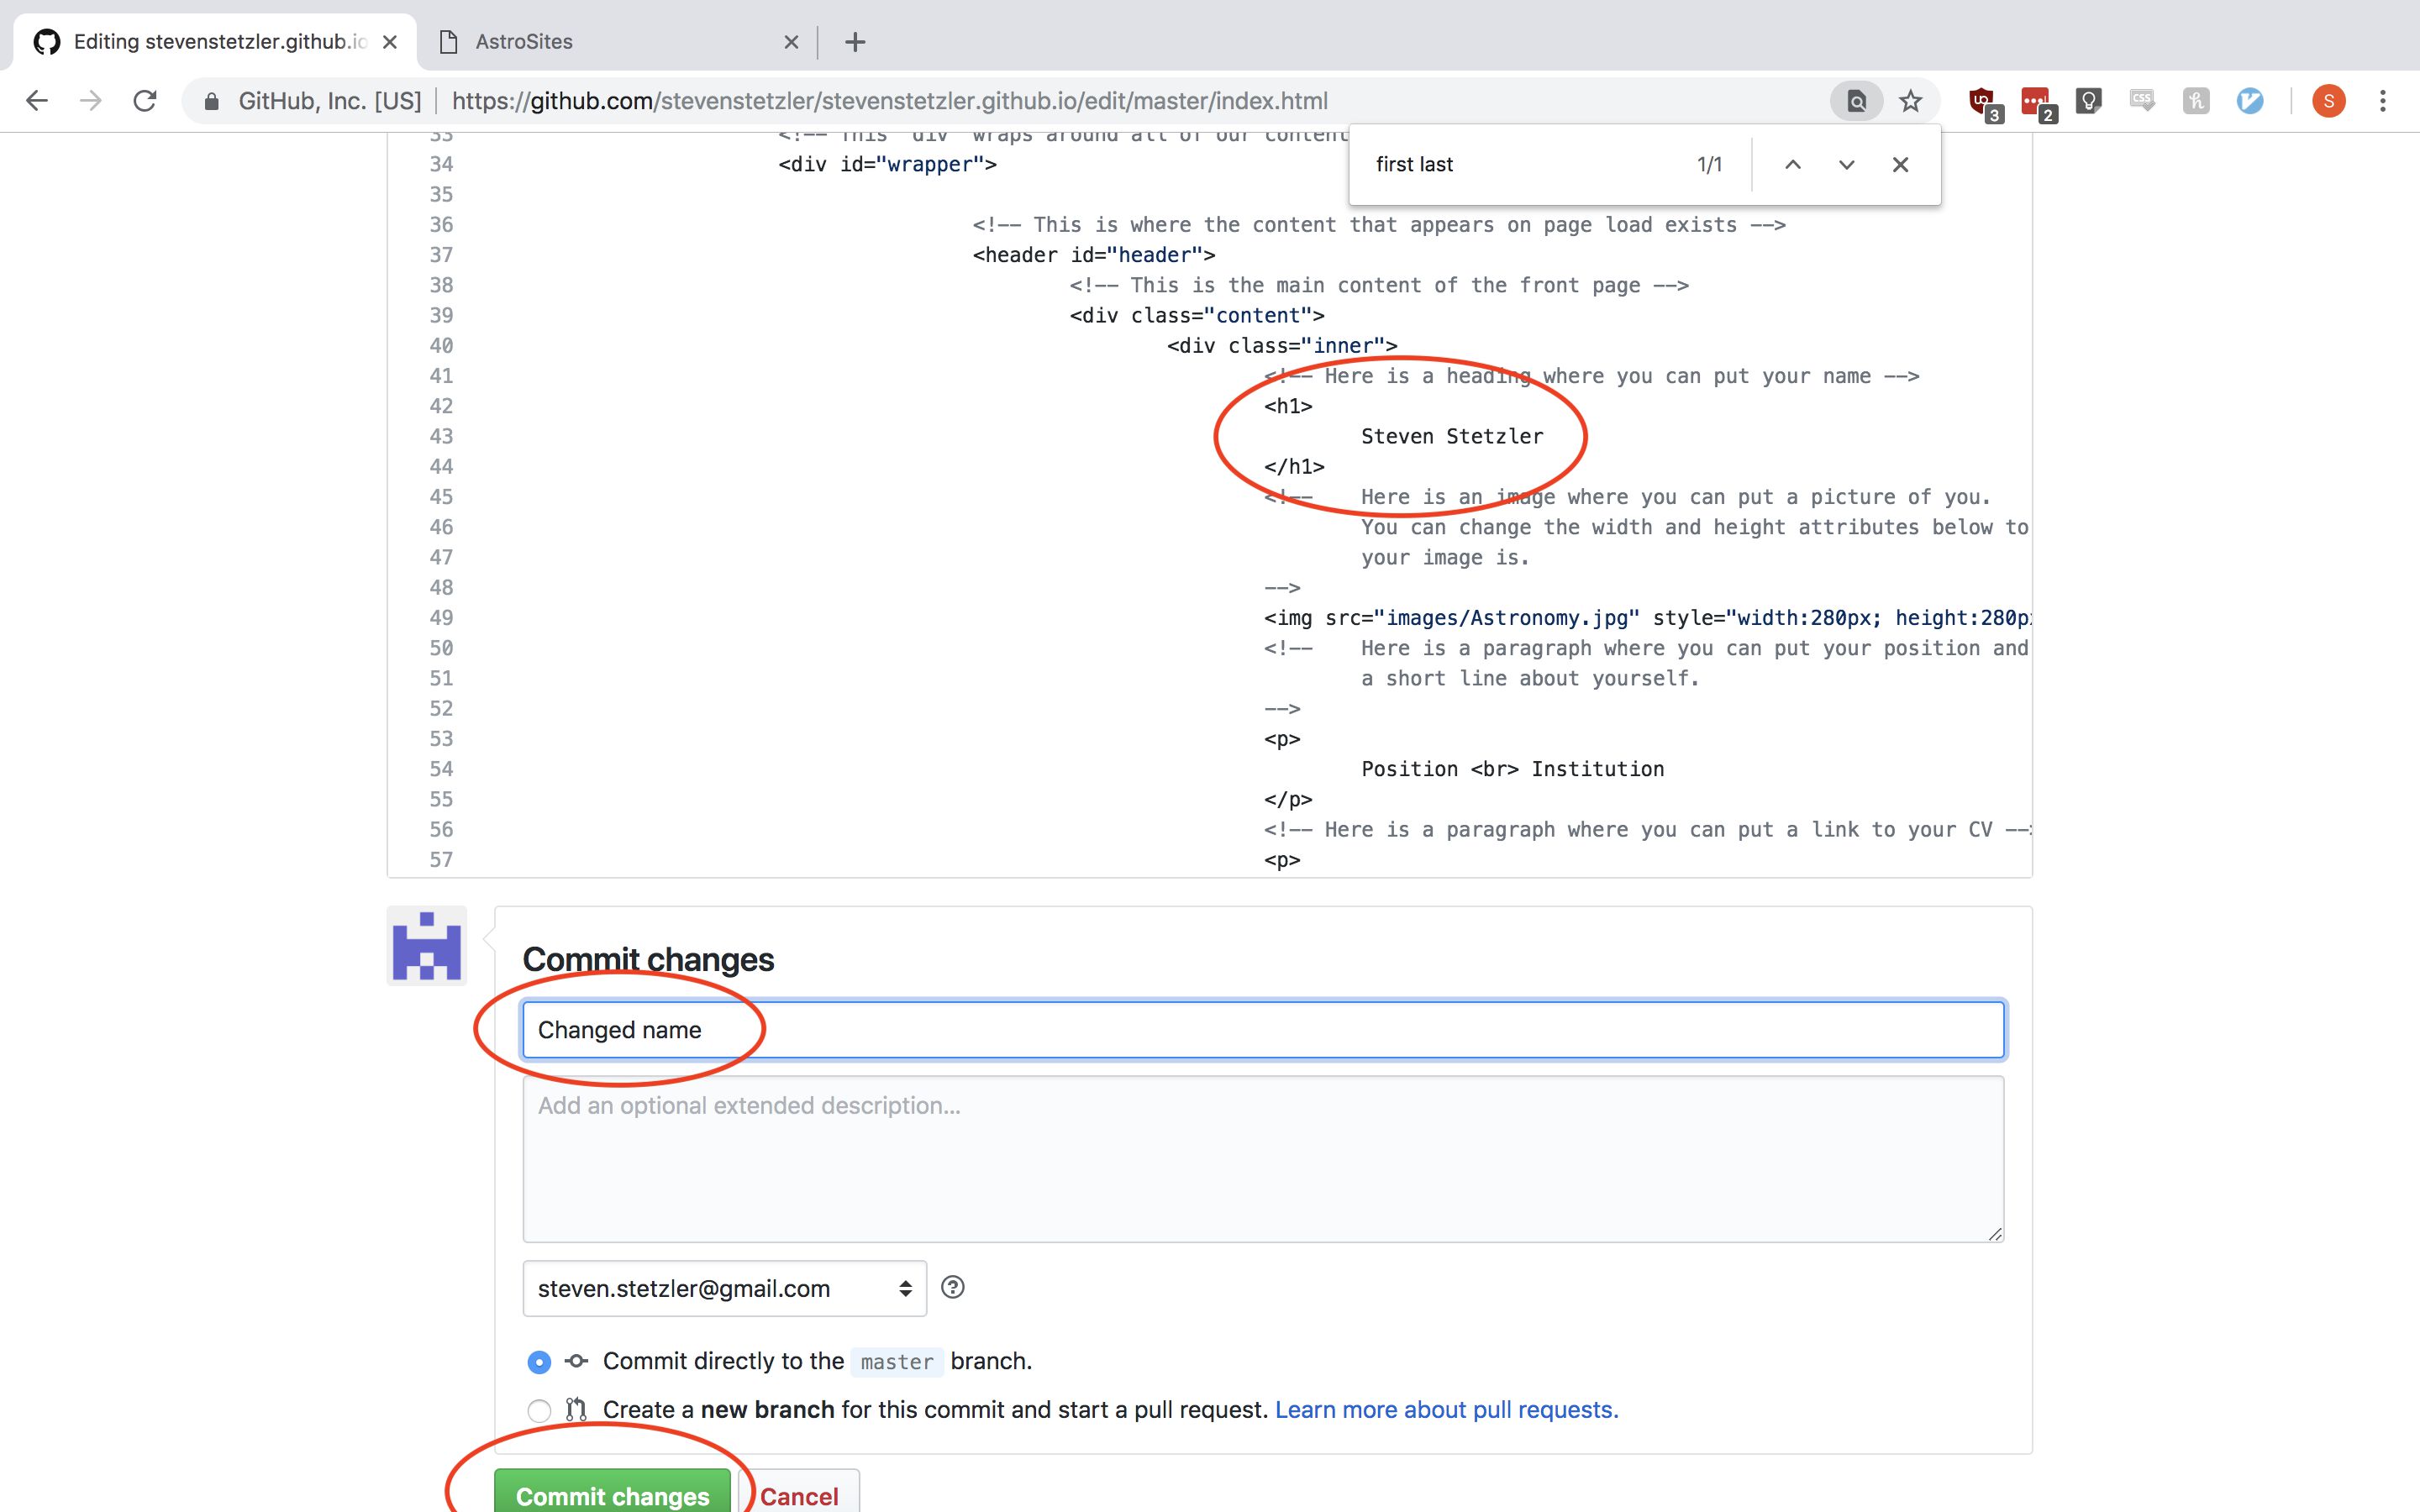
Going back to GitHub, we can now find and edit the “First Last” text. Use Ctrl-F or Command-F to perform a descriptive search of the element we are looking for. For example, you can search for “First Last”, or “<div class="inner">” to find what you are looking for in the page. Once you find the text, change it to your name. When you are done making your edits, scroll to the bottom of the page and “commit” your changes. In the first text box, put a descriptive summary of the changes you’ve made and click “Commit changes”.
If you refresh your website at https://your-github-name.github.io, you should see your site with the updates you’ve made. If you don’t see your updates, wait a minute and then refresh again. To speed up the process, try doing a “force reload” on the page, usually Ctrl-Shift-R or Command-Shift-R. This bypasses your browser’s automatic caching sytem and grabs all the content from their original source. (You can also try disabling caching in your browser, which will vary between browsers.)
Changing Images
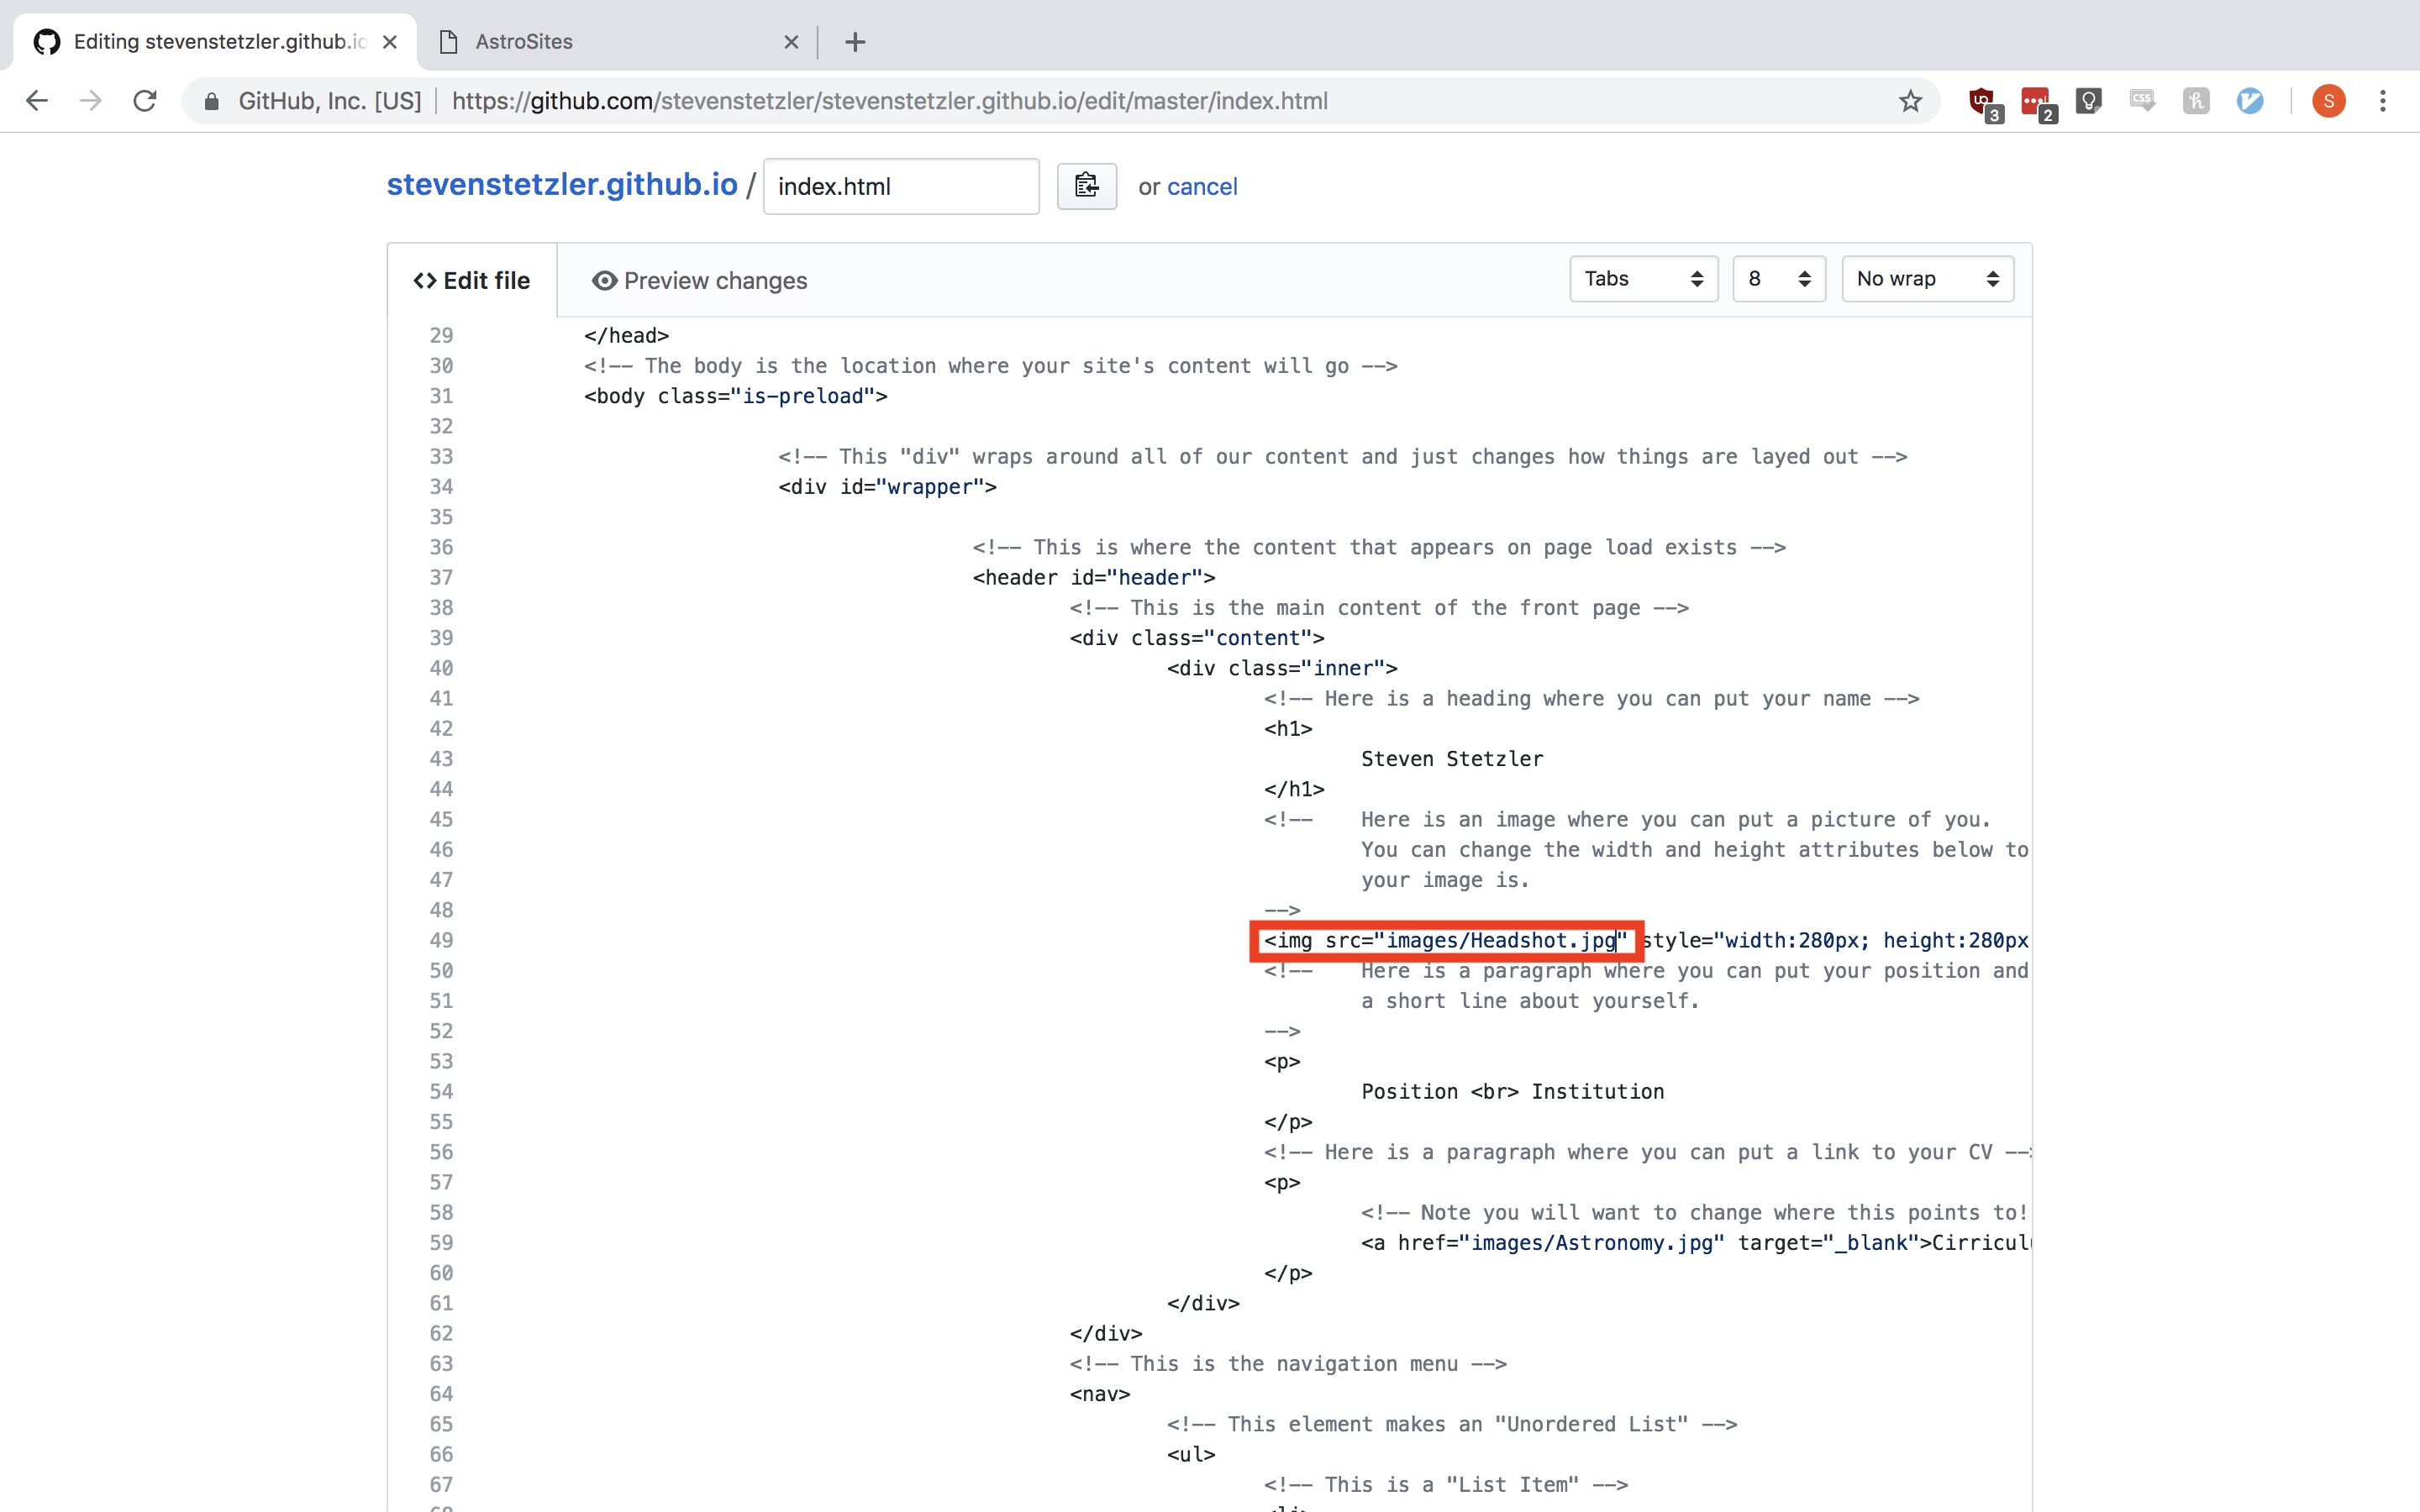
Next, we will add a photo of ourselves to our page. Again, to find where to edit the index.html file, we’ll right click on the image on the front page and use the Inspector to examine the image.

We can see the image is created with the element <img src="images/Astronomy.jpg" style="width:280px; height:280px; object-fit: cover;">. The src="images/Astronomy.jpg" tells the browser to grab the image called Astronomy.jpg located in the images directory of your repository. Note that you can also use any URL here. For example, we can grab this nice photo from Wikipedia and use it instead: <img src="https://upload.wikimedia.org/wikipedia/commons/6/62/Starsinthesky.jpg">. The style="width:280px; height:280px; object-fit: cover;" is some CSS that tells the browser to make the image 280 pixels wide, 280 pixels high, and to crop the image (object-fit: cover) instead of stretching it when resizing. Next, we will upload our own image to use to the images directory of our repository and change the HTML to point to that image instead of the one provided.
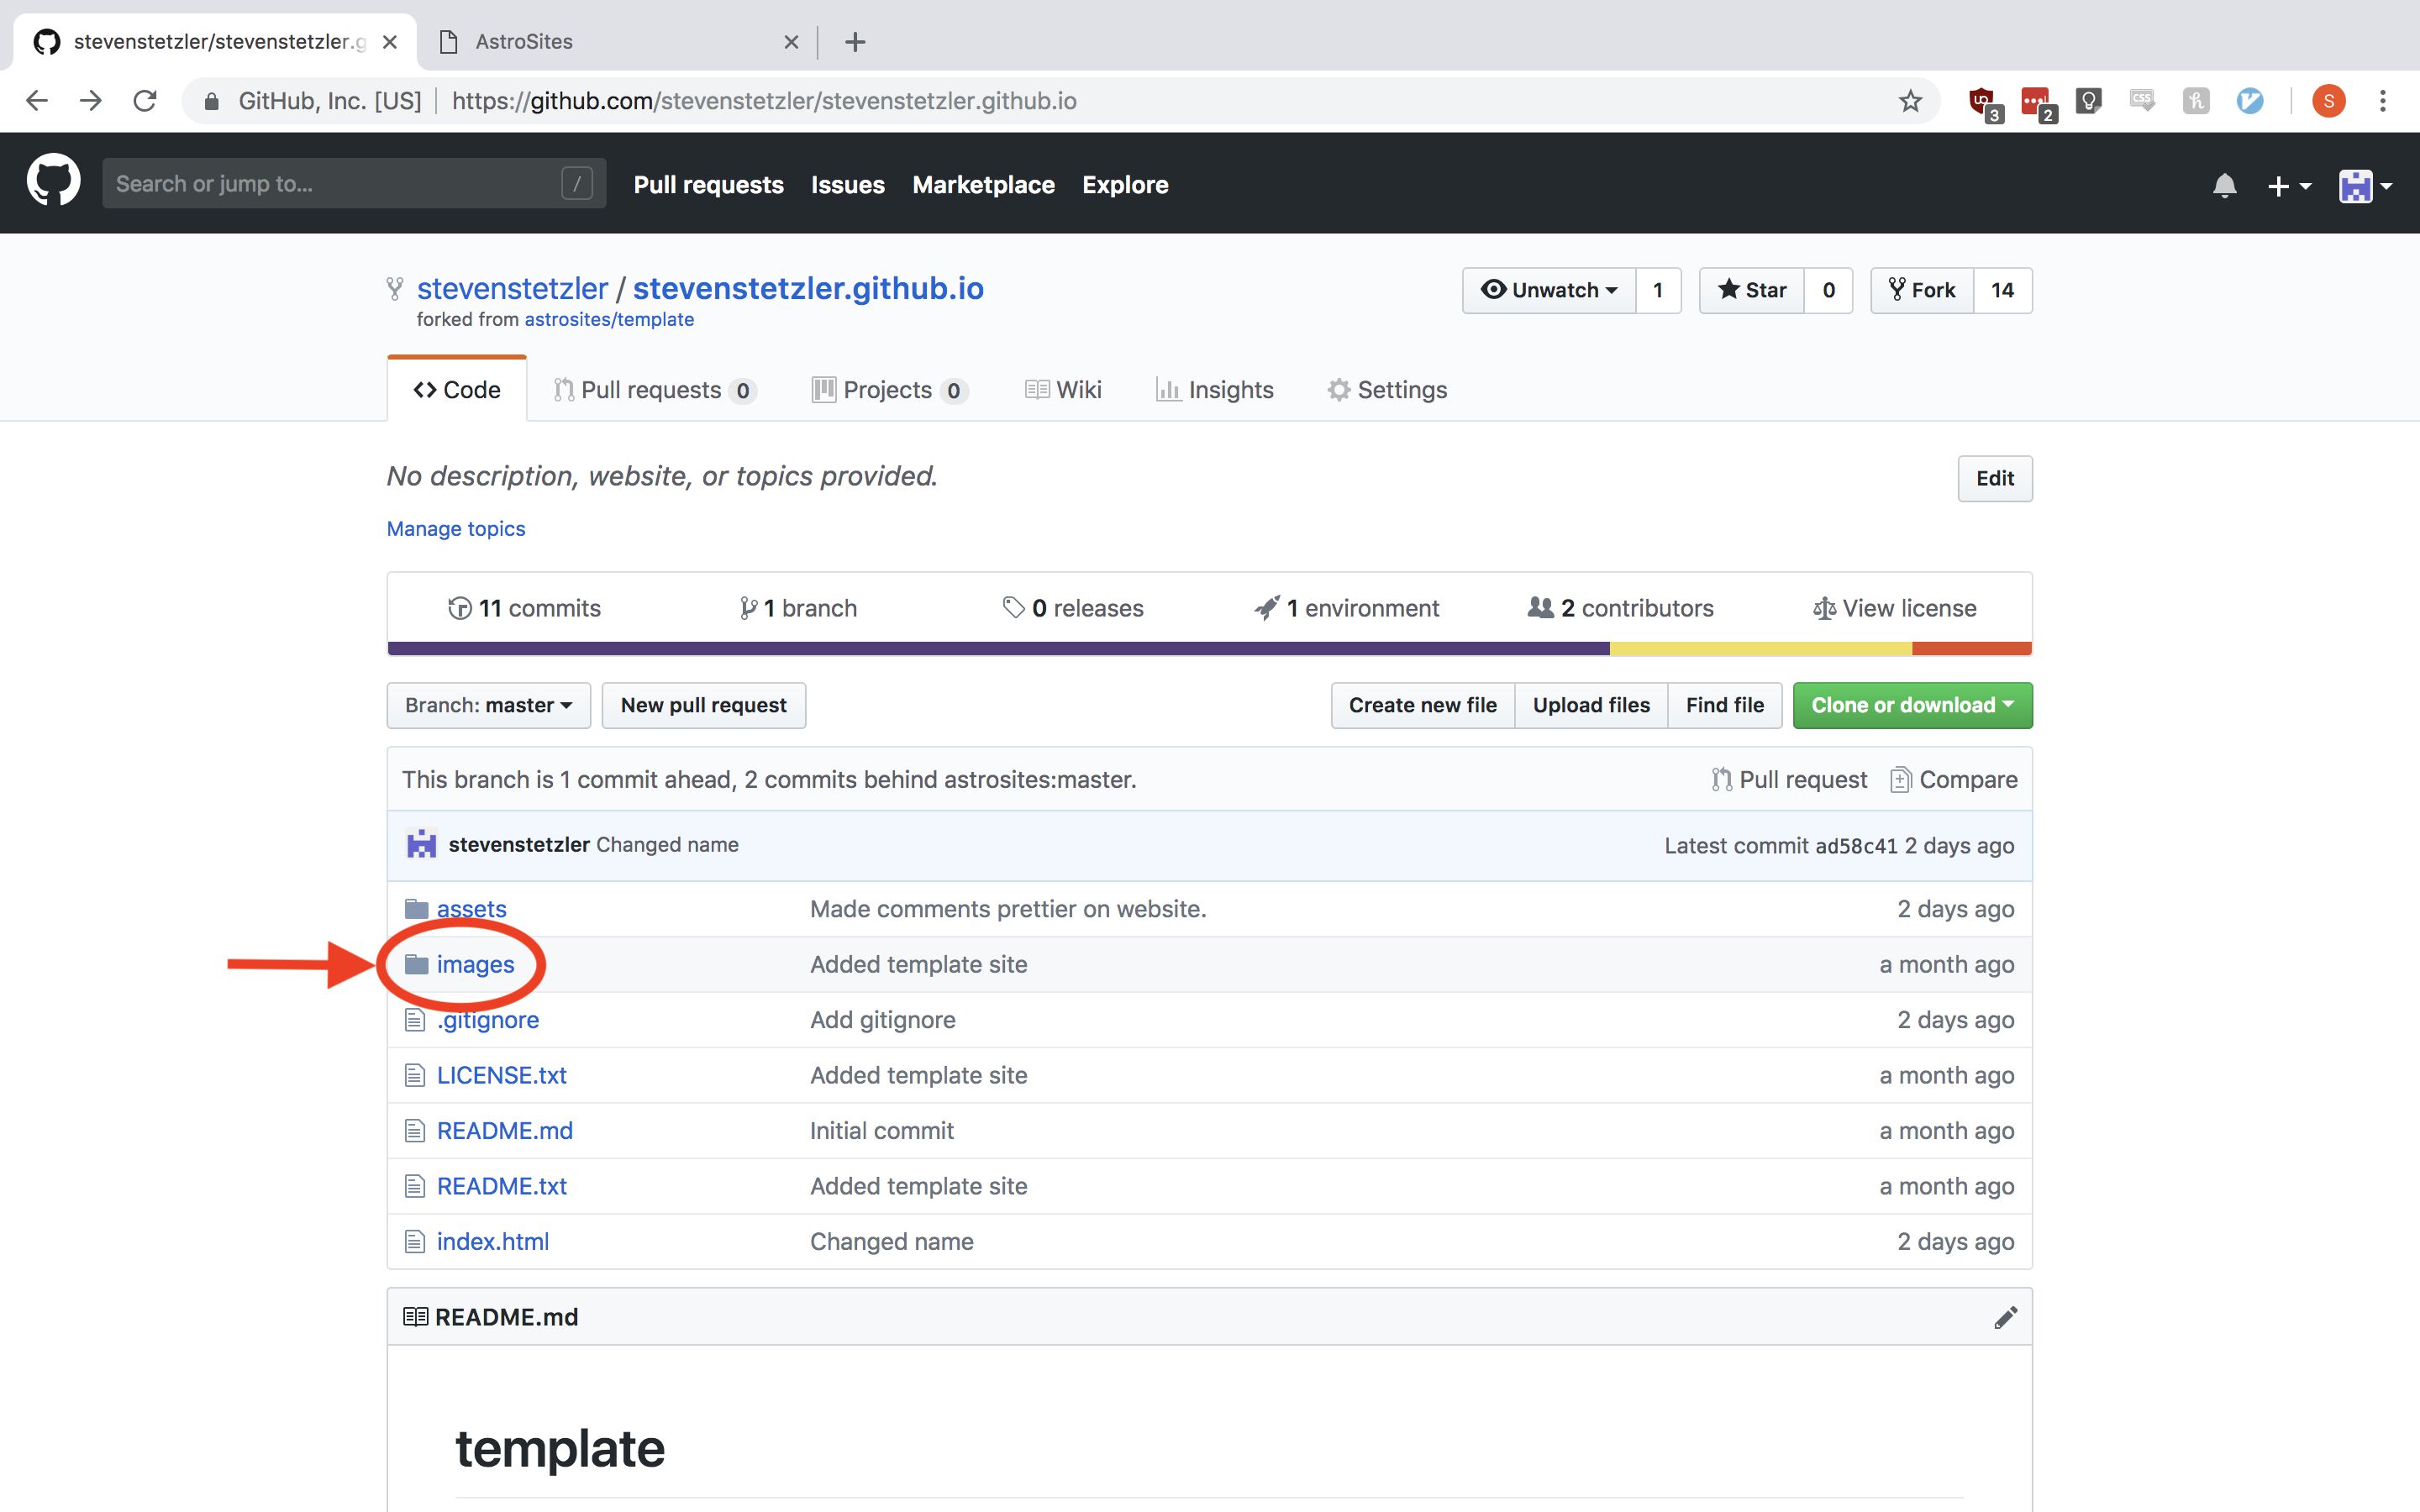
First, gather an image that you want to use as your headshot (or replacement photo) and take note of its filename. Our photo will be called Headshot.jpg, and you should replace instances of that name below with the name of your file. Next, on the main page of your site repository, click on the images folder:
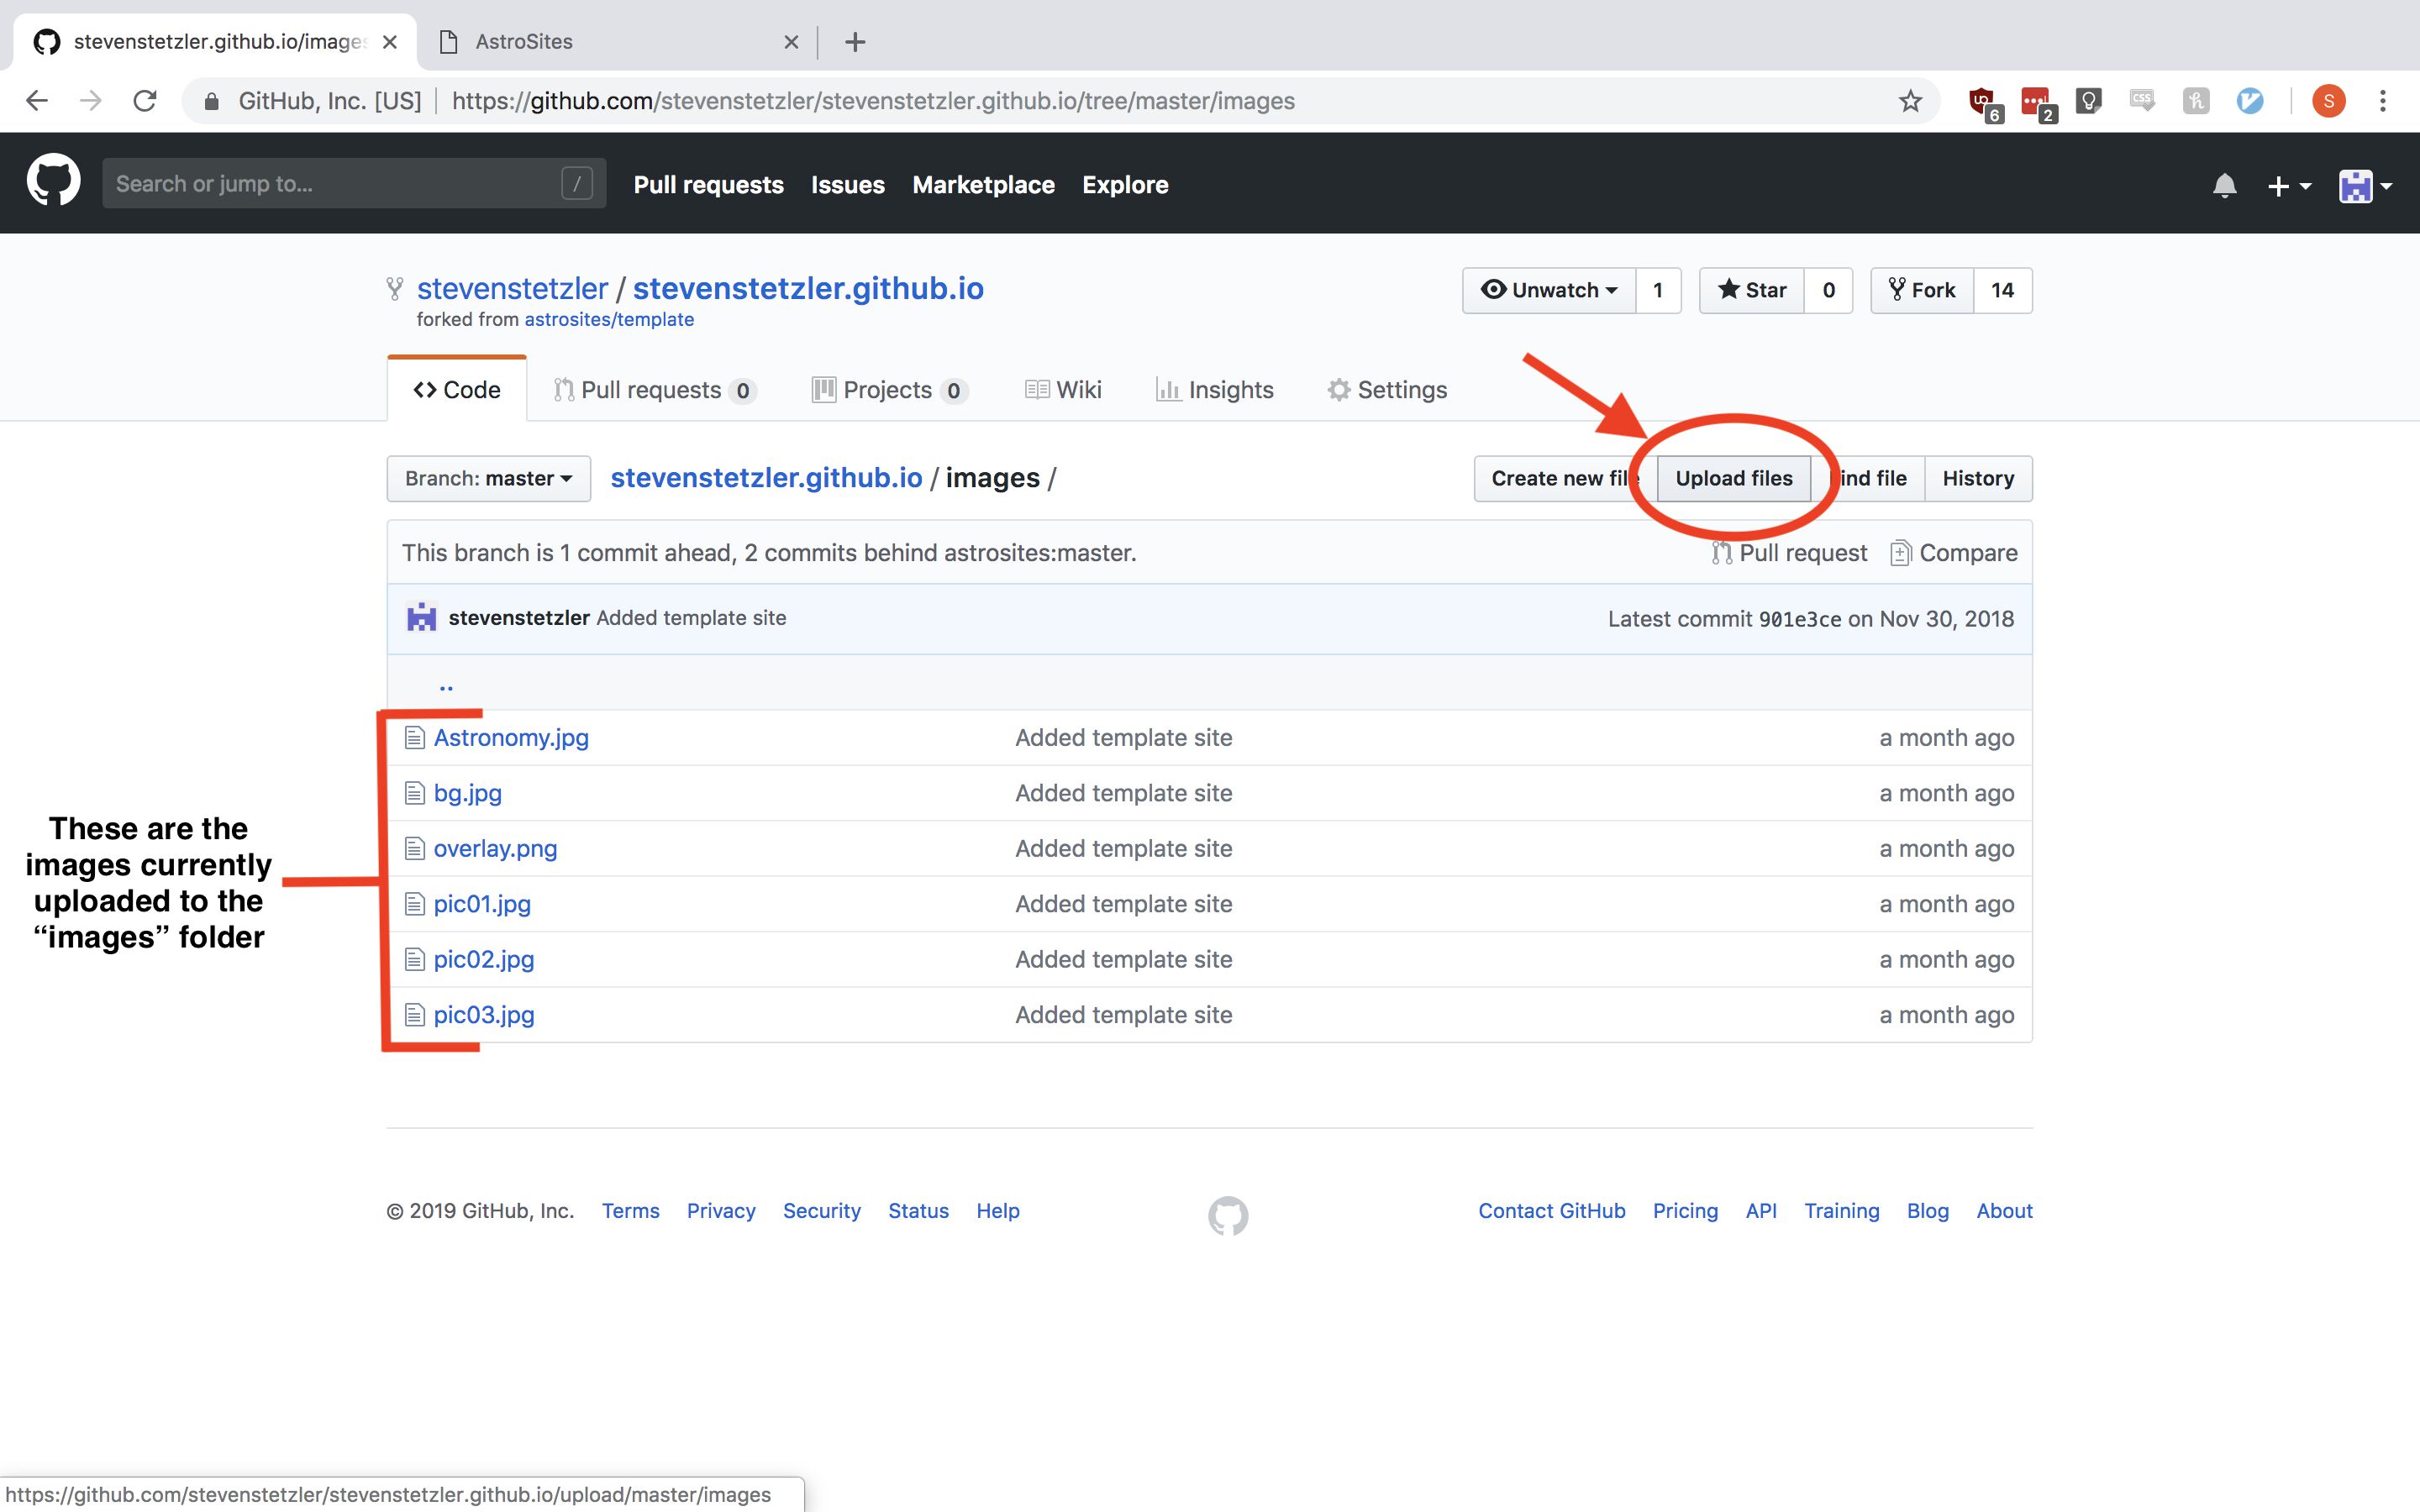
Next, click on the “Upload files” button.
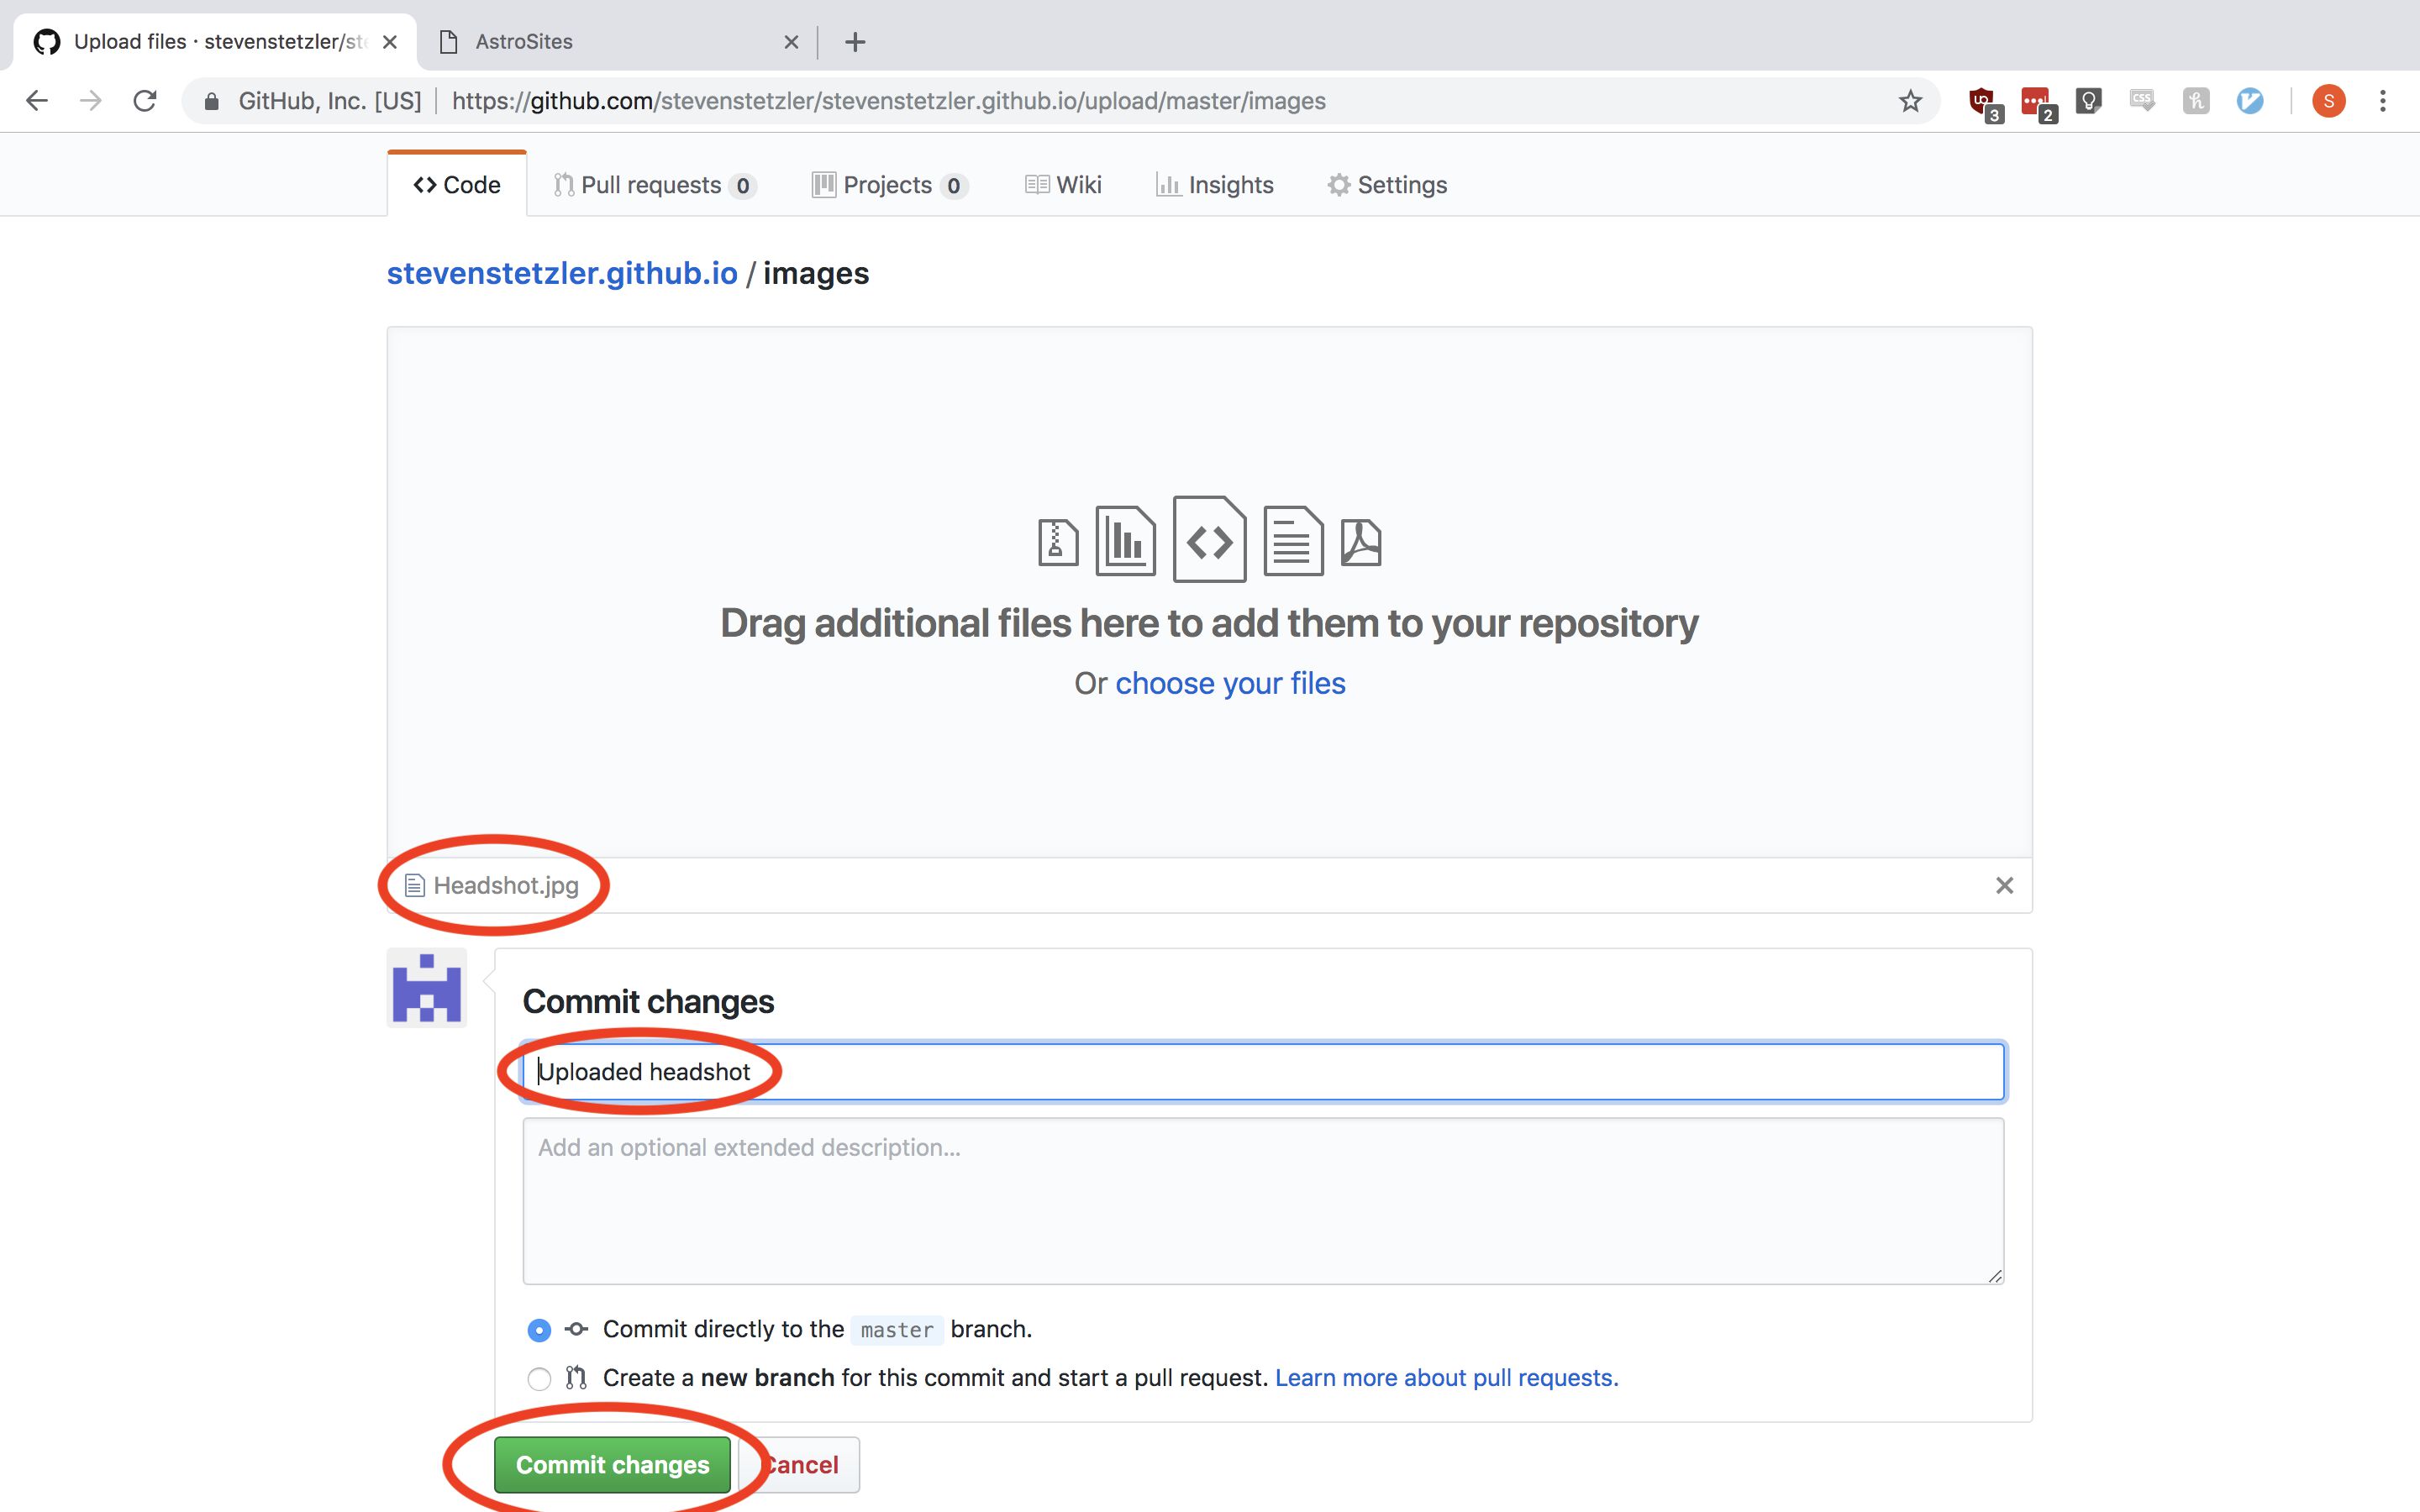
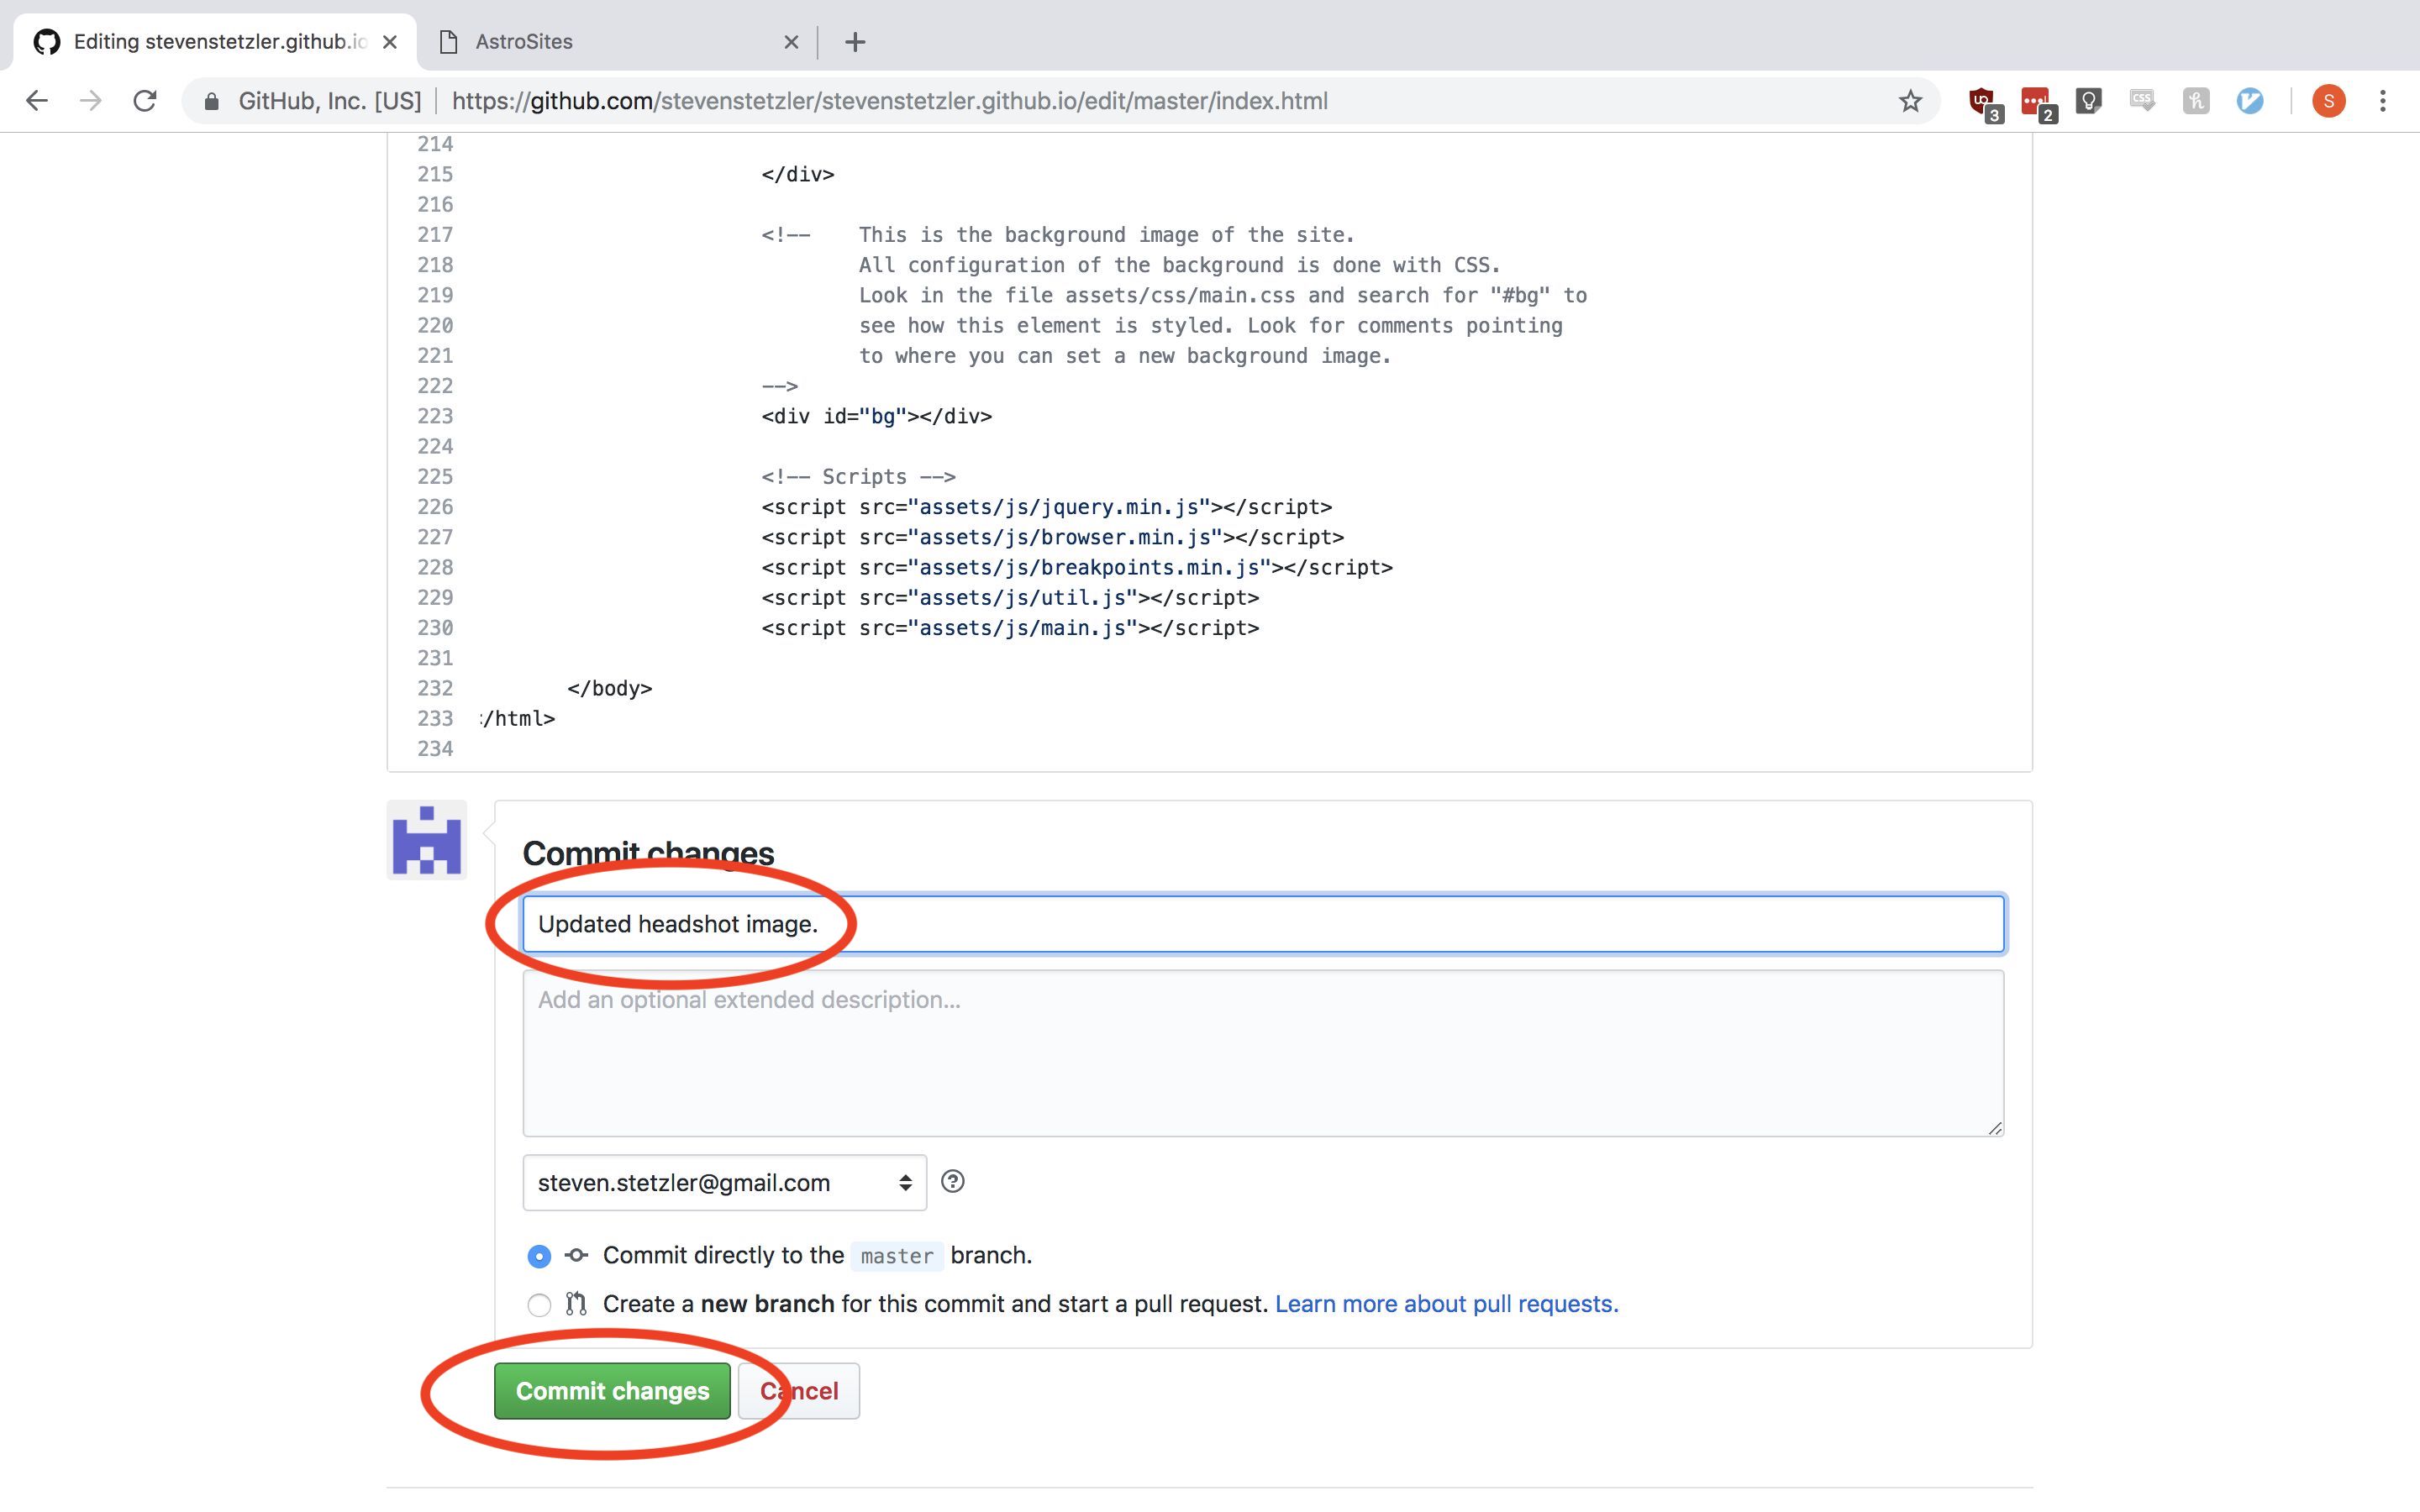
Either drag your photo into the area specified or click the upload area and use the window that pops up to navigate to and upload your photo. Provide a descriptive summary of your change in the “Commit changes” section. Click the “Commit changes” button to finish uploading your file.
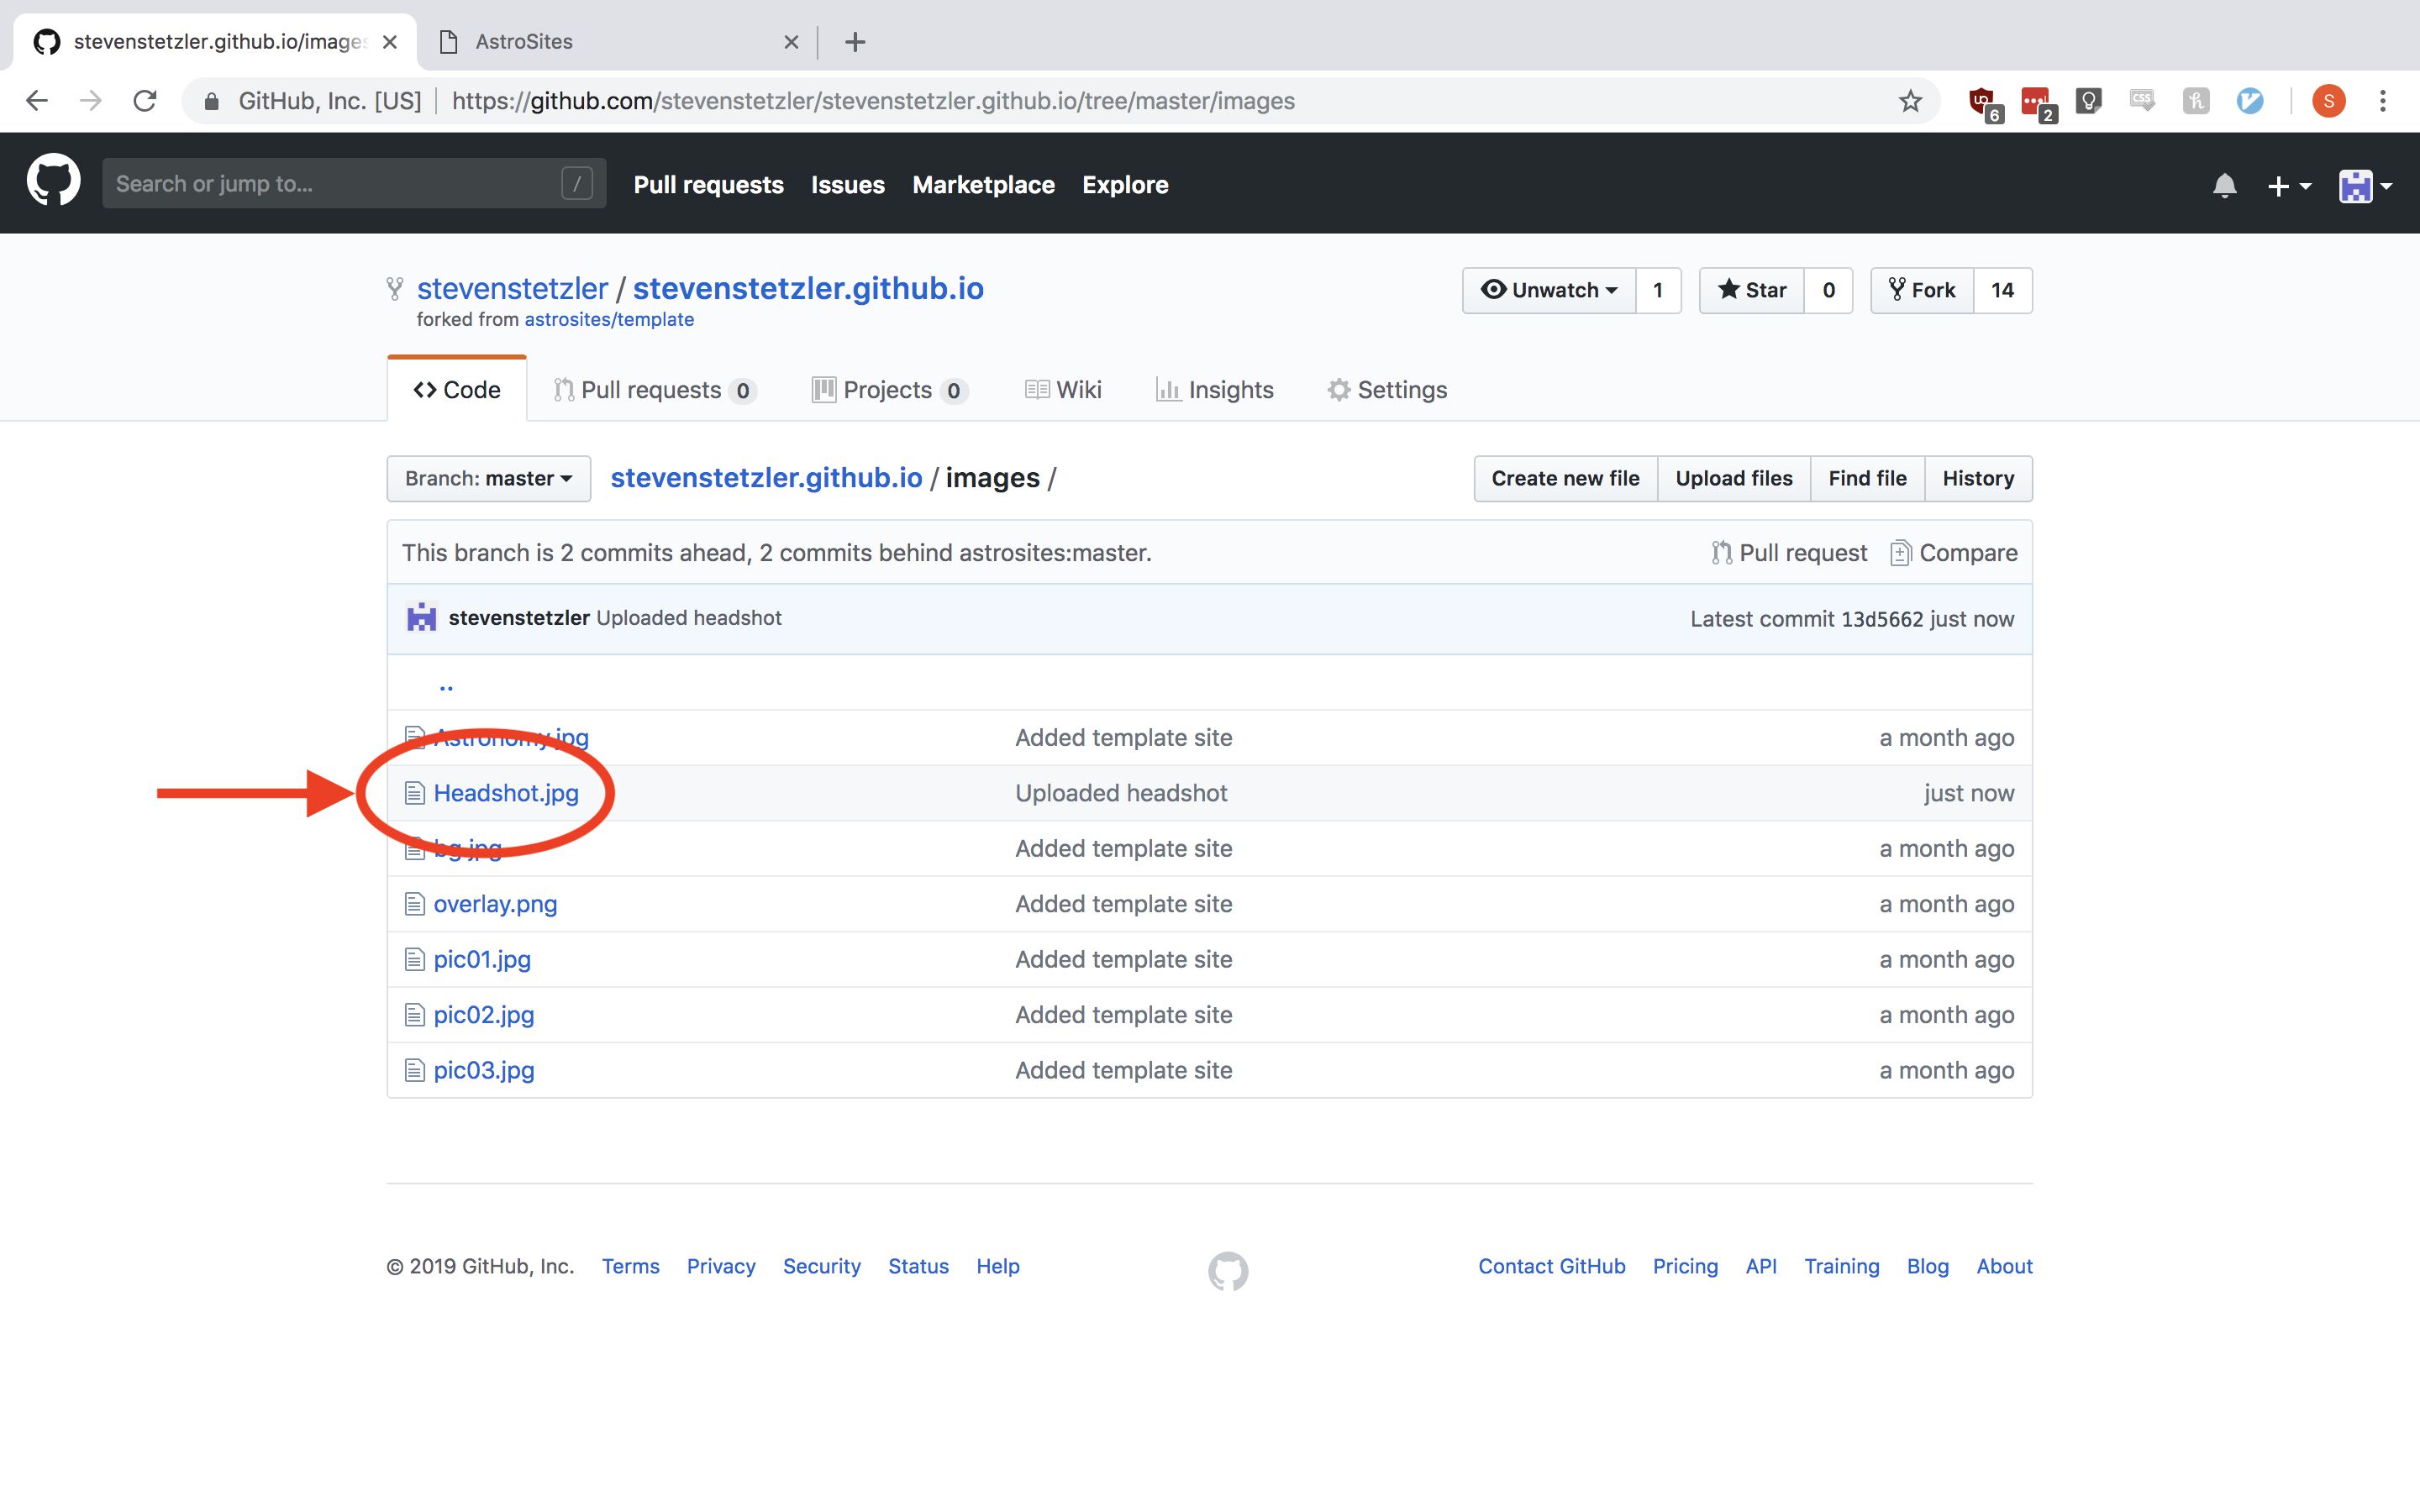
Navigate back to the images folder in your repository and notice that your file has been uploaded.
On your website, this file can be accessed by loading the URL https://your-github-name.github.io/images/Headshot.jpg, and inside the index.html file, we can reference this image using the URL images/Headshot.jpg. Next, open the index.html file and click the pencil icon to edit it. Perform a descriptive search to find the image element that we inspected before. For example you can search for “img src=”images/Astronomy.jpg””

Change src="images/Astronomy.jpg" to src="images/Headshot.jpg" and then commit your changes.
Now if you reload your site, you’ll find your image has changed!
Changing Personal Information
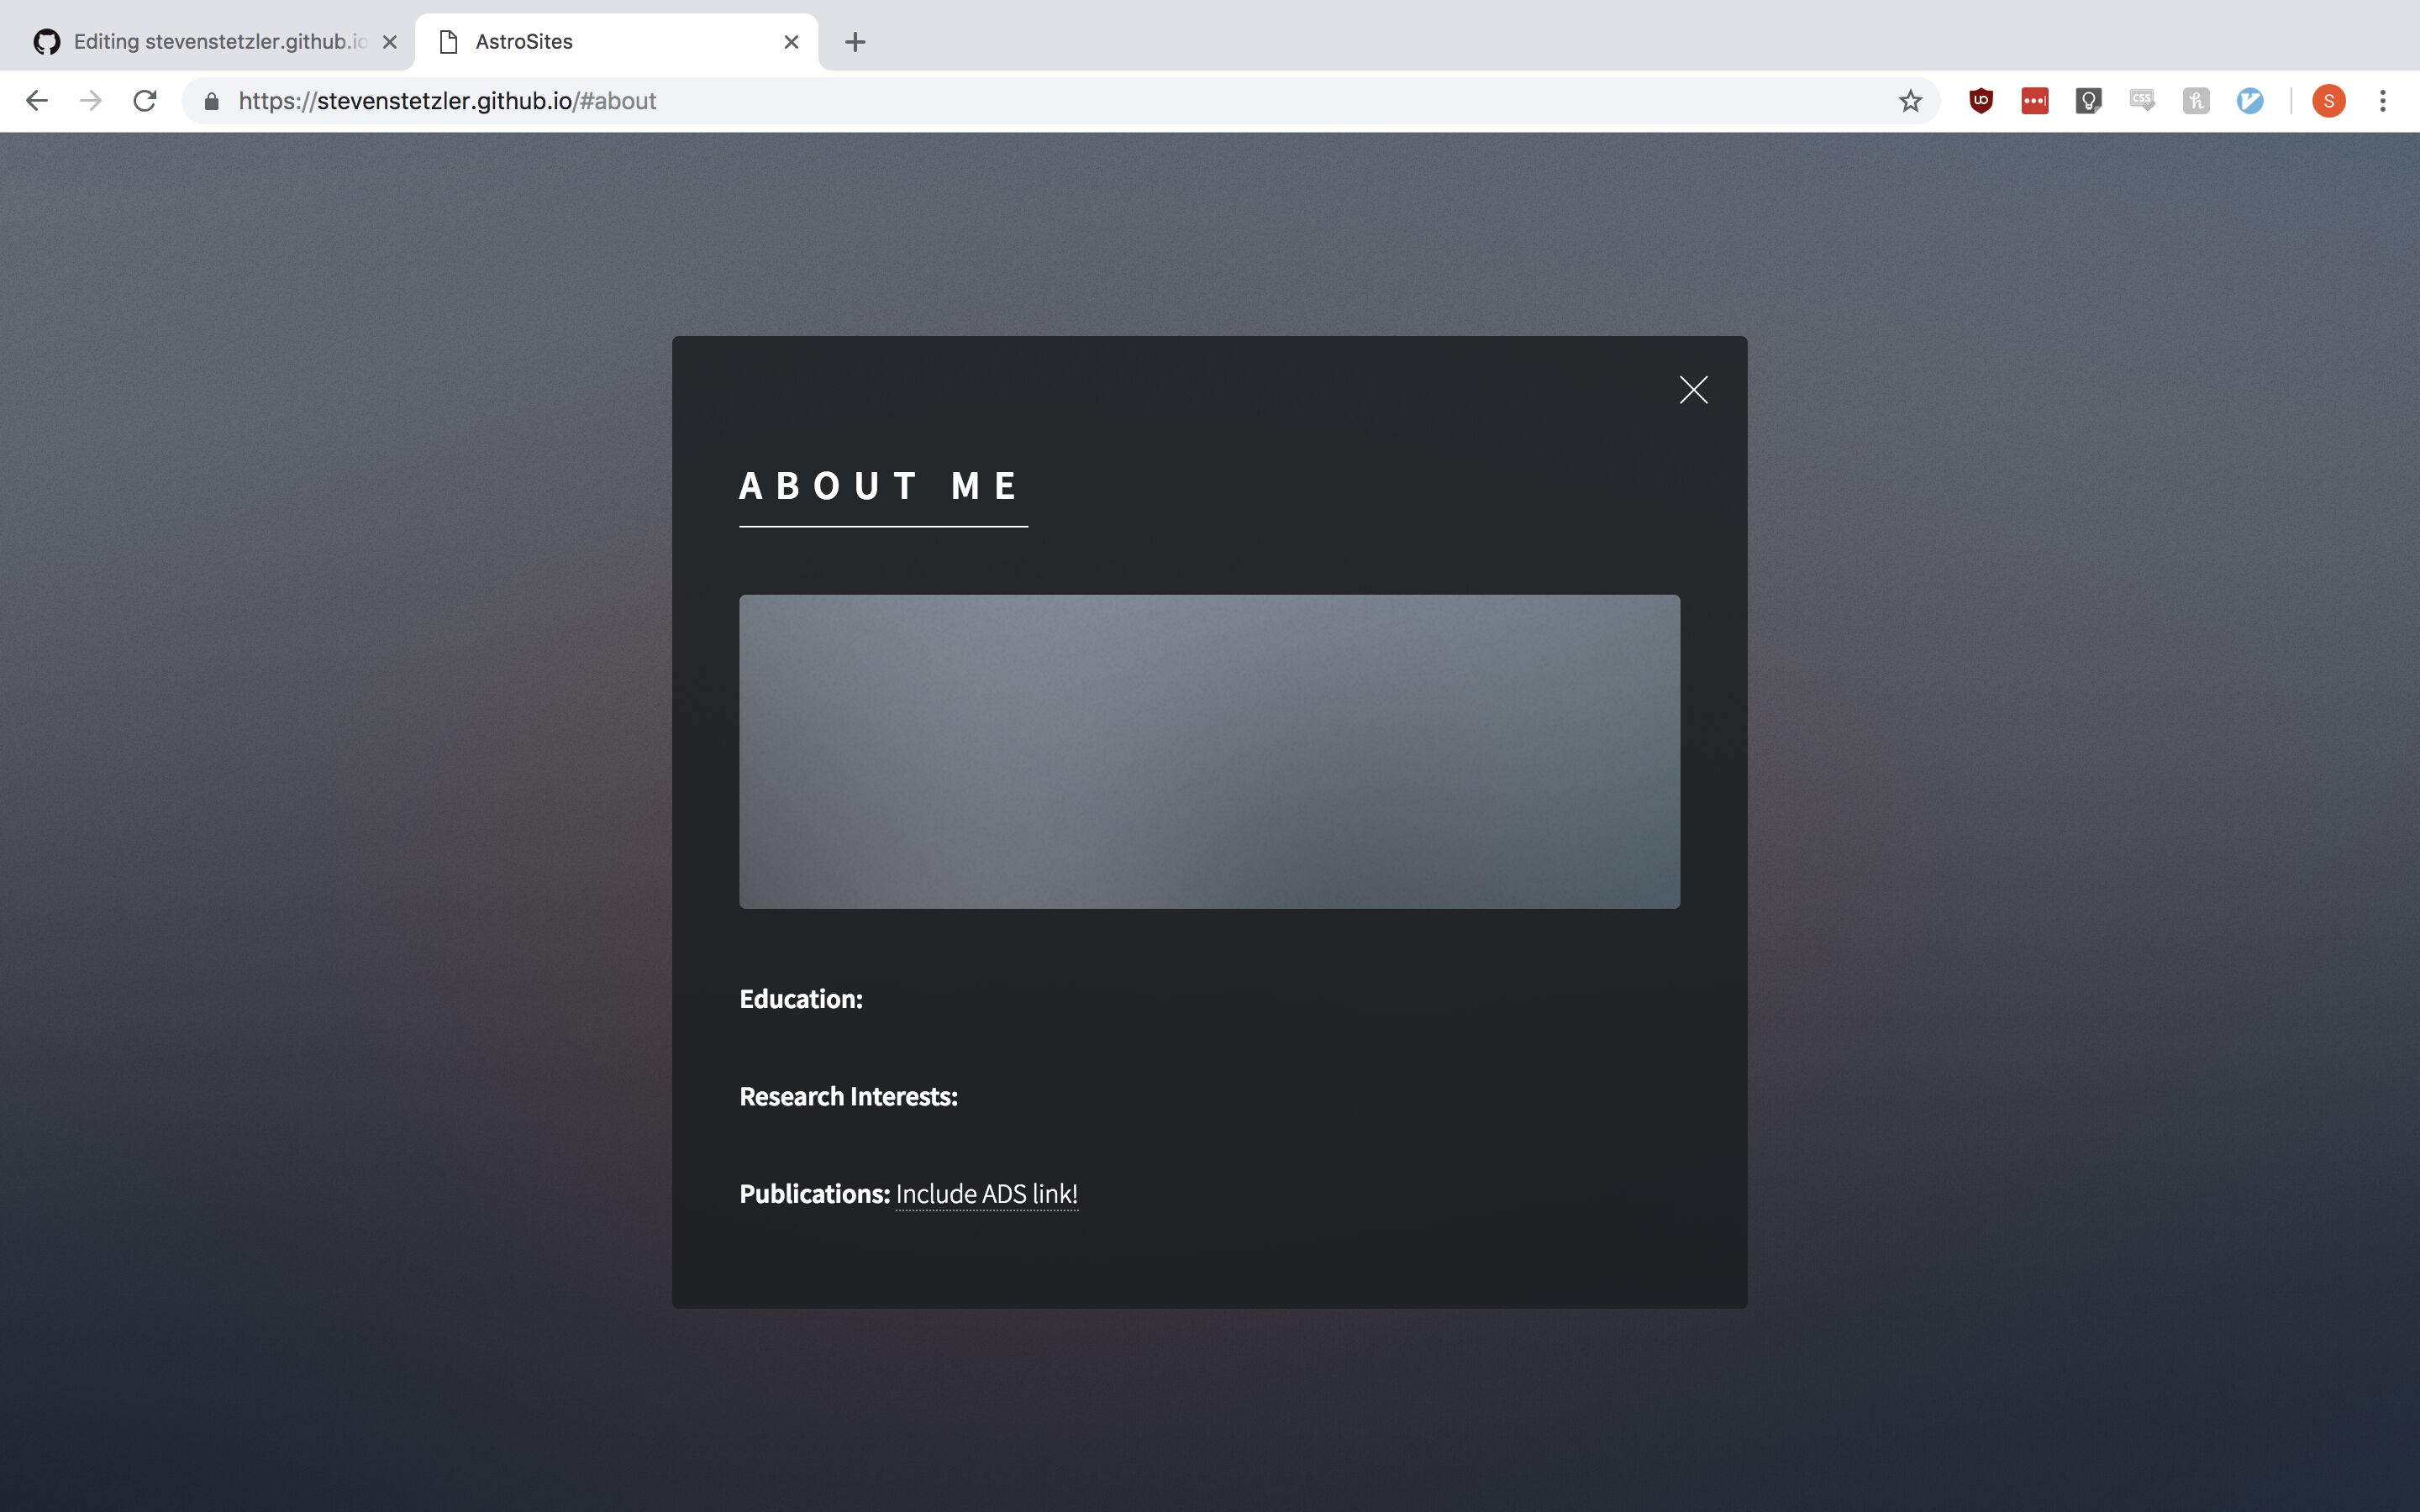
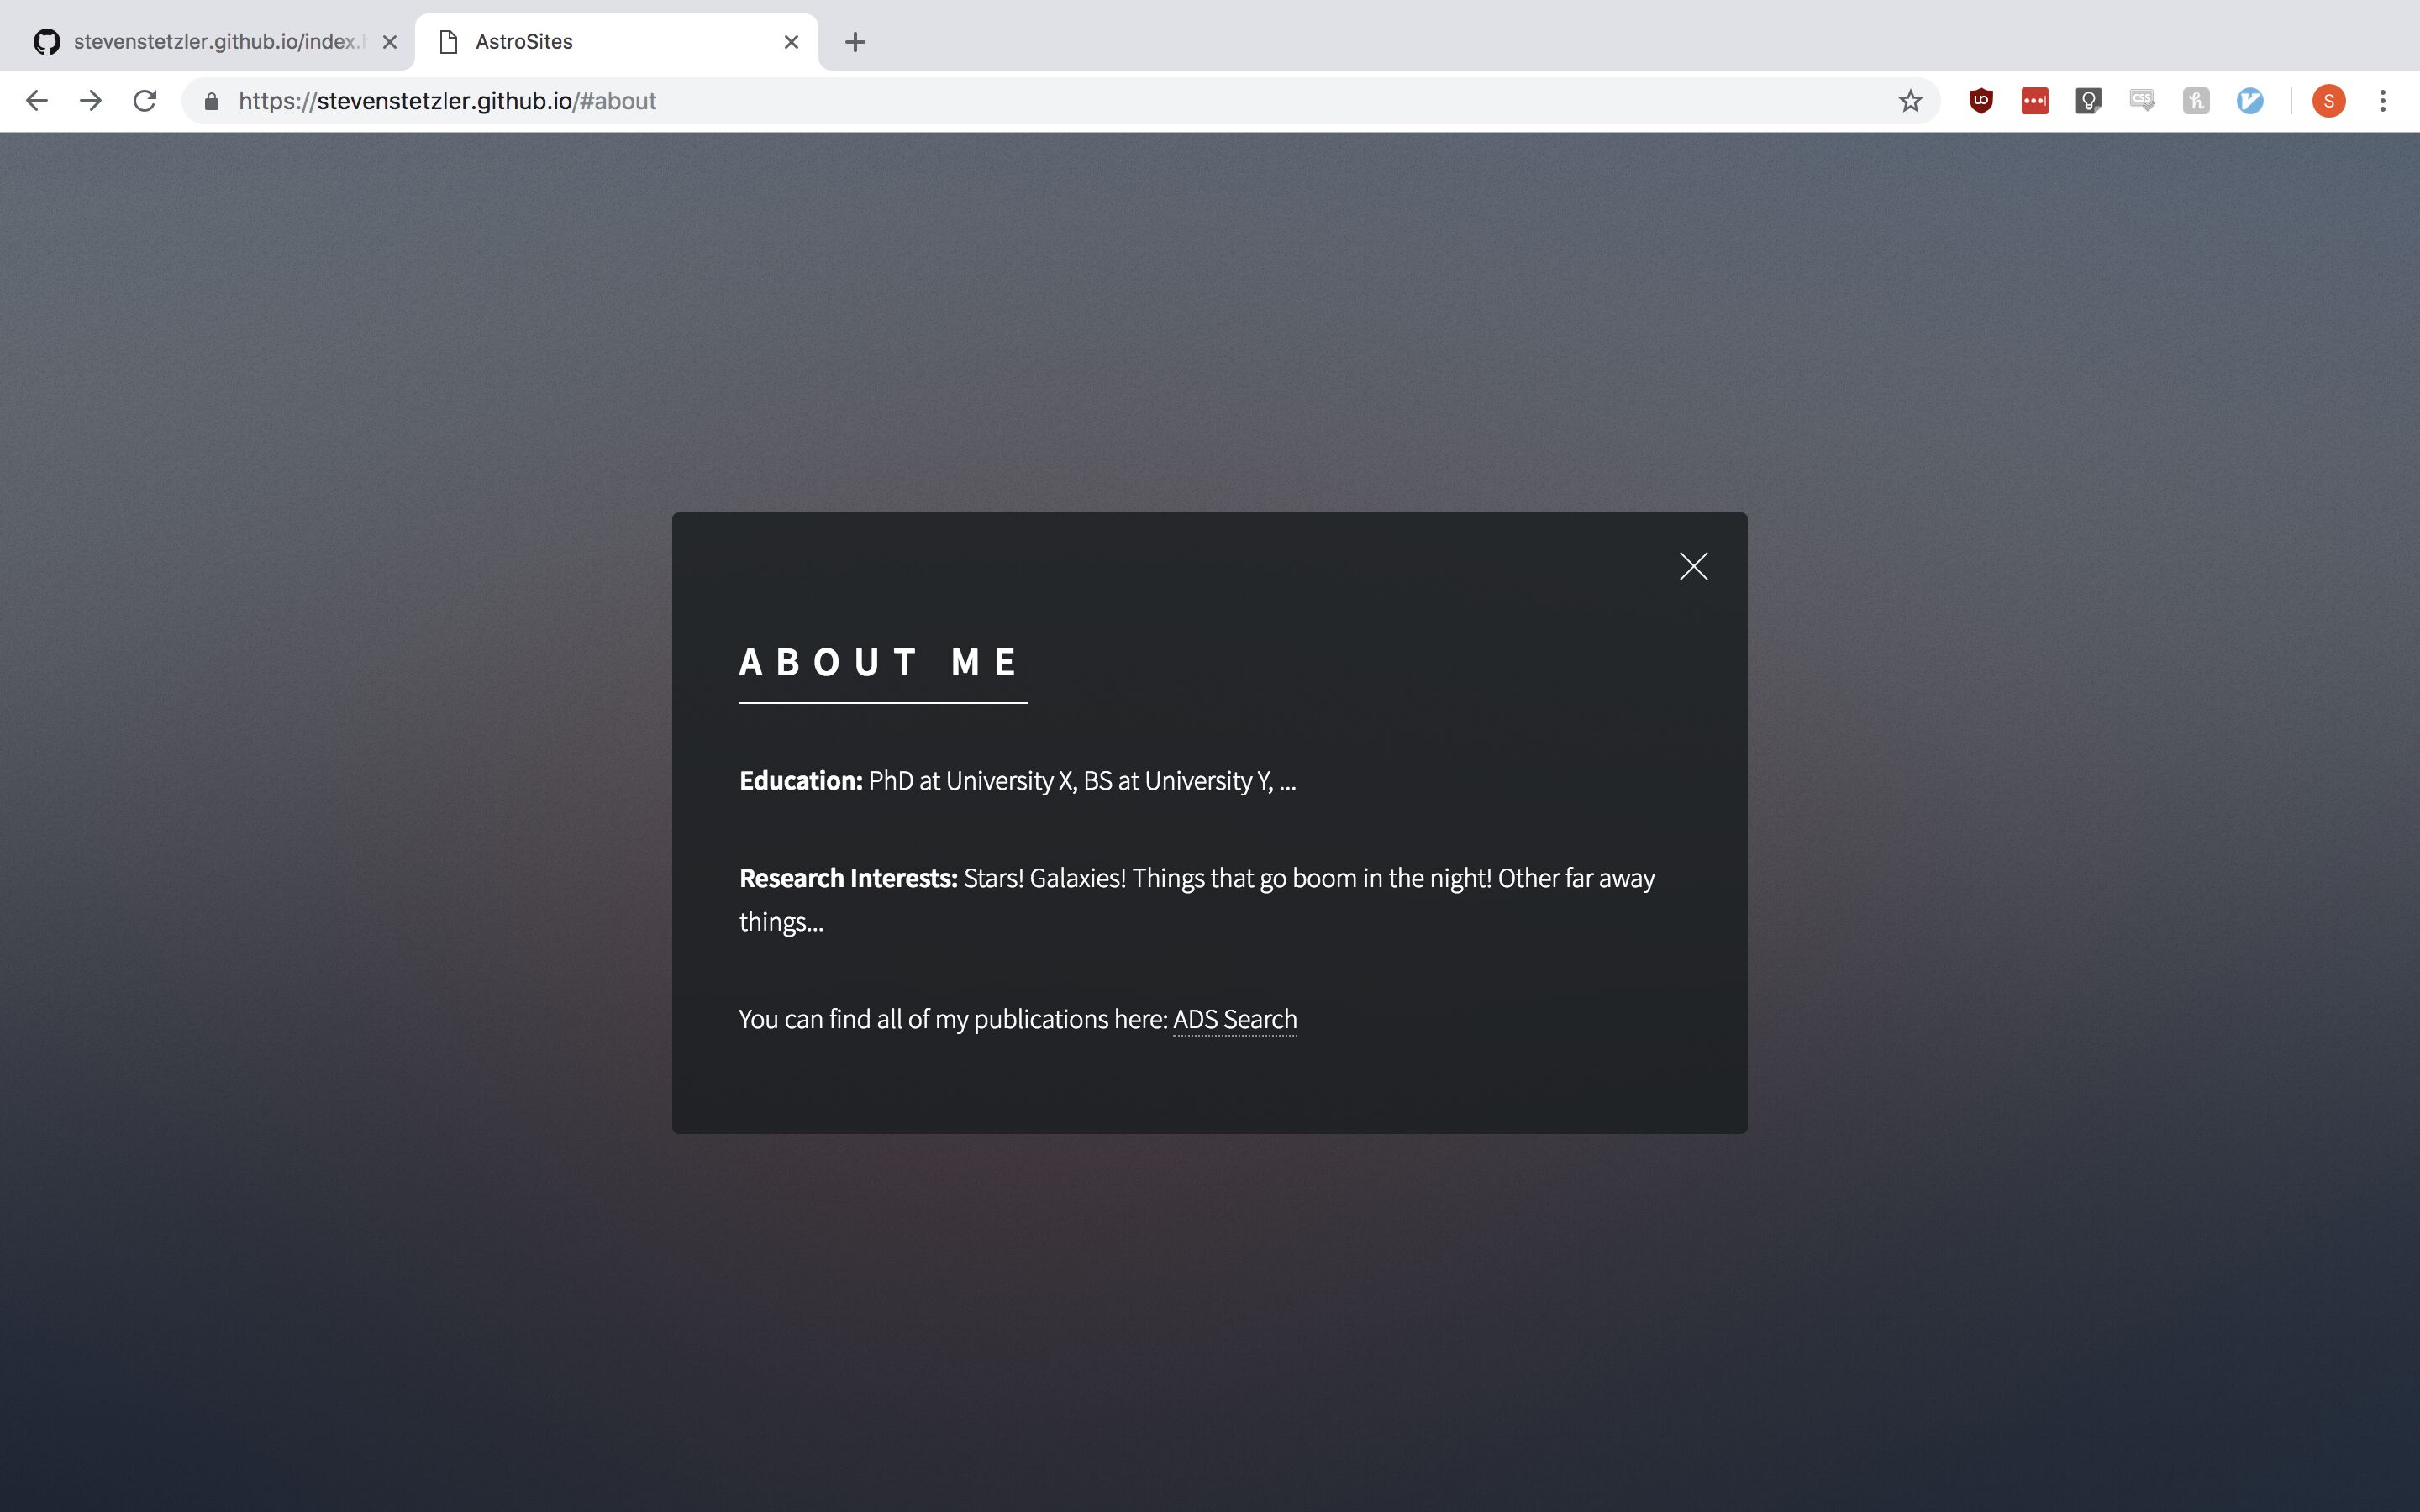
Next, we’ll change the information that exists in one of the pop-up cards, specifically the “About Me” card. First, on our site we’ll click on the “About Me” button to open the card.
On the “About Me” card, we see that there appears to be a heading, a space for an image, and space for information about us.

Next, we’ll inspect this card to learn more about how the HTML in index.html is structured to form this card. Right click on the dark square that wraps around the “About Me” card and click inpsect.
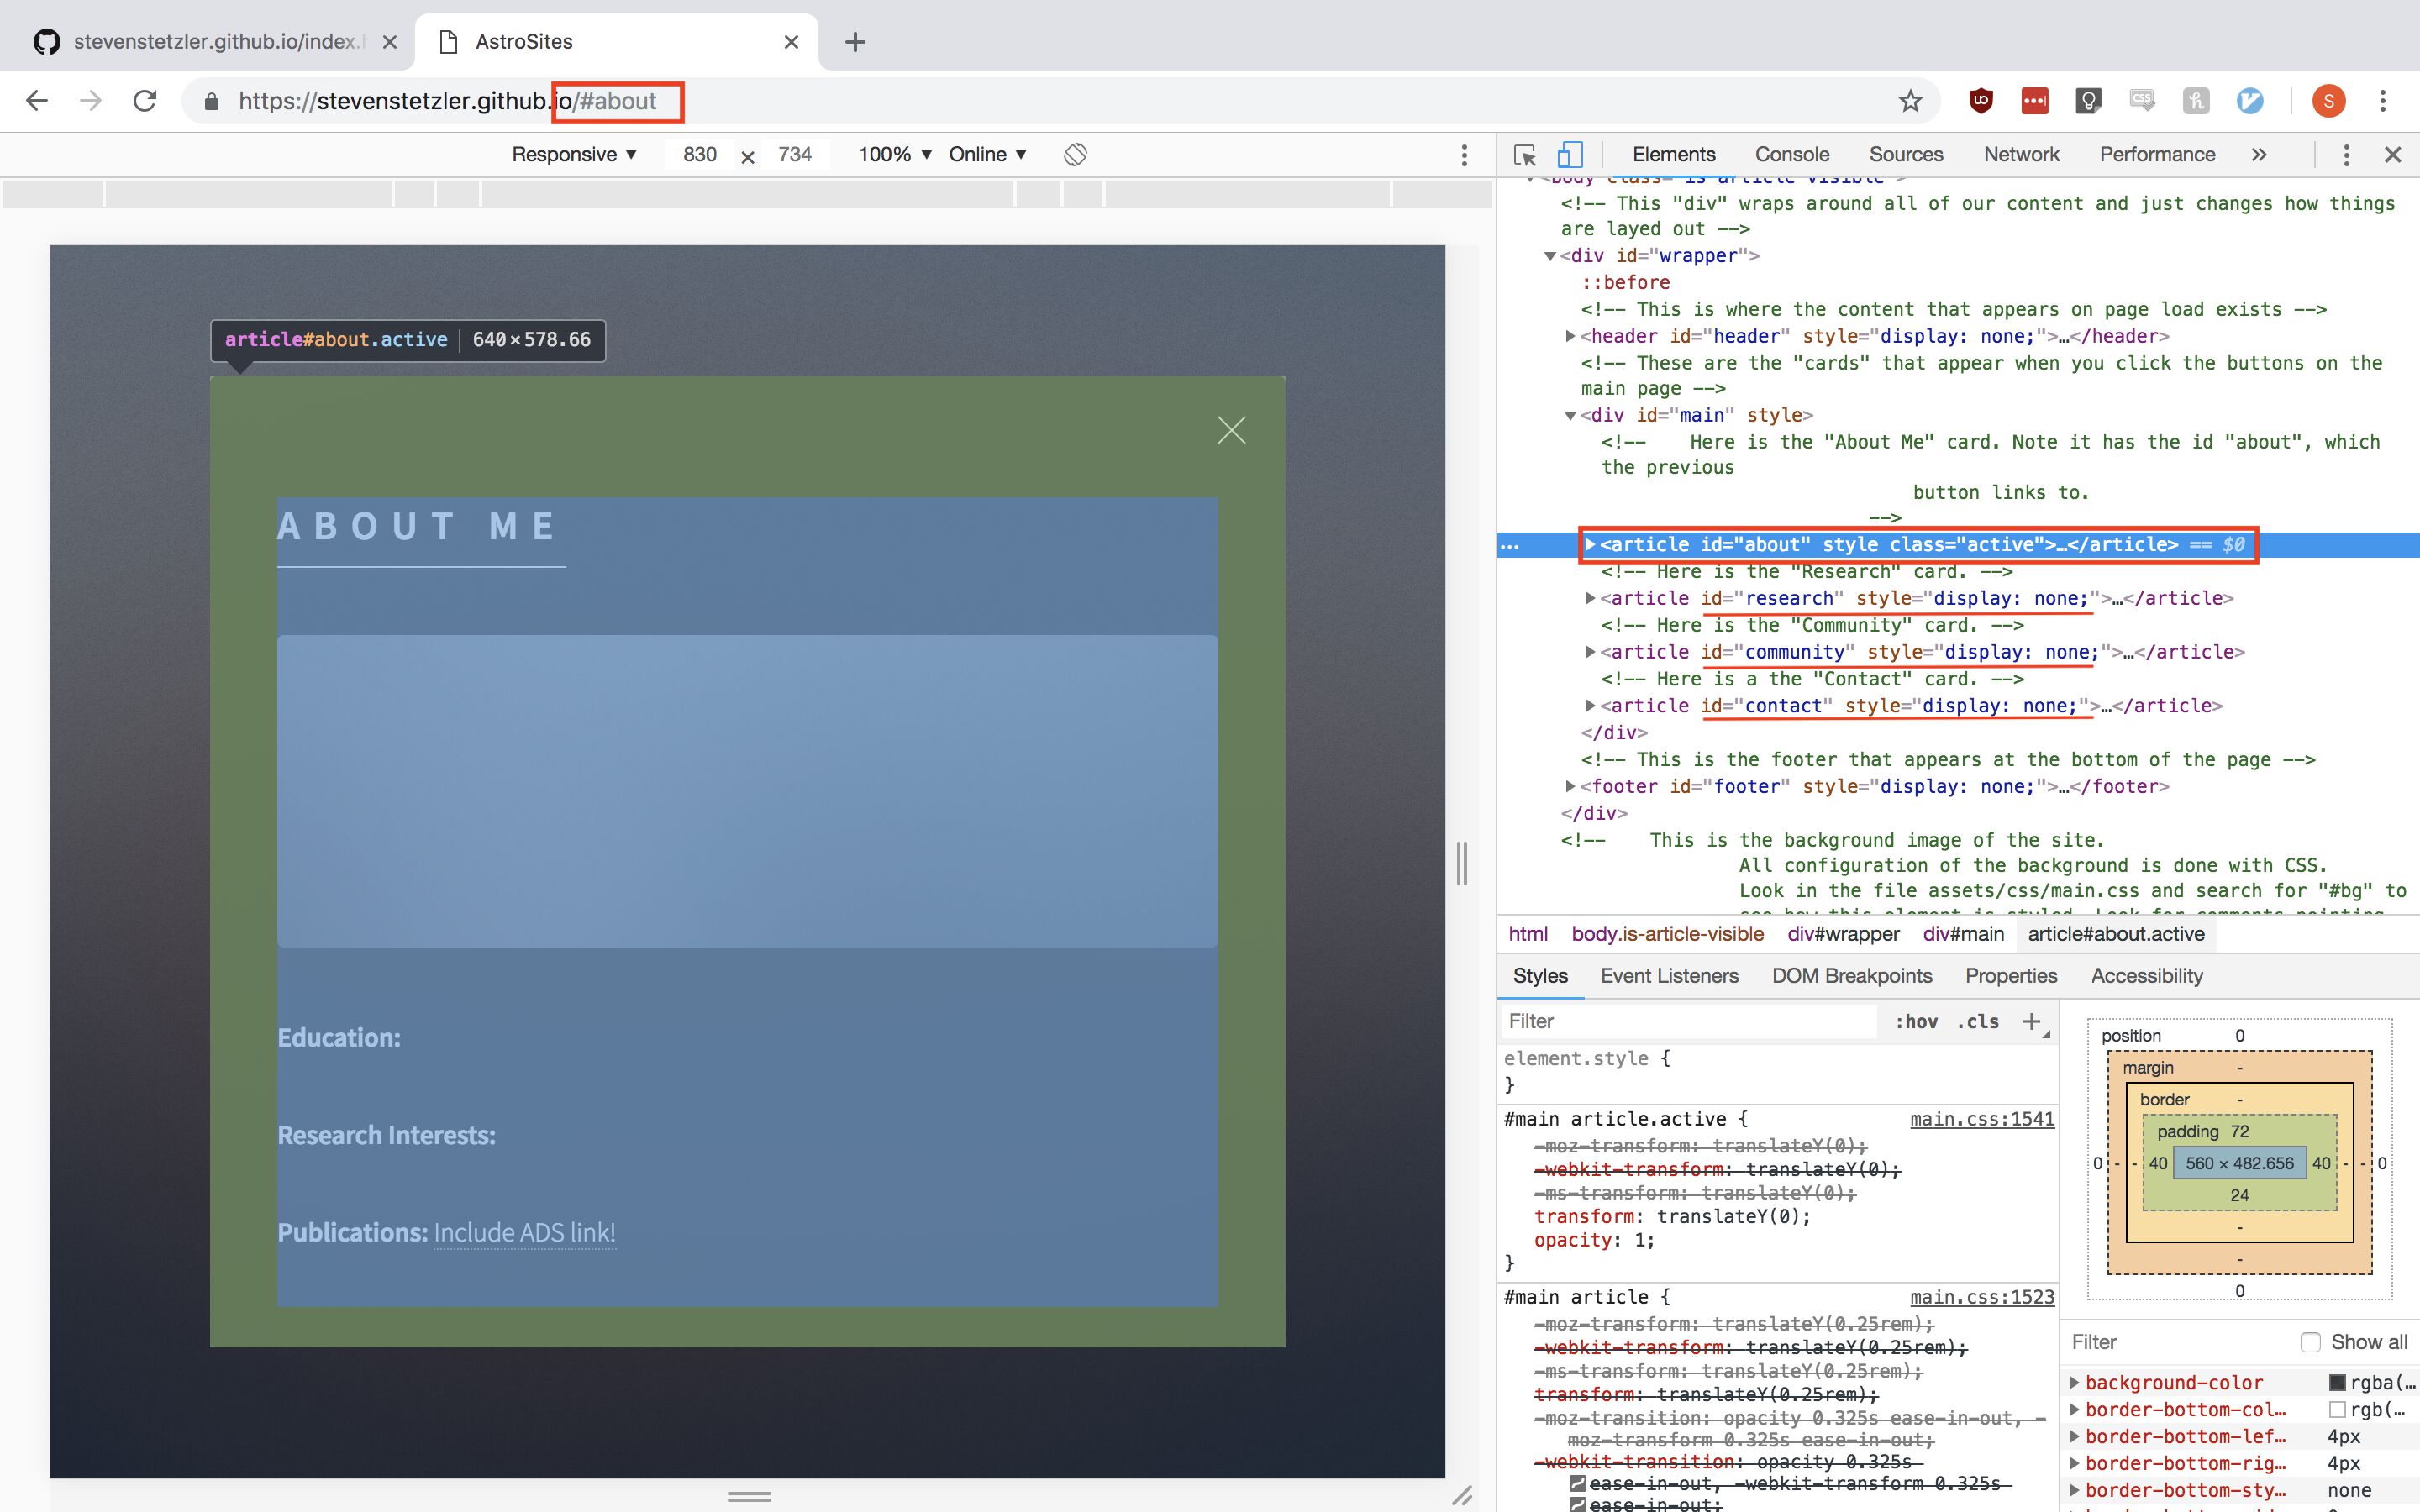
We can see that the card is created using the following HTML:
<article id="about" style="" class="active">
    Content inside here
</article>
which is an <article> element with the ID about and the class active. Notice also that there are other <article> elements below this one with IDs research, community, and contact, which are the names of the other buttons, and which do not have the class="active" attribute but do have a style="display: none;" attribute. Finally, notice that upon clicking the “About Me” button on the home page, we were redirected to https://your-github-name.github.io/#about. When a URL is followed by #something, your browser moves the page to display the element with id=something. This indicates that the template has some JavaScript built into it that hides all of the cards (style="display: none;") when you initially load the page, but shows them by changing the <article> elements’ class and style attributes when you click on one of the navigation buttons on the front page, adding class="active" and removing style="display: none;". (Finally, notice what happens to the URL and <article> elements when you click the “X” icon in the top-right of the card.)
Next, in the GitHub interface, navigate to index.html and click the pencil icon so we can make some changes. Perform a descriptive search to find the HTML we are interested in. Note that since the HTML we are interested in is so far down in the index.html file, you may need to use GitHub’s built in file search function to perform a search. To do so, click on the inner box in the webpage that contains the text of index.html and hit Ctrl-F or Command-F again to do your search.
Here we find the HTML used to make the “About Me” card:

Edit the information here to describe yourself. Note that if you don’t want an image on the card, you can comment out the <span> ... </span> element (by wrapping the element in comment tags: <!-- <span> ... </span> -->) or deleting the element altogether. Once you’ve finished your edits, commit your changes and reload your page to see the edits on your site.
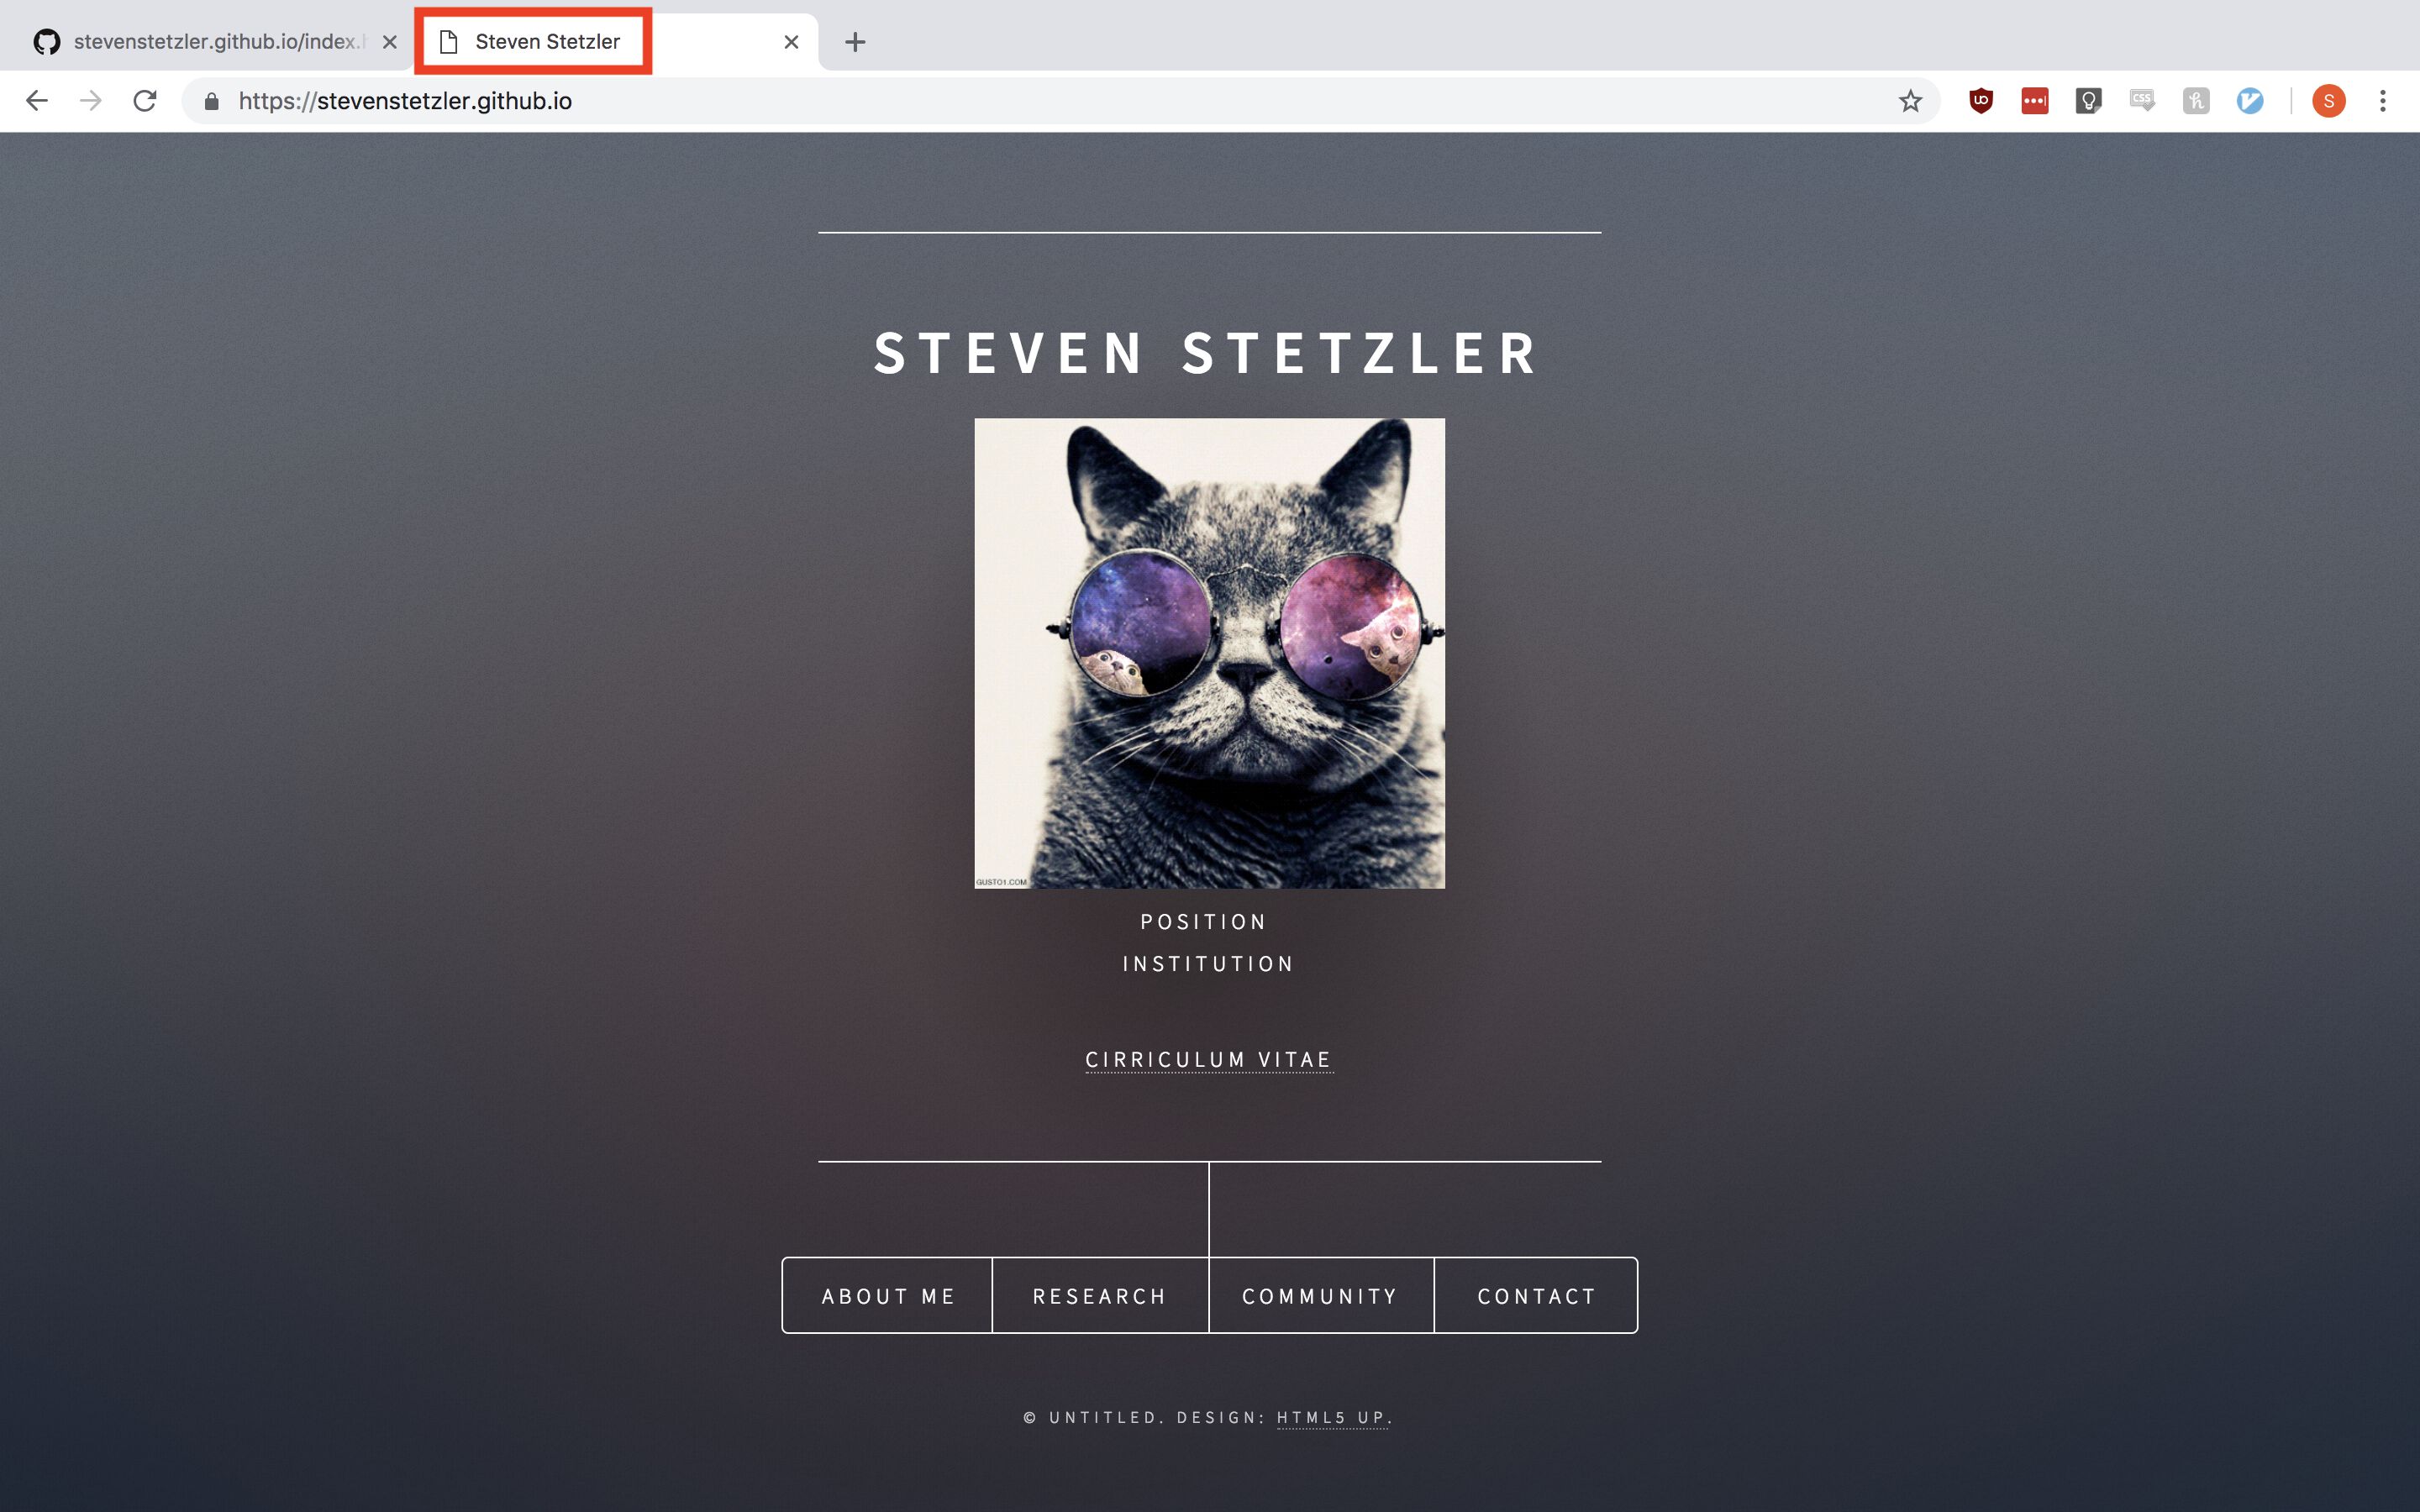
Changing the Site Title
You may have noticed in your web browser that the tab that has your site open has the text “AstroSites” in it.
This part of the website is controlled in the <head> of the index.html page, which we haven’t looked at yet. Open the index.html file in your browser and perform a search for “<head>”.
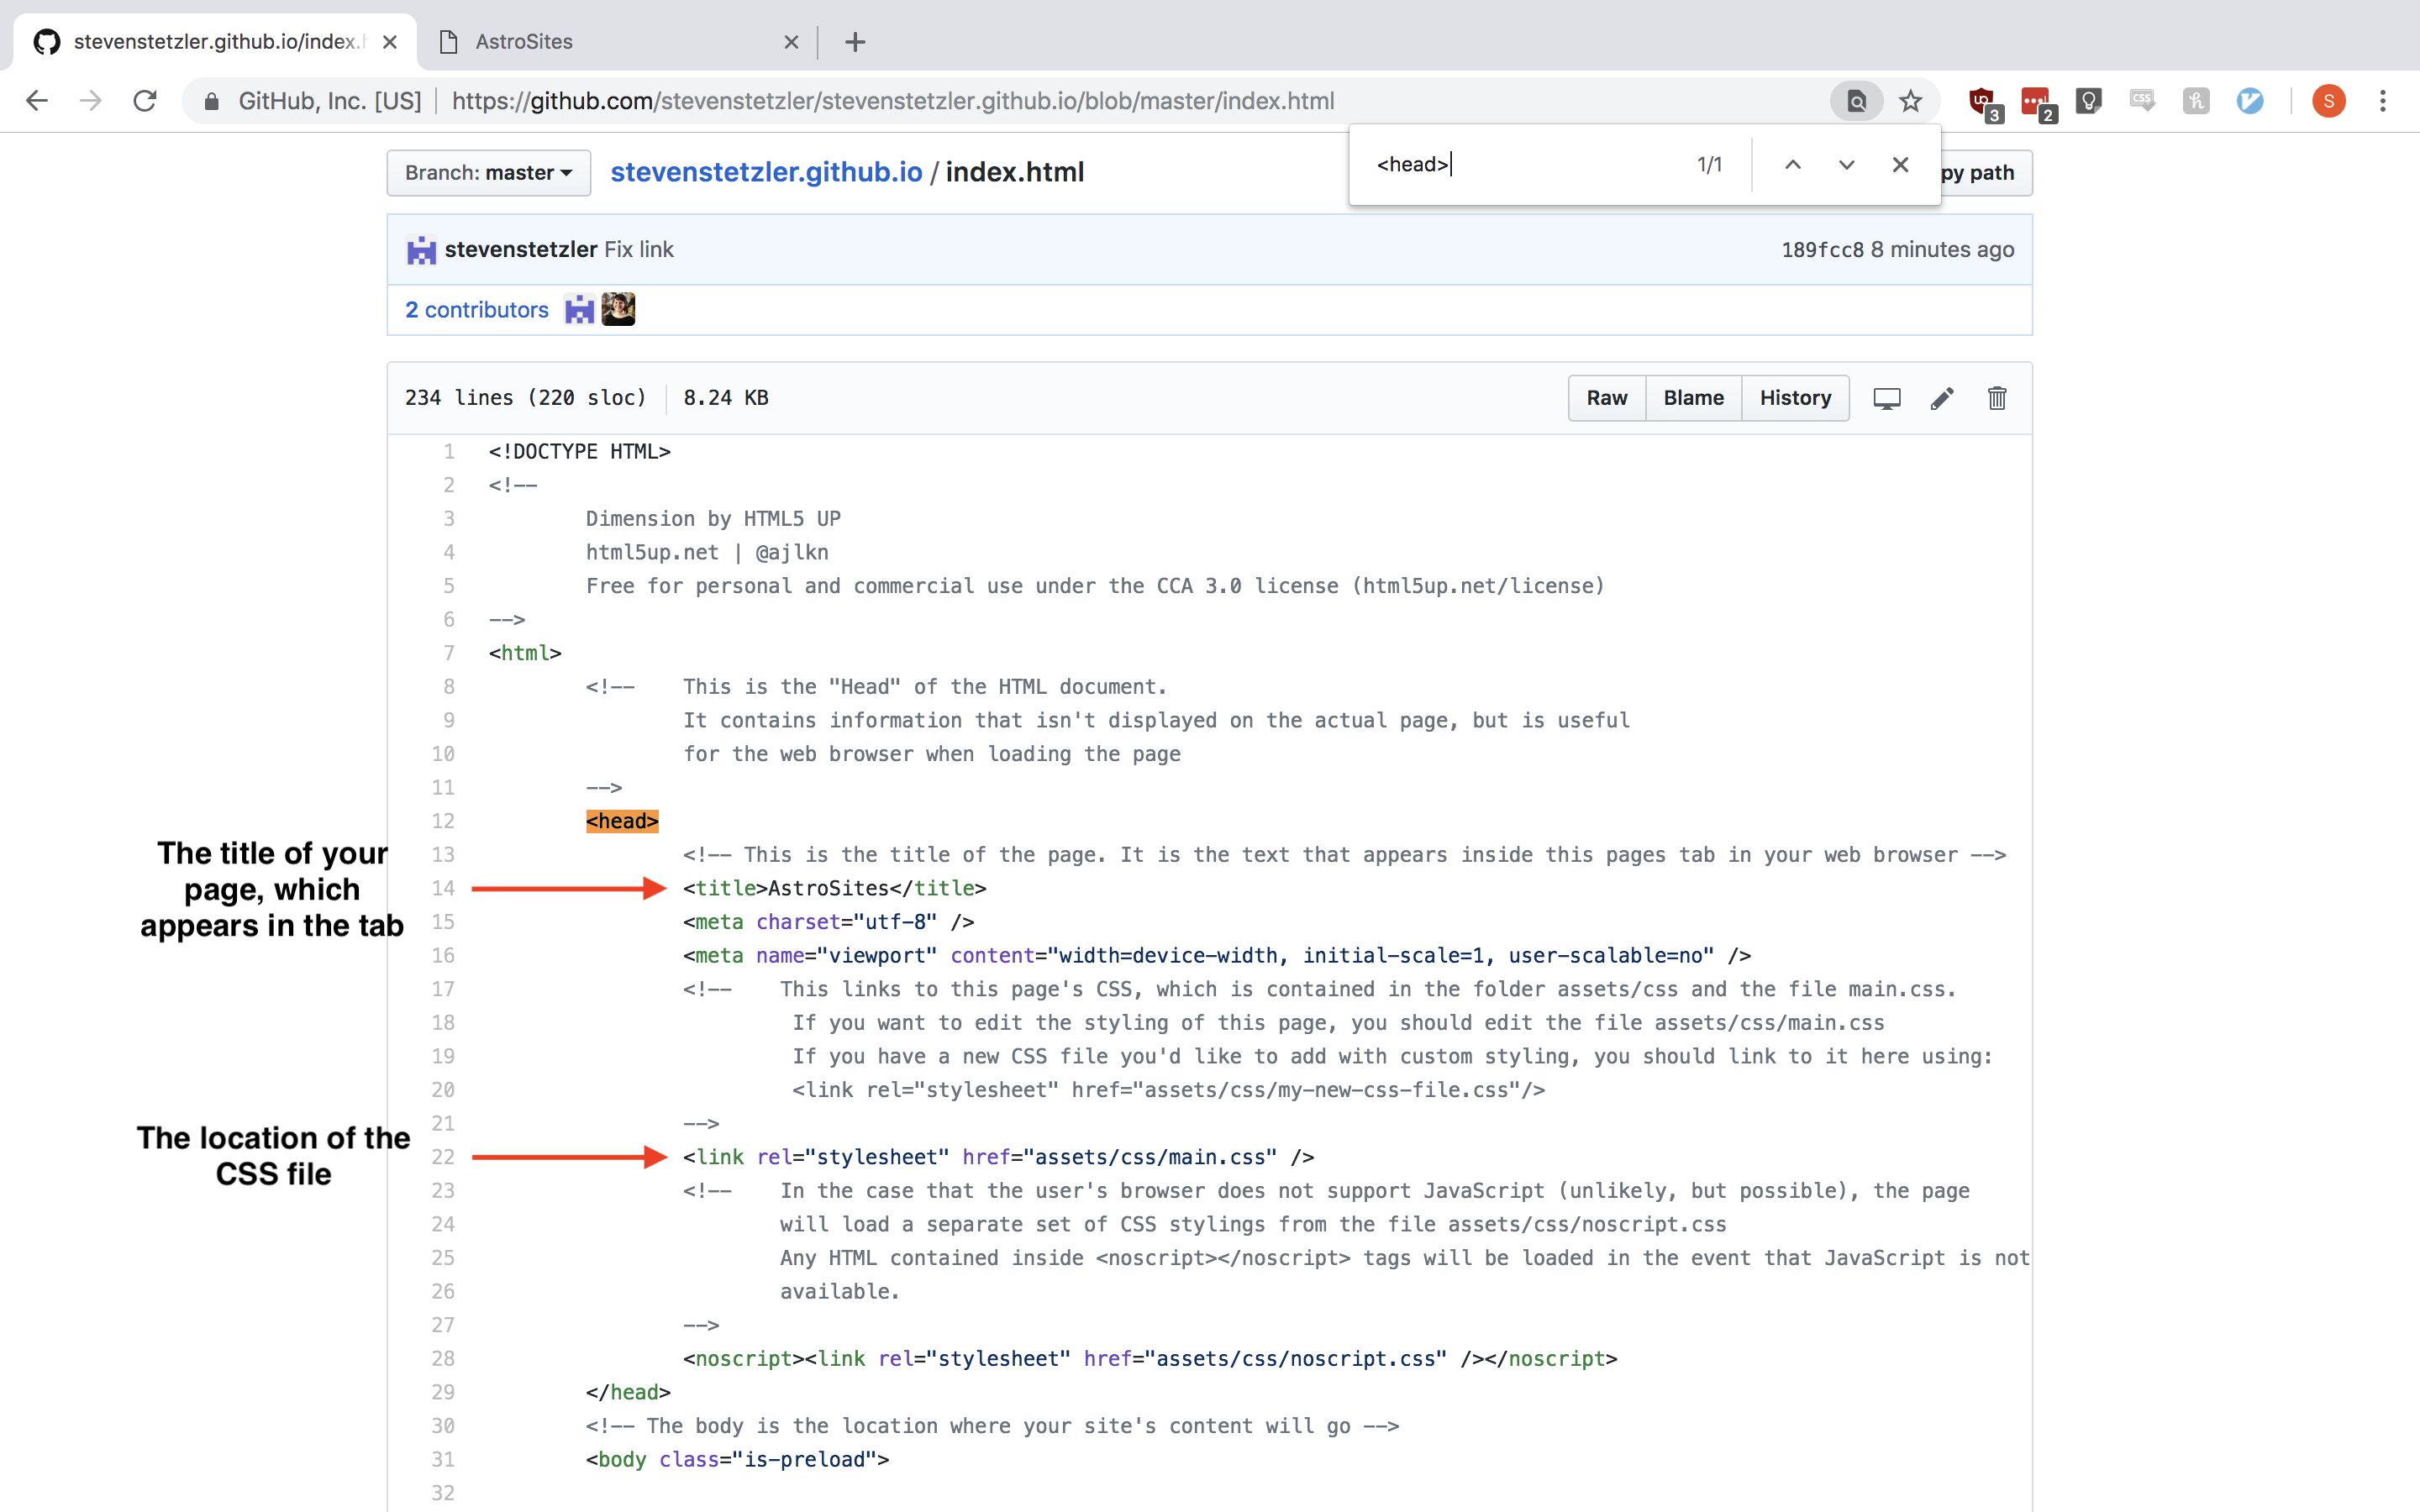
There are two important things to notice. First, the <title> element, which controls the title of the site, and thus what appears in the tab of your web browser. Second, the <link> element which points your web browser to the CSS that styles the template site which is located in assets/css/main.css. Go ahead and change what is contained in the <title> element from “AstroSites” to your name and commit your changes. Reload your site and see the results!
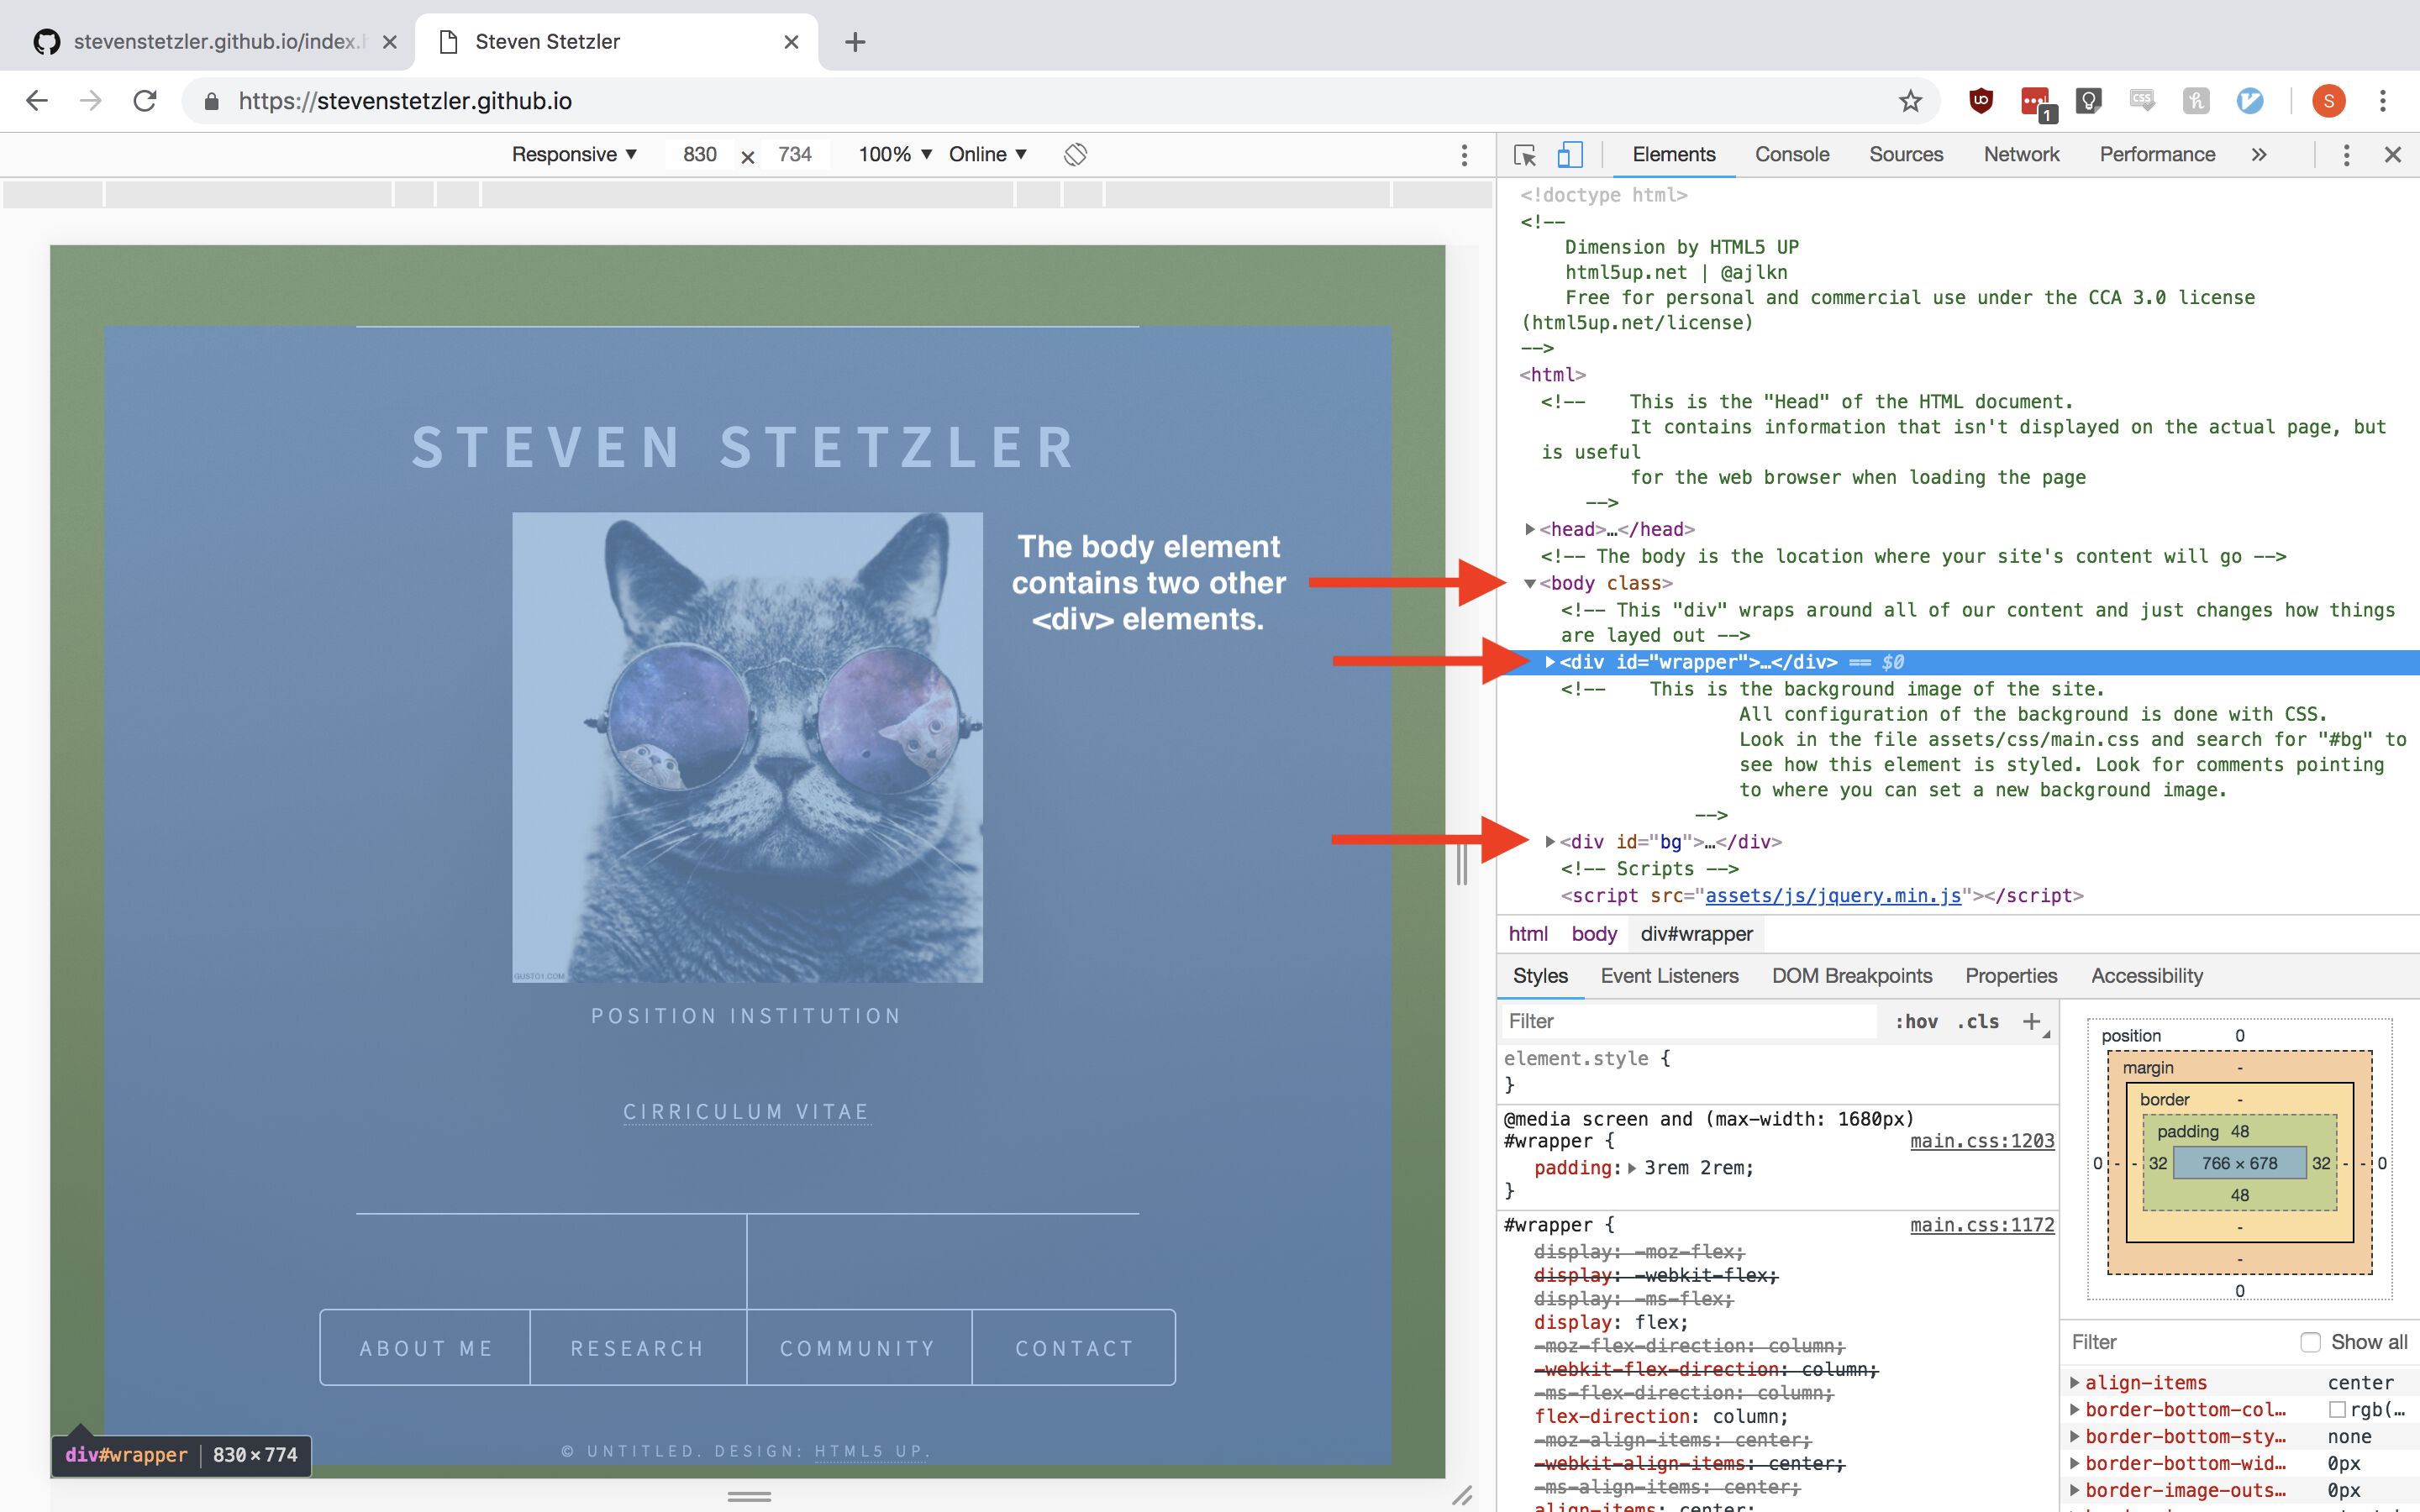
Changing the Background Image
On this template it’s a bit hard to find the HTML and CSS that controls the background image. However, if you right click on the main page of the site and click inspect, you will find that there are two children elements of the <body> tag: the <div id="wrapper"> (which wraps the main content of the site) and the <div id="bg"> element, which appears to take up the whole page. The conspicious name and the element’s rendered size indicate to us that this element controls the background image.
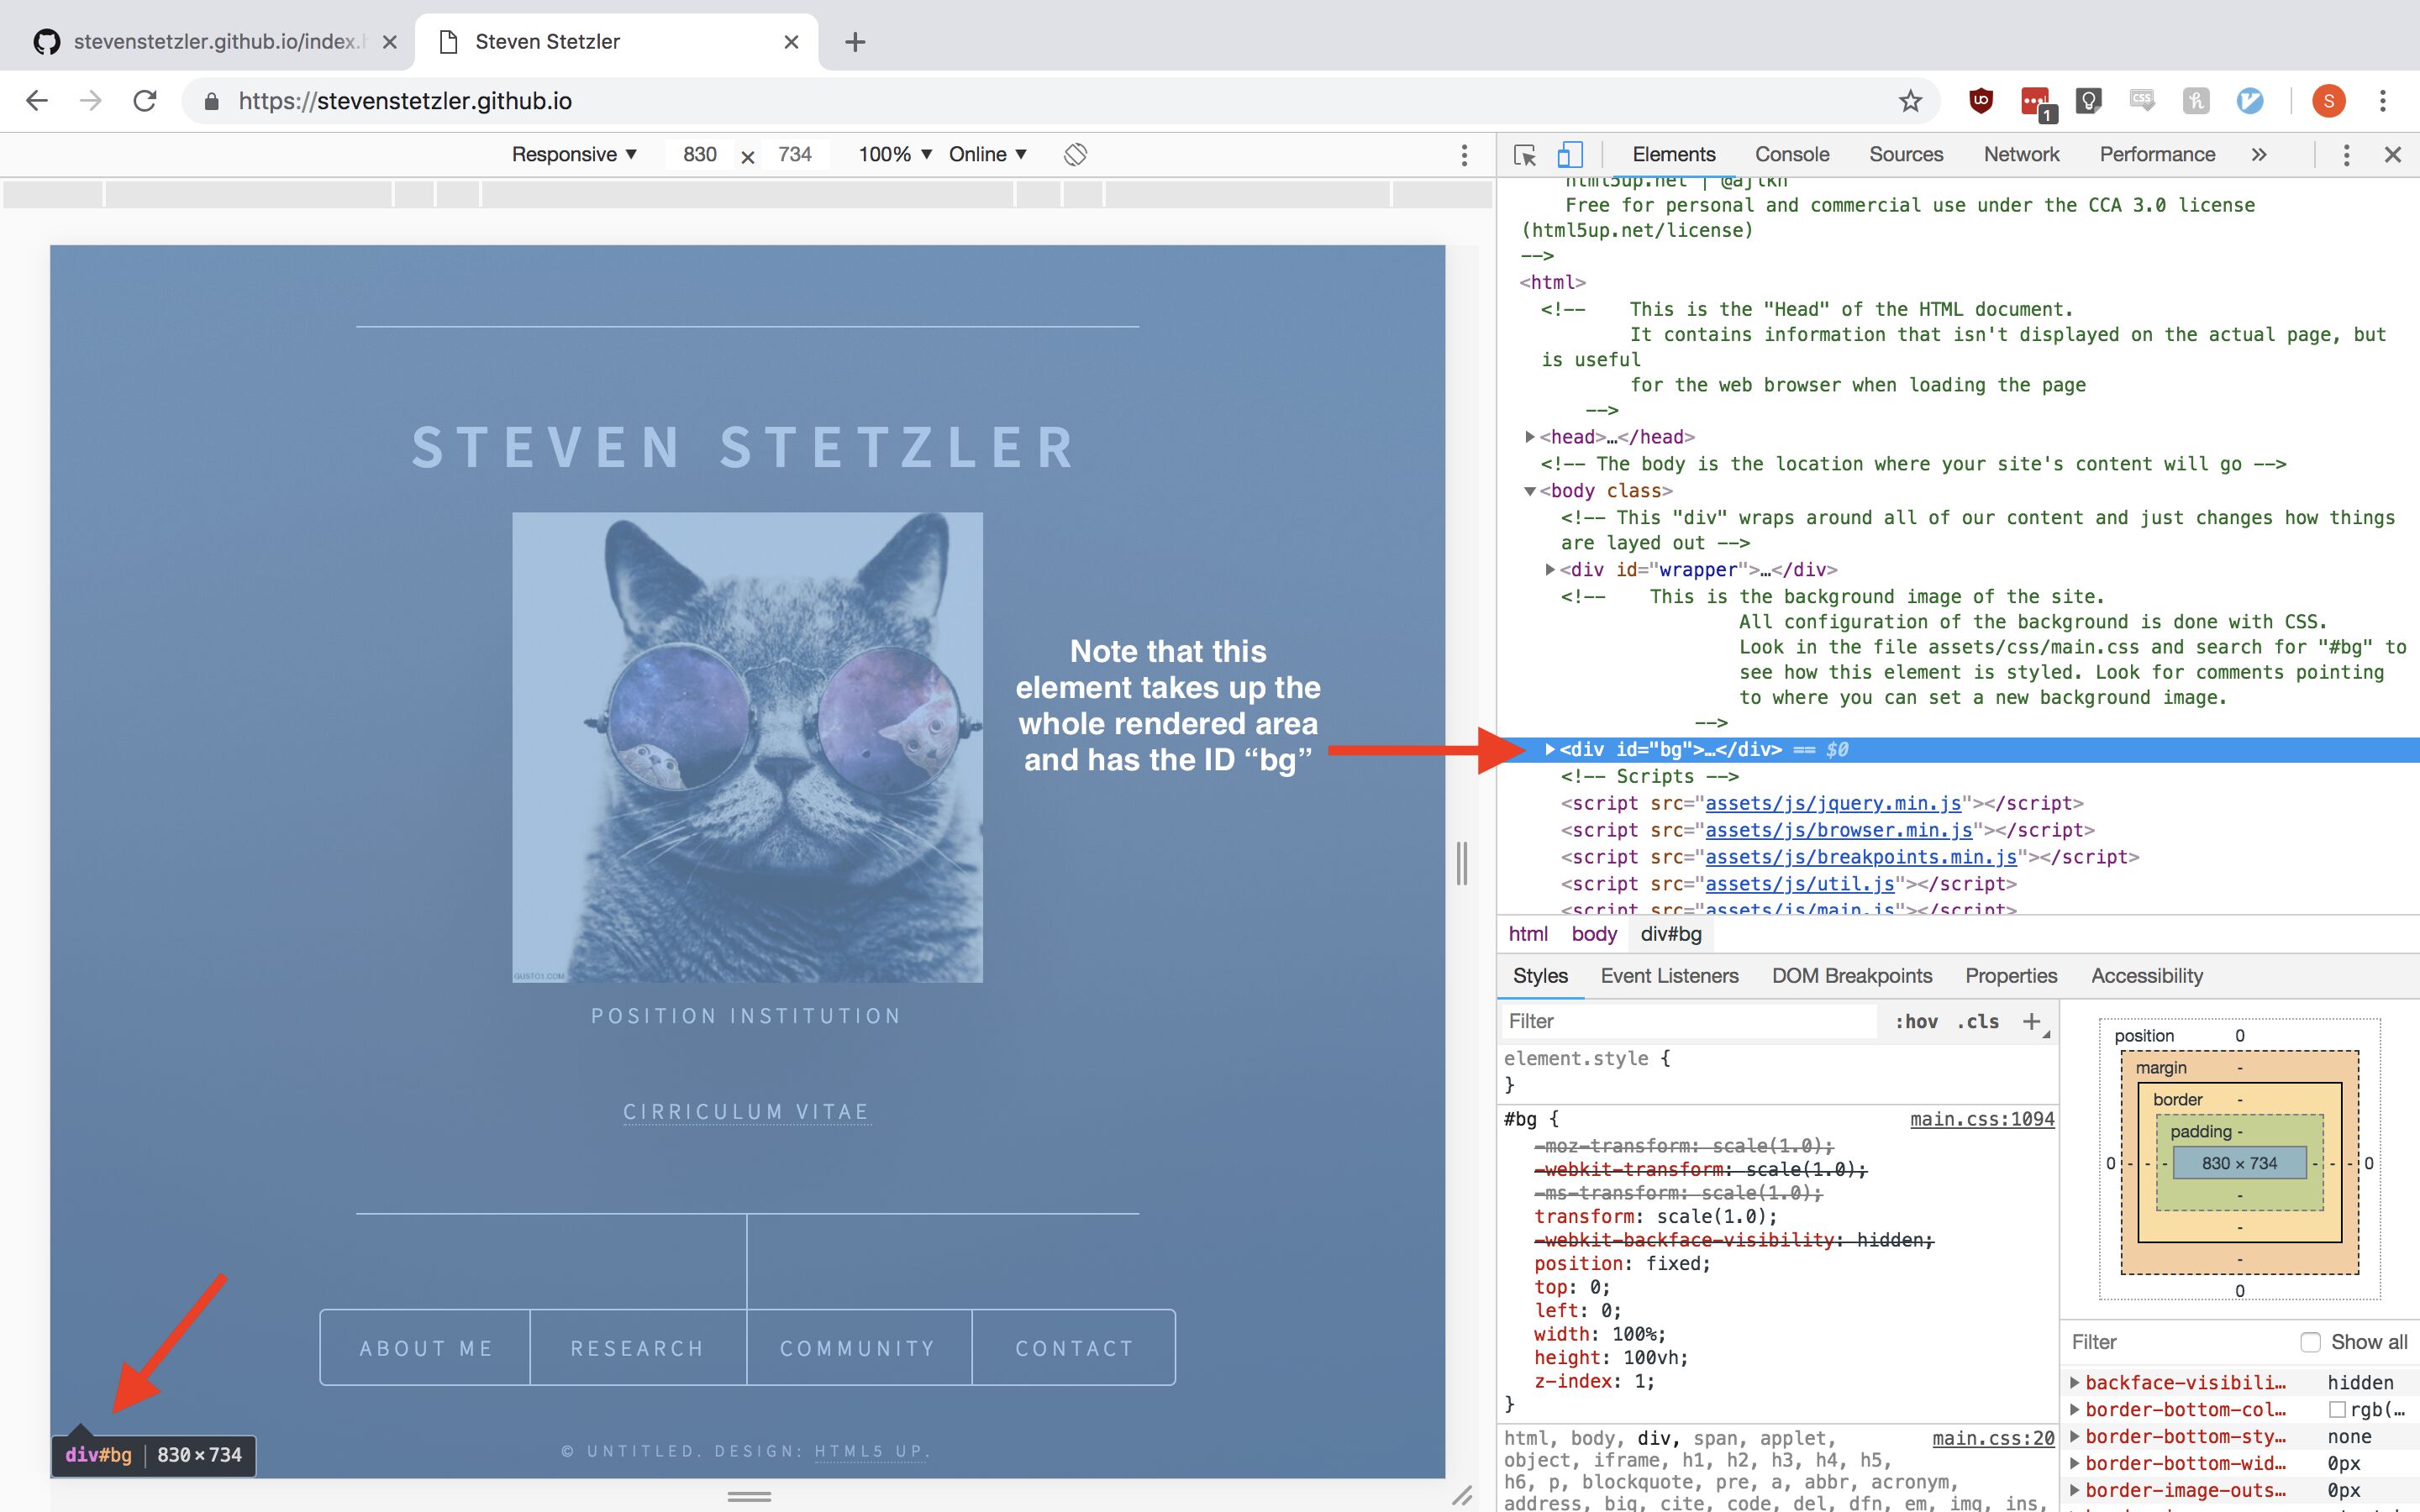
If you look inside the <div id="bg> element, you will see that it does not contain much inside of it other than a ::before and ::after element. This indicates that the background is entirely controlled through the site’s CSS. To edit the image, we will need to edit the CSS file. Using the GitHub browser, from the root folder navigate to the assets then to the css folder. Open the file main.css and click the pencil icon to make edits. Perform a search for the ID of the div element “#bg” (since the element was <div id="bg"> then the CSS selector will be #bg). Next we will scroll down and visually inspect the CSS for where the background-image attribute is in use. (Note that we could have just opened the CSS file and searched for “background-image” to see where the background was being manipulated. However, since there are other ways in HTML and CSS to set a background image, this method is not always reliable.)
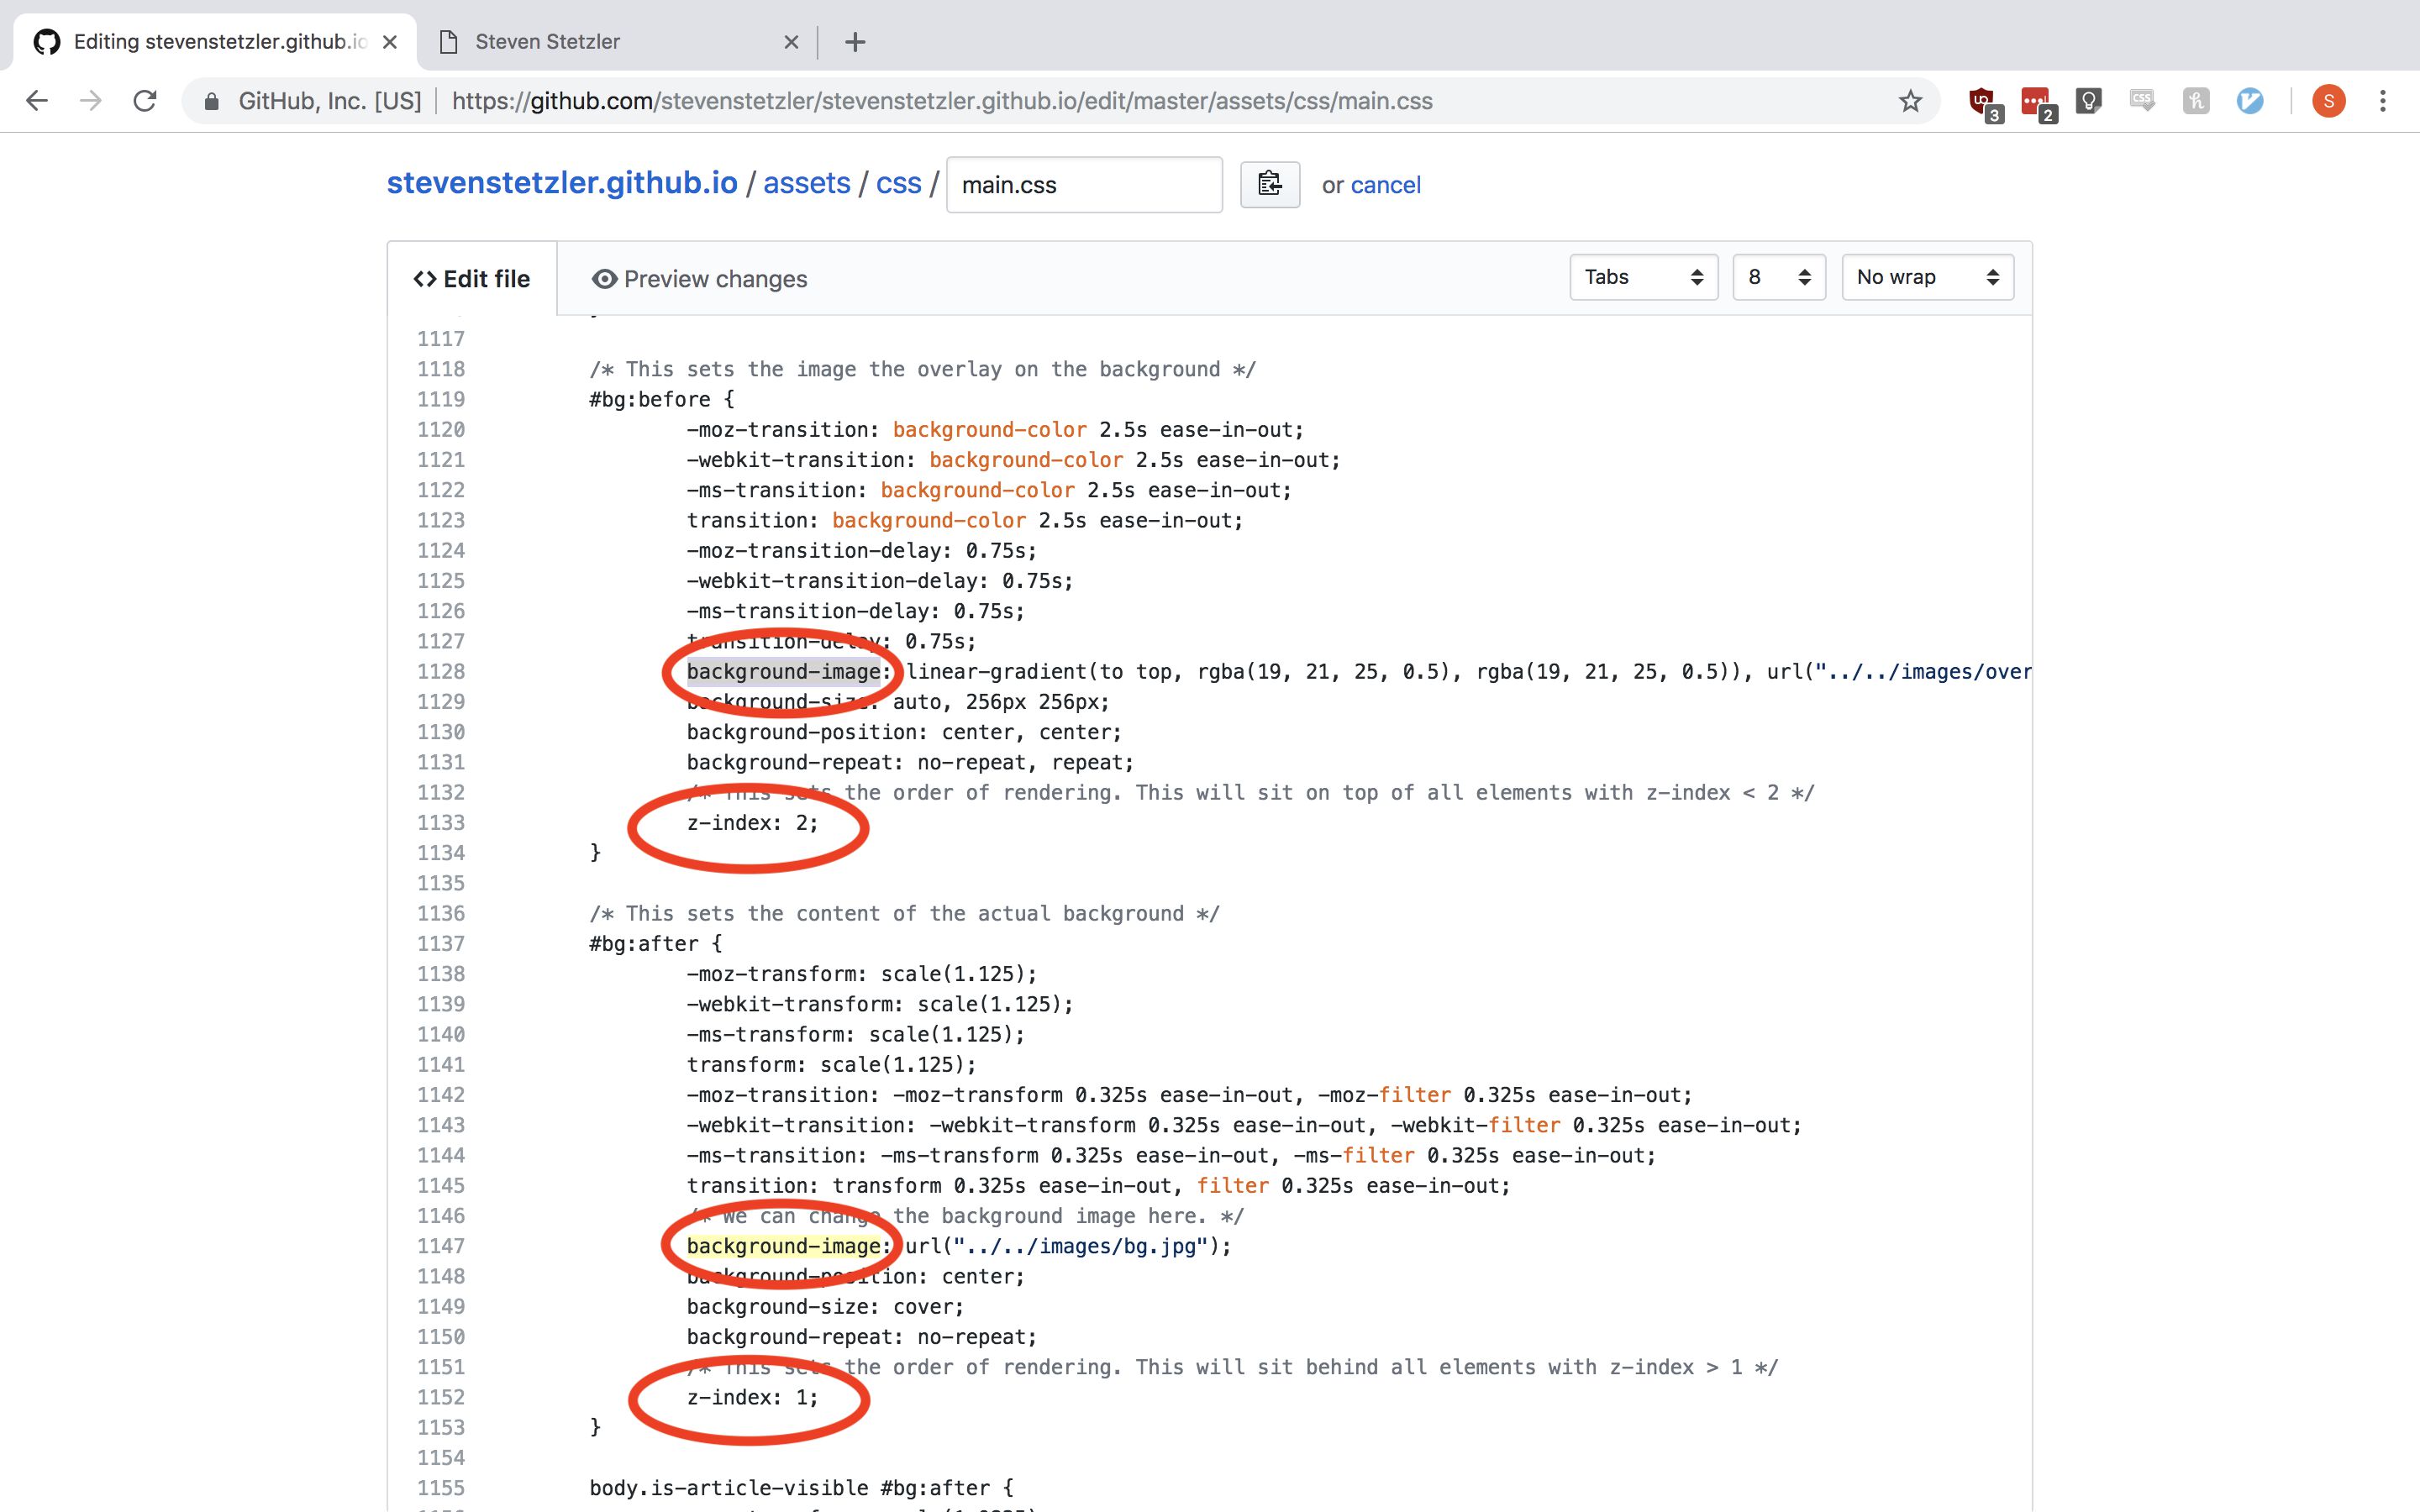
Note that there are two locations where background-image is set, however they are set with two different values of z-index. The z-index attribute sets the order that elements are rendered in. Elements that have a larger value of z-index set are rendered on top of elements with a smaller value of z-index. This indicates that the real background image is the one with z-index: 1 under the #bg:after selector. (The other background image is a speckled gray overlay that makes text stand out on the real background. Check out images/overlay.jpg to see it.) The background image is set to url("../../images/bg.jpg"); which loads an image from the URL ../../images/bg.jpg. Here the ../ tells the browser to go up a level in the website’s file structure. This is necessary since our CSS file exists at the location assets/css/. Thus inside the CSS file a URL of ../ would really point to assets/ and ../../ would really point to the root folder of our site, allowing us to access the images/ folder. Change the url from url("../../images/bg.jpg"); to url("../../images/Astronomy.jpg"); to change the background image and then commit your changes. You can also use any other URL you want to point elsewhere on the web, or you can upload another image to use instead. Reload your site to see your changes!
Continuing Edits
We’ve shown you how to edit the basic components of this template. You should now be able to edit this template to your heart’s content! You can also find another template that better suits your tastes and needs and start editing it in a similar way.
Summary
Hopefully using this tutorial you’ve been able to get a website set up for yourself. If you are interested in using a different template, you can check out other templates here. If you are interested in other tools to make websites, you can find additional information here.